Applicable Products
QTS, Storage & Snapshots, QNAP NAS (non-hot-swappable models)
Scenario
If your QNAP NAS does not support hot-swapping, hard drives must be replaced when the NAS is powered off. This article explains how to safely replace drives in such systems, particularly in a RAID 1 configuration—whether you are recovering from a disk failure or upgrading to larger drives.
Solution
Replacing a failed disk in RAID 1
If one of the disks in your RAID 1 storage pool has failed:
- Power off the NAS.
- Remove the failed hard drive and insert a new drive that has the same capacity or larger capacity.
Important
Do not use drives that were previously used in another QNAP NAS, PC, or Mac to avoid RAID metadata conflicts.
- Power on the NAS.
- QTS will detect the new drive and automatically start the RAID rebuild process.
You can monitor progress in Storage & Snapshots > Storage/Snapshots > Manage > Rebuild.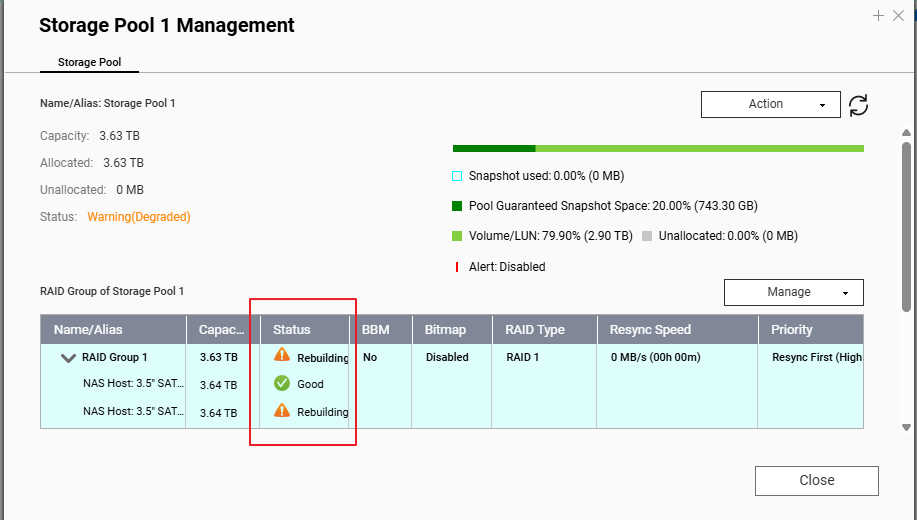
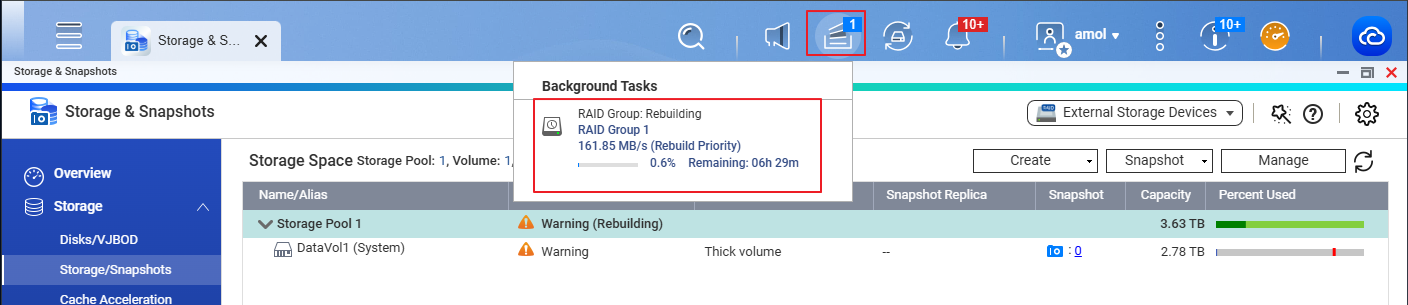
- Wait until the rebuild process is fully completed before performing any other operations. You can monitor the rebuild progress in "Background Tasks" on the Toolbar.
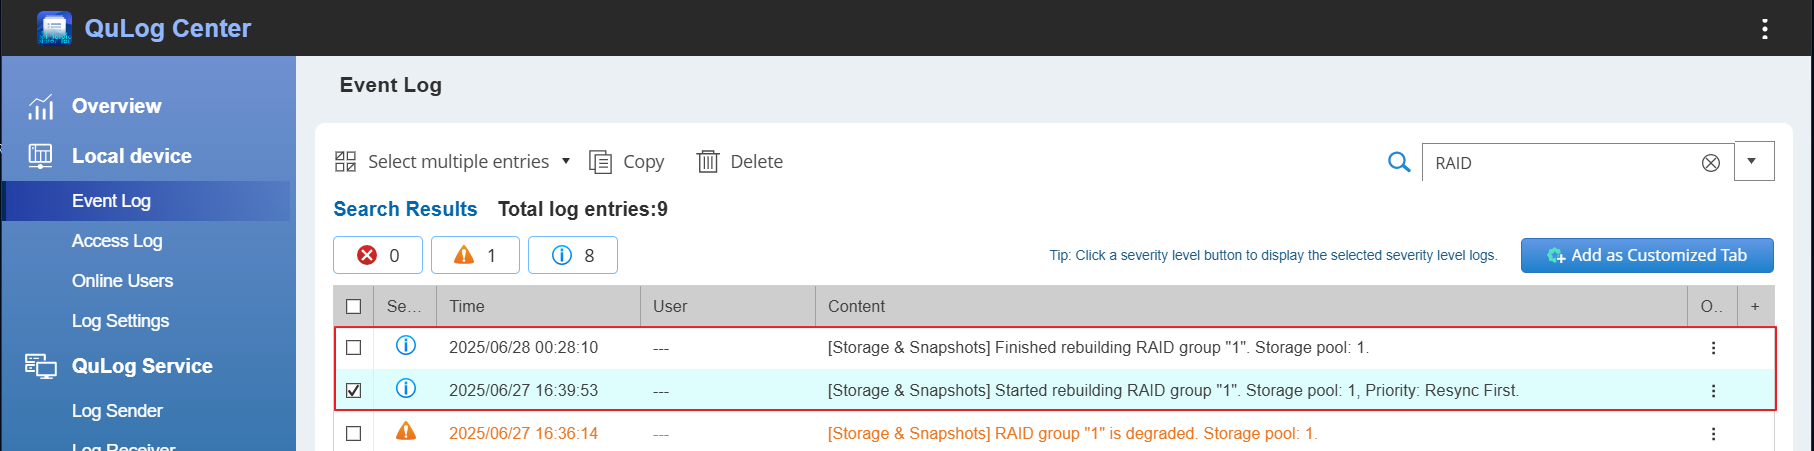
- You may also check the logs to confirm that the RAID rebuilding is finished.
Replacing both healthy disks to upgrade storage capacity
If you want to upgrade to drives of larger capacity:
- Back up all data from the NAS.
- Power off the NAS and replace both drives with new drives.
- Power on the NAS and initialize the system. This will create a new RAID 1 storage pool.
- Restore your data from the backup.
Note
You cannot expand RAID 1 capacity on a non-hot-swappable NAS by replacing one drive at a time. You must replace all drives and rebuild the RAID volume from scratch.
Migrating from RAID 1 to RAID 5 by adding a drive
If you want to change your setup from RAID 1 to RAID 5 by adding another drive:
- Ensure that the NAS supports RAID migration and the desired number of drives for RAID 5.
- Power off the NAS.
- Install the third hard drive (must have the same capacity or larger than the existing drives, and preferably a new drive).
- Power on the NAS.
- Open Storage & Snapshots and go to Manage > Migrate RAID Group.
- Follow the on-screen instructions to migrate from RAID 1 to RAID 5.
Recommendation
- The NAS must be powered off when you install new drives on non-hot-swappable models
- Always use brand-new hard drives for replacements.
- Avoid reusing drives from other QNAP systems or computers.
- Refer to the QNAP HDD Compatibility List to choose compatible models.
- Maintain regular backups before making any hardware changes.
Further Reading
适用产品
QTS, 存储与快照总管, QNAP NAS(非热插拔型号)
场景
如果您的QNAP NAS不支持热插拔,必须在NAS关闭时更换硬盘。本文解释了如何在这种系统中安全地更换硬盘,特别是在RAID 1配置中——无论您是从磁盘故障中恢复还是升级到更大的硬盘。
解决方案
在RAID 1中更换故障磁盘
如果您的RAID 1 存储池中的一个磁盘出现故障:
- 关闭NAS。
- 移除故障硬盘并插入一个新的硬盘,容量相同或更大的硬盘。
重要提示
不要使用之前在其他QNAP NAS、PC或Mac中使用过的硬盘,以避免RAID元数据冲突。
- 开启NAS。
- QTS将检测到新硬盘并自动开始RAID重建过程。
您可以在存储与快照总管 > 存储/快照 > 管理 > 重建中监控进度。
- 在执行任何其他操作之前,请等待重建过程完全完成。您可以在"后台任务"工具栏上监控重建进度。
- 您还可以检查日志以确认RAID重建已完成。
更换两个健康磁盘以升级存储容量
如果您想升级到更大容量的硬盘:
- 备份NAS中的所有数据。
- 关闭NAS并用新硬盘替换两个硬盘。
- 开启NAS并初始化系统。这将创建一个新的RAID 1 存储池。
- 从备份中恢复您的数据。
注意
您不能通过一次更换一个硬盘来扩展非热插拔NAS上的RAID 1容量。您必须更换所有硬盘并从头开始重建RAID卷。
通过添加硬盘从RAID 1迁移到RAID 5
如果您想通过添加另一个硬盘将设置从RAID 1更改为RAID 5:
- 确保NAS支持RAID迁移和RAID 5所需的硬盘数量。
- 关闭NAS。
- 安装第三个硬盘(必须与现有硬盘容量相同或更大,最好是新的硬盘)。
- 开启NAS。
- 打开存储与快照总管并转到管理 > 迁移RAID组。
- 按照屏幕上的说明从RAID 1迁移到RAID 5。
建议
- 在非热插拔型号上安装新硬盘时,NAS必须关闭
- 始终使用全新的 硬盘进行更换。
- 避免重复使用来自其他QNAP系统或计算机的硬盘。
- 请参考QNAP HDD 兼容性列表以选择兼容型号。
- 在进行任何硬件更改之前保持定期备份。
进一步阅读


