NAS Recovery Guide for Legacy ARM-based NAS
最后修订日期:
2025-07-02
Applicable Models
- TS-110, TS-210, TS-410, TS-410U
- TS-112, TS-212, TS-412, TS-412U
- TS-119, TS-119P+, TS-219, TS-219P, TS-219P+, TS-419P, TS-419P+, TS-419U, TS-419U+
- TS-120, TS-220, TS-420, TS-420U
- TS-121, TS-221, TS-421, TS-421U
Overview
This FAQ explains how to manually recover your NAS if it fails to start up. This FAQ only applies to the NAS models listed above.
NAS Recovery Requirements
To recover the NAS, you will need the following:
- A Windows PC
- An Ethernet cable
- A thin pointed object to press the NAS reset button
Recovering the NAS
To recover the NAS, perform the following steps:
1. Create an Ubuntu virtual machine
Choose one of the following options to create an Ubuntu virtual machine on your Windows PC:
Option 1: WMware Workstation Player
- Download and install WMware Workstation Player.
- Download the ISO file below corresponding to the NAS model:
NAS Model ISO File - TS-x10
- TS-x12
- TS-x19
- TS-x20
- TS-x21
https://eu1.qnap.com/Storage/tsd/live_cd/live-cd-20130730.iso - TS-112P
- TS-212P
- TS-212E
- HS-210
https://eu1.qnap.com/Storage/tsd/live_cd/live-cd-20140212.iso - Disable all wireless network connections on your PC.
- Connect your PC to the local network with an Ethernet cable.
- Open VMware Workstation Player.
- Click Create a New Virtual Machine.
The New Virtual Machine Wizard window appears and the Welcome to the New Virtual Machine Wizard page appears. - Under Installer disc image file (iso), click Browse.
- Select the downloaded ISO file.
- Click Open.
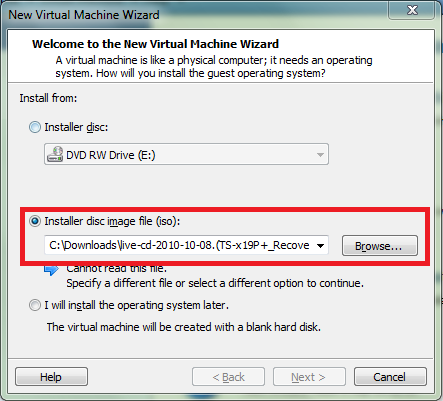
- Click "Next >".
The Select a Guest Operating System page appears. - Under Guest Operating System, select Linux.
- Under Version, select Ubuntu.
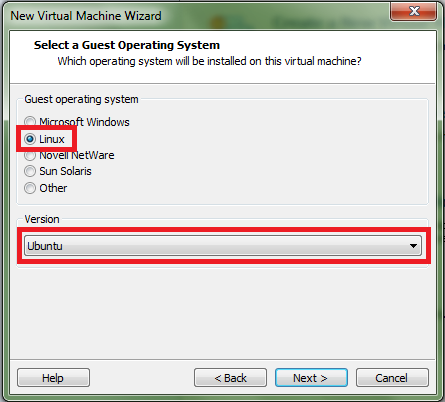
- Click "Next >".
The Name the Virtual Machine page appears. - Optional: Under Virtual Machine Name, specify a name for the Ubuntu virtual machine.
- Optional: Under Location, specify the location where the Ubuntu virtual machine will be installed.
- Click "Next >".
- Depending on the version of VMware Workstation Player, additional settings pages may appear. Configure additional settings and click "Next >" on each additional settings page until the Ready to Create Virtual Machine page appears.
- On the Ready to Create Virtual Machine page, review the Ubuntu virtual machine configuration.
- Click Customize Hardware.
The Hardware window appears.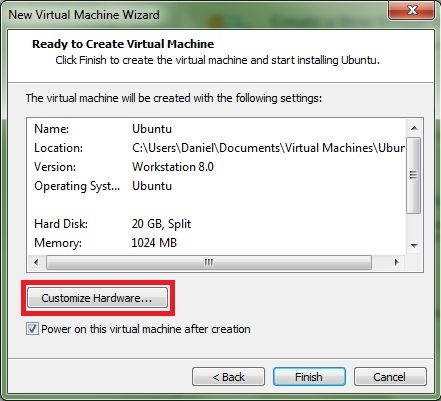
- In the device list, select Network Adapter.
- Under Network Connection, select Bridged.
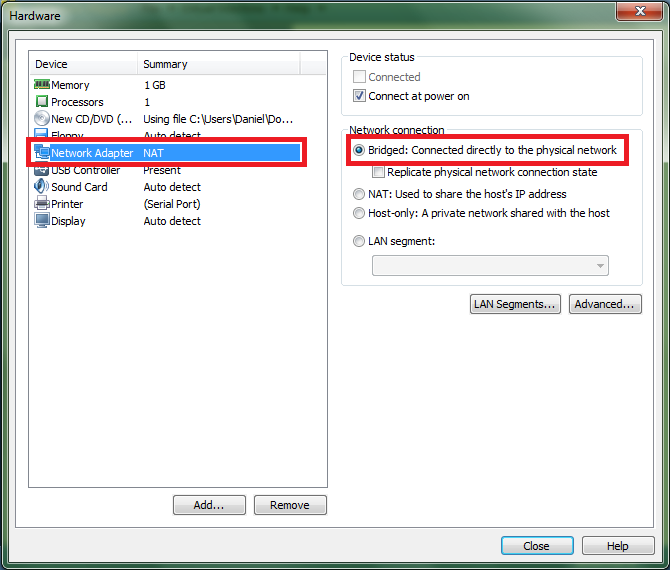
- Click Close.
- Click Finish.
The Ubuntu virtual machine is created and the Ubuntu virtual machine terminal opens in a new window. Depending on the version of VMware Workstation Player, you may need to manually start the Ubuntu virtual machine. - An Ubuntu virtual machine terminal opens. A login prompt may appear, but it is not necessary to log in.
The Ubuntu virtual machine is created and running.
Option 2: With a CD
- Download the ISO file from the links below that correspond to the NAS model:
NAS Model ISO File - TS-x10
- TS-x12
- TS-x19
- TS-x20
- TS-x21
https://eu1.qnap.com/Storage/tsd/live_cd/live-cd-20130730.iso - TS-112P
- TS-212P
- TS-212E
- HS-210
https://eu1.qnap.com/Storage/tsd/live_cd/live-cd-20140212.iso - Burn the ISO file to a CD-R.
- Remove the CD-R from your PC.
- Power off your PC.
- Insert the CD-R into your PC.
- Power on your PC.
- Before your PC fully boots, enter the BIOS menu.TipThe method to enter your computer's BIOS menu during start-up will depend on the model and brand of your computer. The options and appearance of the BIOS menu will also depend on the model and brand of your computer. See your computer's users guide for details.
- Select the option to boot up your PC using the CD-R.
Your PC will boot up with Ubuntu as the operating system. - If a login prompt appears, then do not specify any credentials and press enter to continue.
Your PC is now running the Ubuntu operating system as a virtual operating system.
2. Reset the NAS
- Power off the NAS.
- Remove all drive trays.
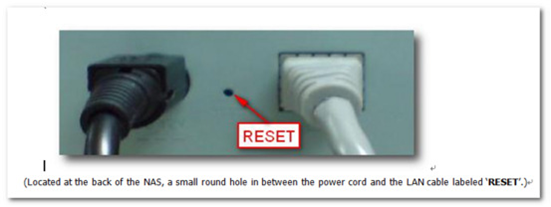
- Connect the NAS to your PC with an Ethernet cable.TipIf your NAS has two LAN ports, only one LAN port can be used for NAS recovery. Depending on the NAS model, this may be the first or second LAN port.
- Reset the NAS by performing the following steps:
- Use a pointed thin object to press and hold the physical reset button on the NAS.
- Press and hold the power button on the NAS.
- Continue holding the power button and reset button simultaneously until an audio alert of two short beeps is issued. The NAS status LED will start flashing red and green. The LAN LED will also start flashing.
- Release the power button and reset button.
- After a short amount of time, the NAS status LED becomes red, and the LAN LED stops flashing and becomes orange or green.
- The Ubuntu virtual machine starts transferring data to the NAS. Do not power off or disconnect the NAS.
- After a short amount of time, approximately 5-10 minutes, an audio alert of one long beep or two short beeps is issued, and the NAS status LED becomes green.
- Optional: View the progress of the data transfer between the NAS and the Ubuntu virtual machine
- Log into the NAS via the Ubuntu virtual machine terminal with the following credentials:
Username Password root root - Enter the following command:
ifconfigYou can see the data transfer progress under TX under port eth0.
- Log into the NAS via the Ubuntu virtual machine terminal with the following credentials:
- The NAS automatically restarts. This restart may take several minutes.
- After the NAS restarts, an audio alert of one long beep is issues.
Qfinder Pro can now find the NAS
- Use a pointed thin object to press and hold the physical reset button on the NAS.
3. Install the latest available firmware version on the NAS with Qfinder Pro
- Download and install Qfinder Pro.
- Open Qfinder Pro.
- Locate your NAS in the device list.TipFor details on using Qfinder Pro, see Qfinder Pro Help.
- Right click on your NAS.
- Select Update Firmware.
 The Update Firmware window opens.
 - Select Automatically update the firmware to the latest version.

- Click Start.
The NAS firmware is updated to the latest version.
4. Install Hard Drives
- After the firmware is updated, perform the following steps to install hard drives:
- Attach the hard drives to the drive trays.
- Insert the drive trays into the NAS.
For details on installing hard drives, see the NAS User Guide available for download from Download Center. - If the hard drives are not new, the firmware must be updated again while the hard drives are installed. For details, see Updating the NAS Firmware Using Qfinder Pro in How to search and manage a QNAP NAS using Qfinder Pro.
- If the hard drives are new, you can continue to initialize the NAS. For details on initializing QTS, see QTS Initialization (5.0.x).
Further Troubleshooting
- If the NAS BIOS failed to display:
Your NAS needs to be physically serviced by a qualified hardware technician. - If the steps of this guide could not be successfully completed:
Your NAS needs to be physically serviced by a qualified hardware technician. - If you were able to install the latest firmware version on your NAS with Qfinder Pro but after installing the hard drives, the NAS will not boot up:
The hard drives are faulty and need to be replaced. A NAS will fail to start up if the hard drives are faulty.
Further Reading
What to do if Firmware update is stuck?
Why won't my NAS boot after a firmware update?
What can I do if I can not access my NAS after firmware update?
What do I do if there was a power failure or network disconnection during a firmware update?


