Applicable Products
Overview
This tutorial guides you through the process of backing up hypervisors in HDP for PC/VM to a remote QNAP NAS using HBS 3. The process requires 4 steps:
A. Adding a Hypervisor to the Inventory (HDP for PC/VM)
B. Creating a Repository (HDP for PC/VM)
C. Backing Up a Hypervisor to a Repository (HDP for PC/VM)
D. Backing Up or Syncing a Repository to a Remote NAS (HBS 3)
Important
When creating backup jobs in HDP for PC/VM (step C) and in HBS 3 (step D), ensure the two job schedules do not overlap.
Requirements
The following must be installed on both the local and remote NAS devices:
- HDP for PC/VM 1.3.0.0813 or later
- HBS 3 version 17.2.0726 or later
A. Adding a Hypervisor to the Inventory
- Open HDP for PC/VM.
- Go to Inventory > Virtual Machine.
- Click Add to choose the type of hypervisor to backup (VMware or Hyper-V).
- The Add/Edit Inventory window opens.
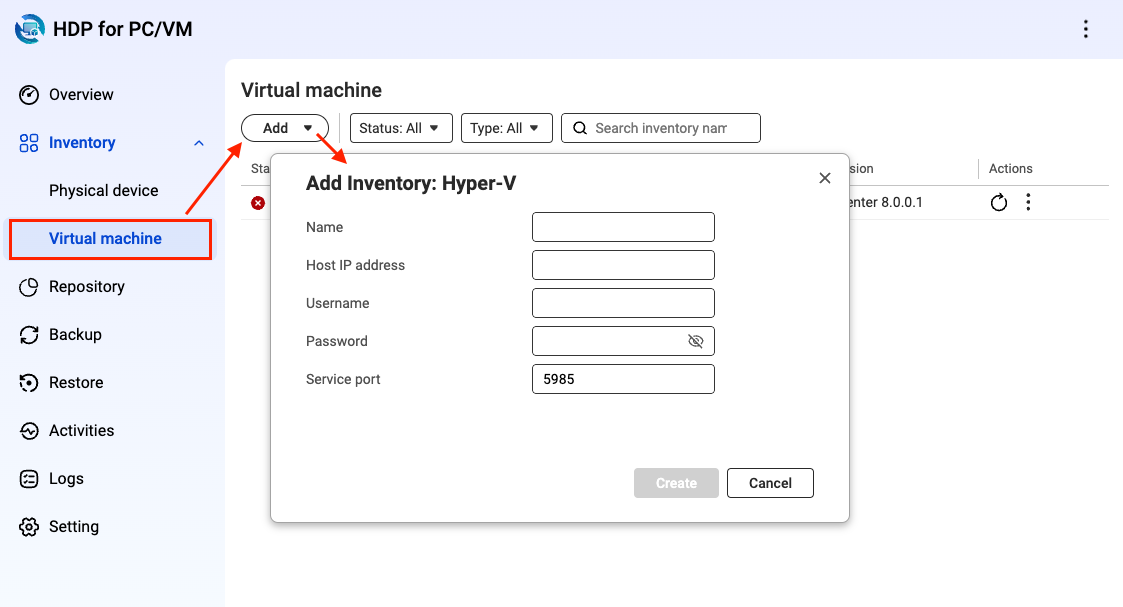
- Enter the details for the hypervisor.
- Enter the name.
- Enter the host IP address.
- Enter the username for the hypervisor account.
- Enter the password for the hypervisor account.
- Enter the service port.
- Click Create.
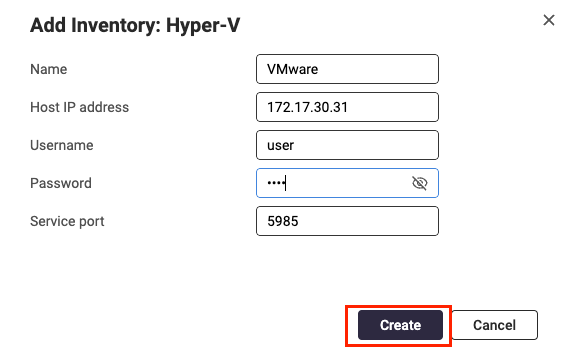
- Check that the hypervisor has been added to the list.
B. Creating a Repository
A repository is required to store the hypervisor data.
- Open HDP for PC/VM.
- Click Repository.
- Click Create.
The Create Repository window opens.
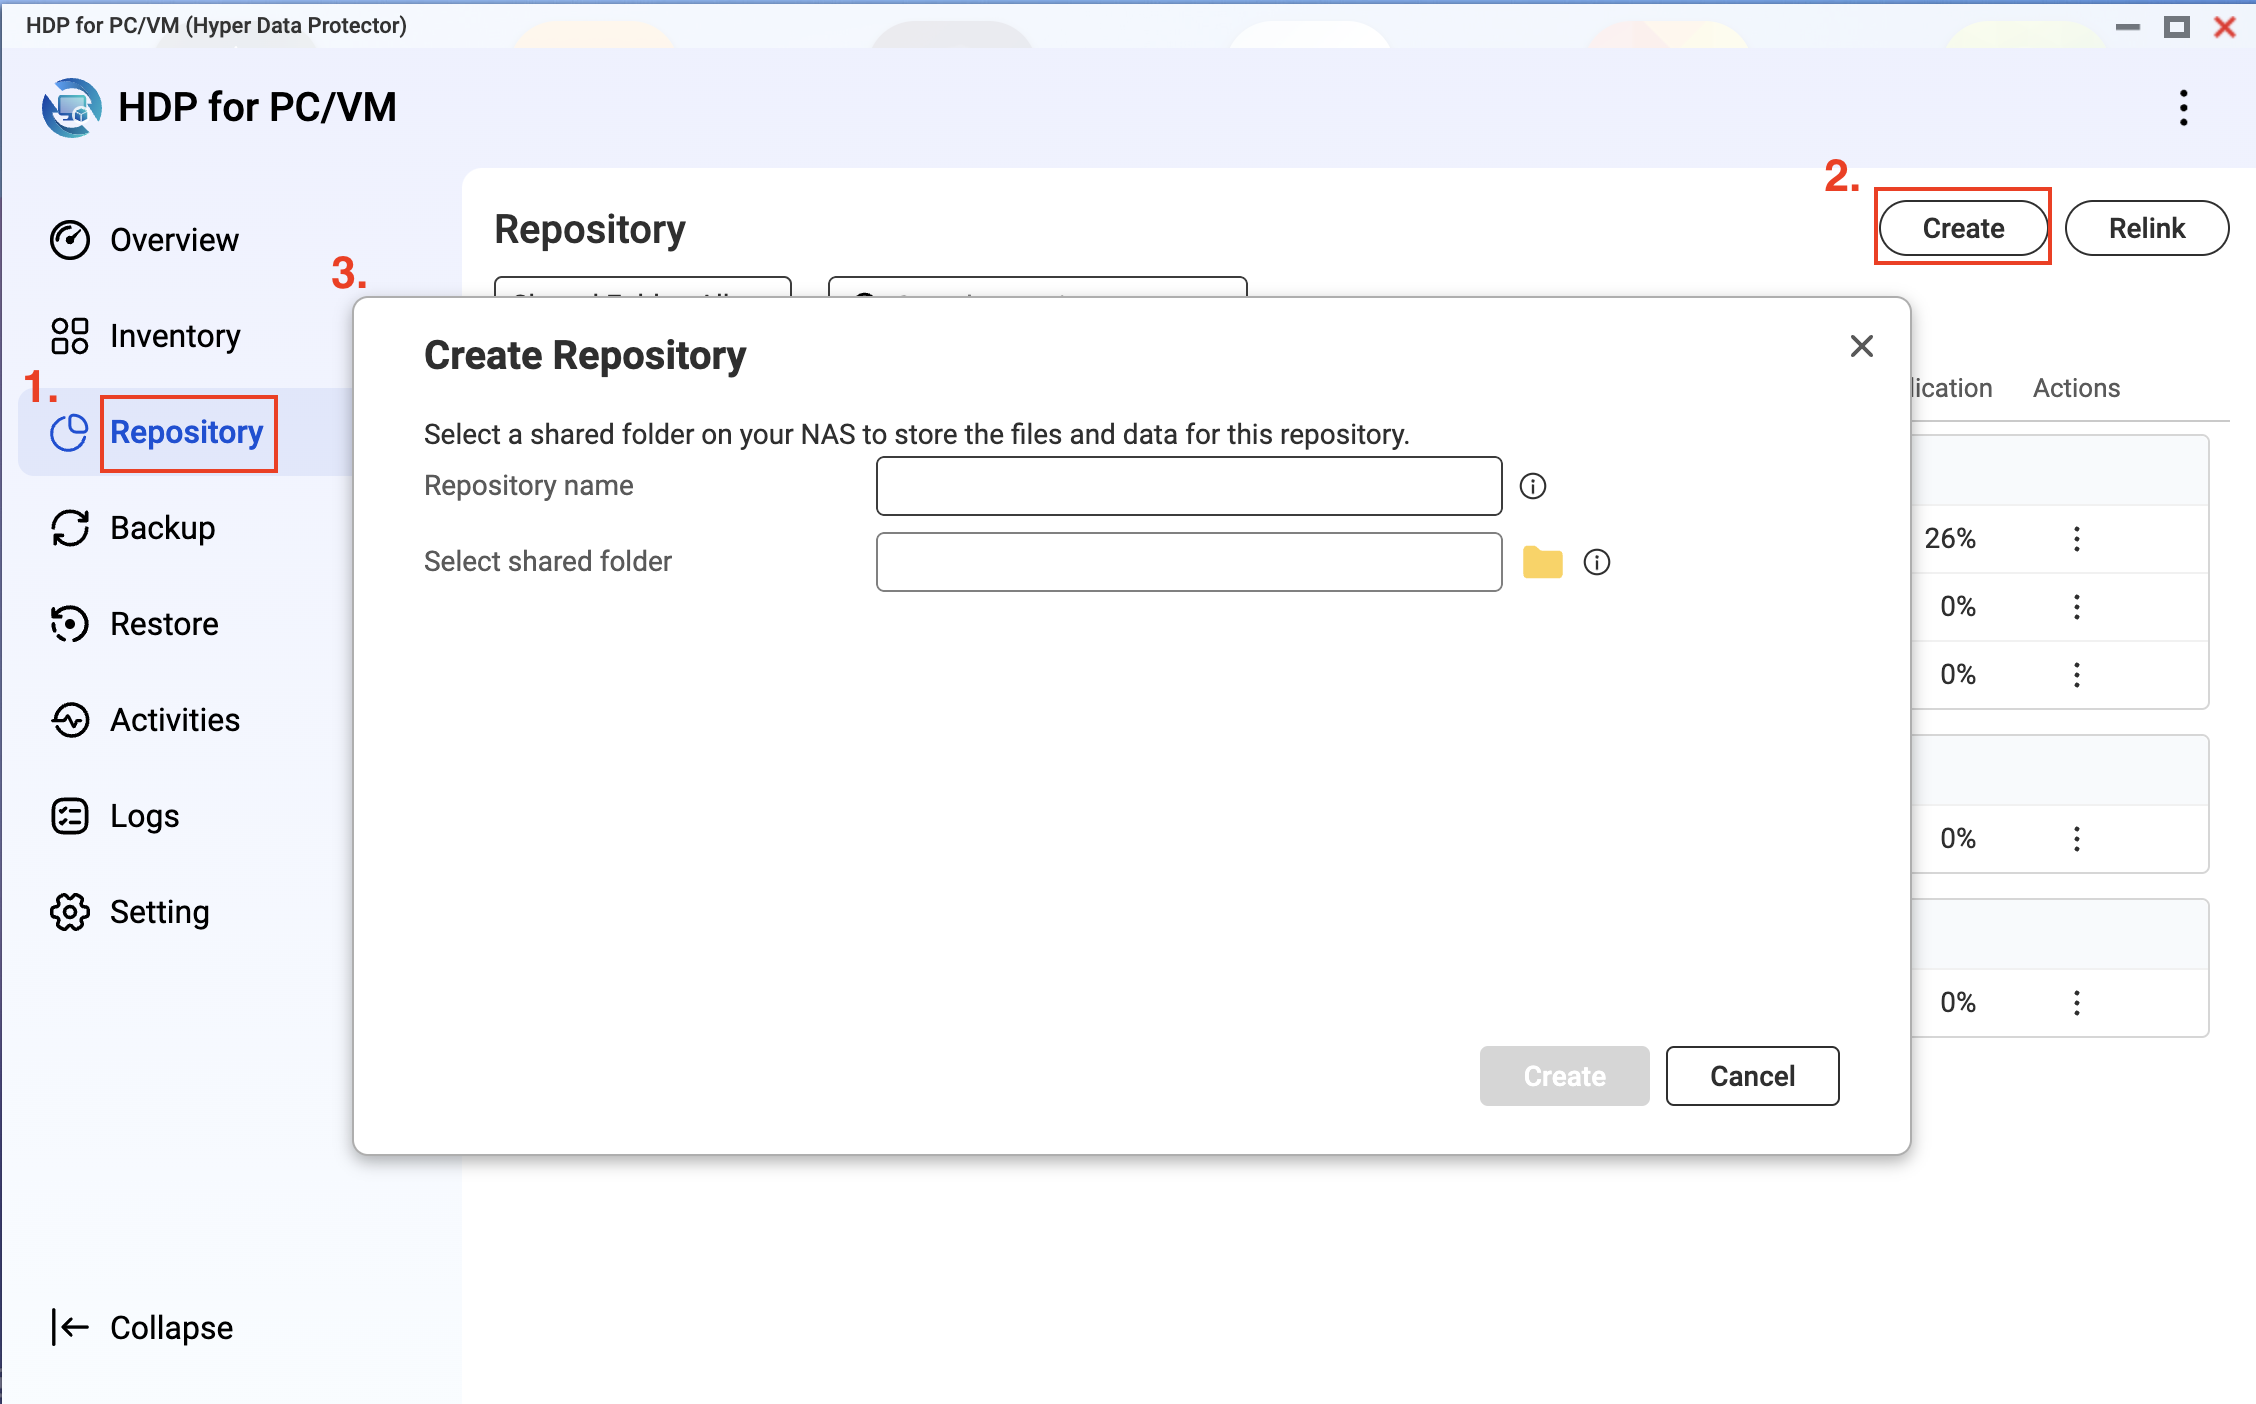
- Enter a repository name.
- Select one or more shared folders to store your backup data.
- Click Create.
C. Backing Up a VMware/Hyper-V Hypervisor to a Repository
To back up a hypervisor to a repository, you need to create a backup job in HDP for PC/VM.
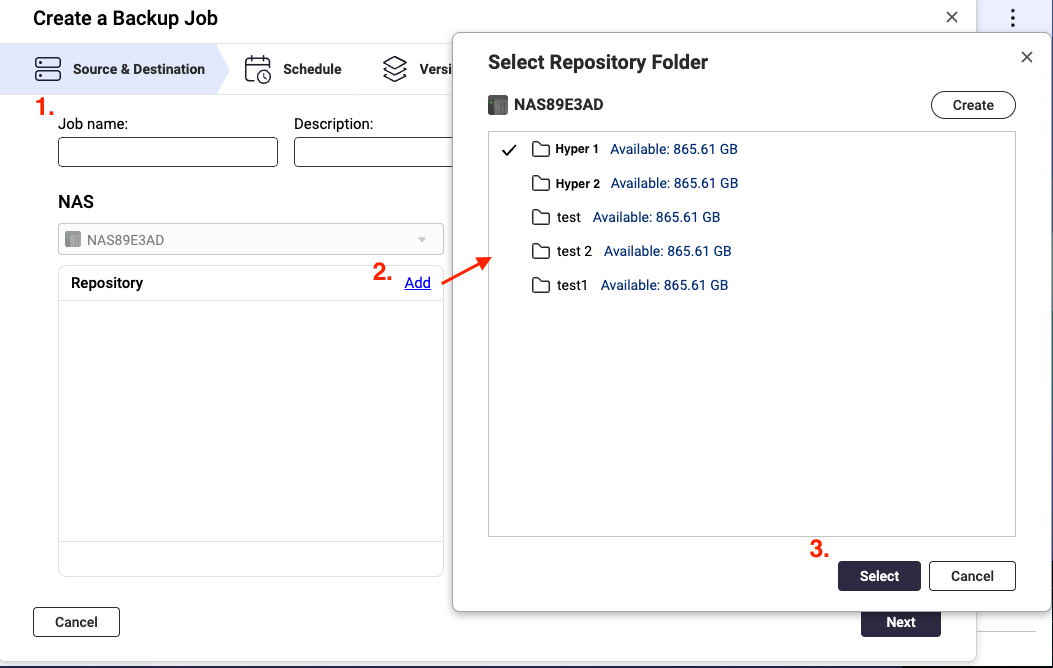
- In HDP for PC/VM, click Backup > Create Job.
The Create a Backup Job window opens. - Enter a job name.
- Optional: Enter a description.
- In the Repository section, click Add.
The Select Repository Folder window opens. - Select or create a folder to store backup data.
- Click Select.
- Under Inventory, select an existing inventory or add a new inventory.
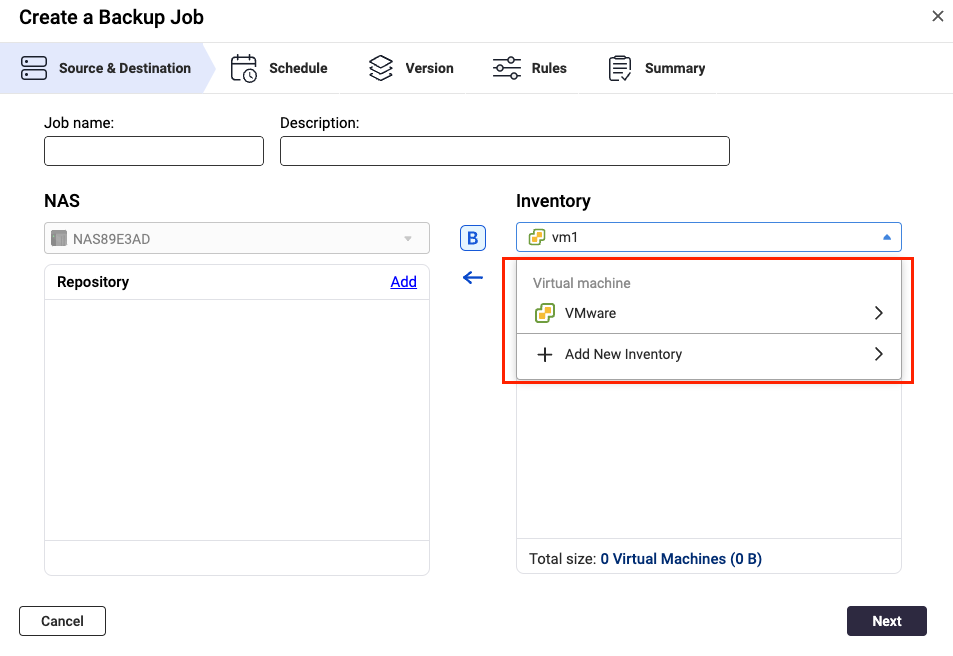
- Click Add.
The Select Source window opens.- Select a view.
- Select the virtual machines or disks to include.
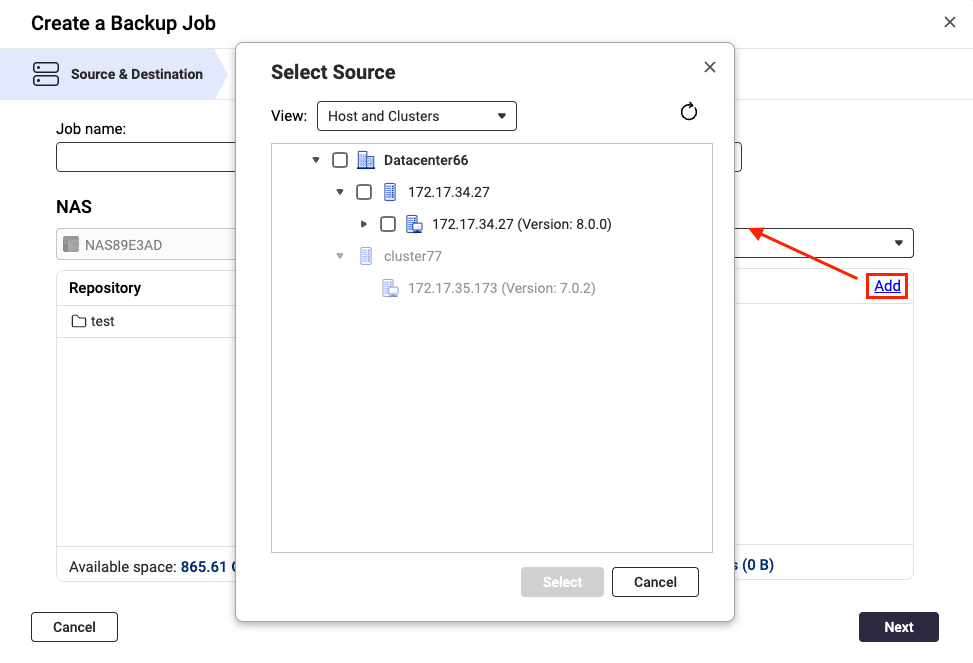
- Click Select.
The Select Source window closes. - Review the total number of selected virtual machines and their total size.
- Click Next.
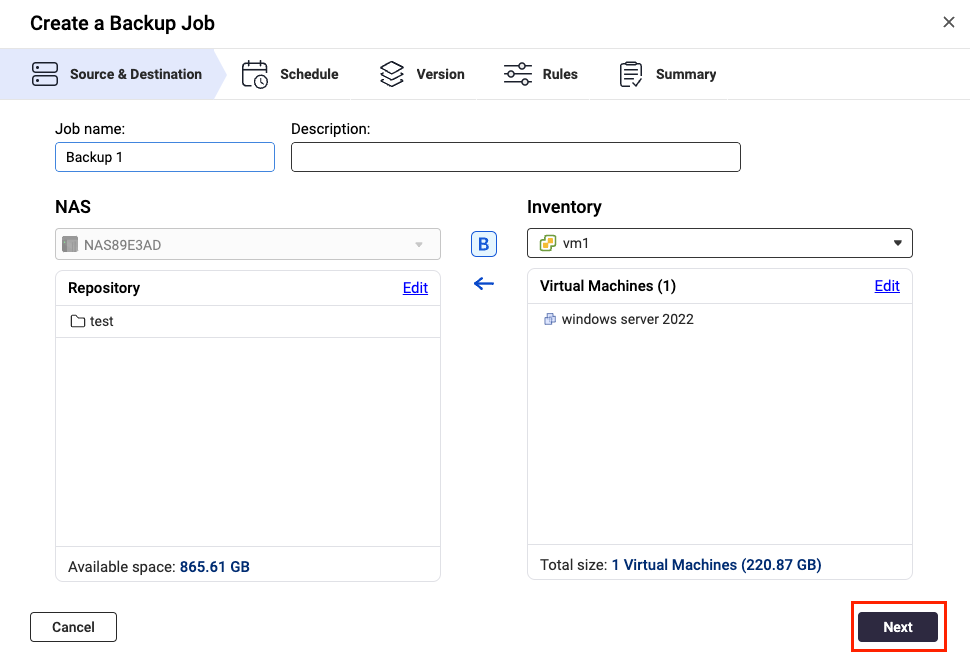
- Configure the backup schedule, then click Next.
- Configure the retention policy, then click Next.
- Configure the rules, then click Next.
Tip
- Transfer encryption and compression: Enhances transfer security and optimizes file size for faster transmission.
- Enable VMware CBT for all VMs: Changed Block Tracking (CBT) is an incremental backup technology for VMware VMs. CBT only backs up blocks that have changed, rather than backing up every block of every VM in the infrastructure.
- Enable application-aware processing: Application awareness is based on Microsoft VSS and prevents data loss or application failures if the backup files include application data or system state information.
- Review the summary page, then click Finish.
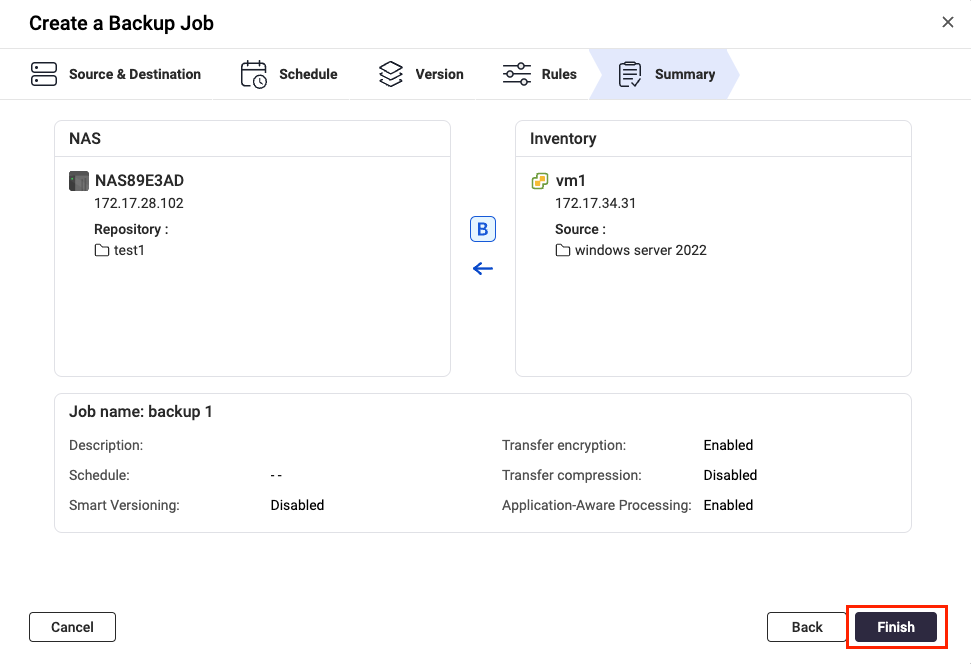 HDP for PC/VM executes the backup job according to the configured schedule.
D. Backing Up or Syncing a Repository to a Remote NAS
Note
The steps to create a backup job and to create a sync job are nearly identical. Below we demonstrate the steps needed to create a sync job.
- Configure the RTRR server on the remote NAS.
Important
This step is required to allow the local and remote NAS devices to connect via HBS 3.
- Open HBS 3 on the remote NAS.
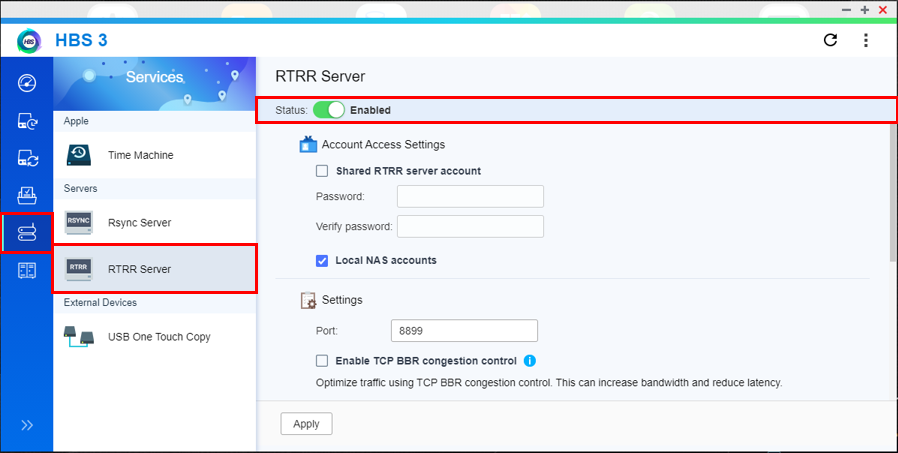
- Go to Services > RTRR Server and enable the RTRR server.
- Configure the account access settings.
- Shared RTRR server account: This option allows incoming connections to log in with a shared account.
- Local NAS accounts: This option allows incoming connections to log in with a local account of the remote NAS.
Note
Remember which option you choose. You will need this information later when you set up the backup job on your source NAS.
- Configure the server settings.
- Port: Specifies the port number used to access the remote NAS.
Note
Remember the port number. You will need this information later when you set up the backup job on your local NAS.
- Use TCP BBR congestion control: This option optimizes transmissions speeds allowing for higher bandwidth and lower latency.
Important
To ensure data integrity, we recommend enabling this setting.
- Integrate with QuWAN: Allows QuWAN to manage and optimize network traffic for jobs using this service.
Important
To ensure data integrity, we recommend disabling this setting.
- Upload limit: Sets the upload rate limit.
- Download limit: Sets the download rate limit.
- Click Apply.
- Open HBS 3 on the local NAS.
- Go to Sync > Create > One-way Sync Job.
Tip
To create a backup job, go to Backup > Create > New backup job.
The Create a Sync Job wizard appears. - Select Remote NAS.
- Click Add new account.
The Create a Storage Space window opens.
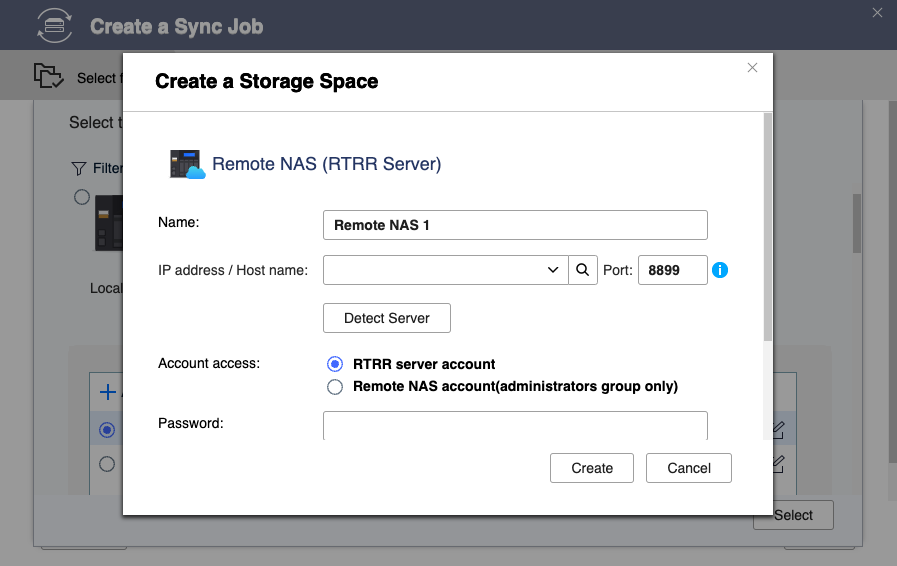
- Configure the storage space settings.
- Name: The name used to identify the storage space.
- IP address / Host name: The IP address or hostname used to access the storage space.
- Port: The port number used to access the storage space.
This value must be between 1 to 65535. - Account access: The account used to access the storage space.
Use the same settings you configured for the RTRR server on the remote NAS. - Username: The username used to access the storage space.
This field is only available if Remote NAS account is selected for account access. - Password: The password used to access the storage space.
- Use SSL connection: Requires SSL connection when accessing the remote NAS.
- Click Create.
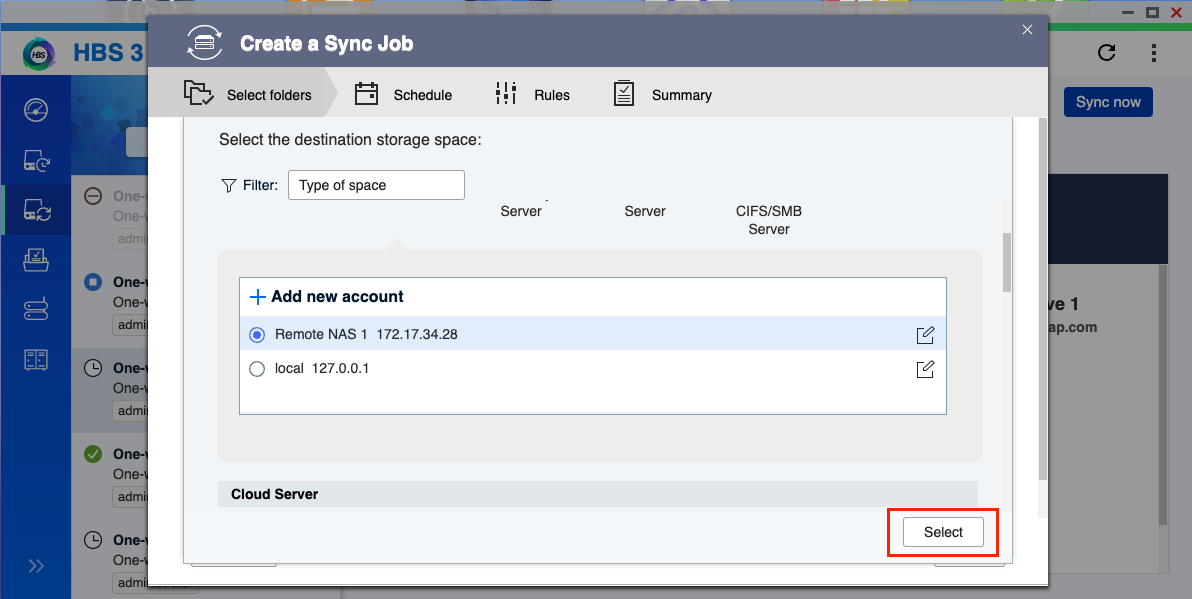
- Select the newly added destination NAS.
- Click Select.
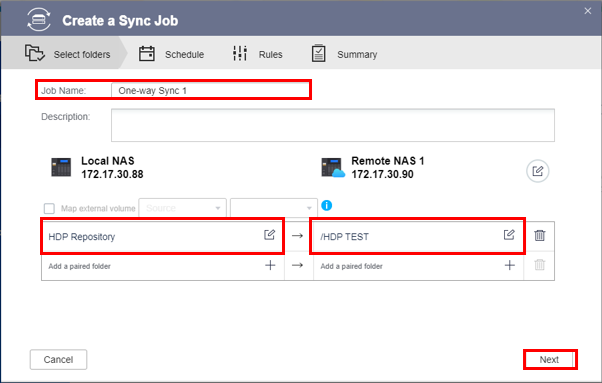
- Enter a name for the sync job.
- Select the previously backed up HDP for PC/VM repository.
Important
The selected folder must be located in a shared folder or in an "HDP" folder in the shared folder.
- Select the destination folder on the remote NAS.
Important
Ensure the folder is not a destination for another one-way sync job. File corruption may occur if the same folder is used as a destination for two or more one-way sync jobs.
- Click Next.
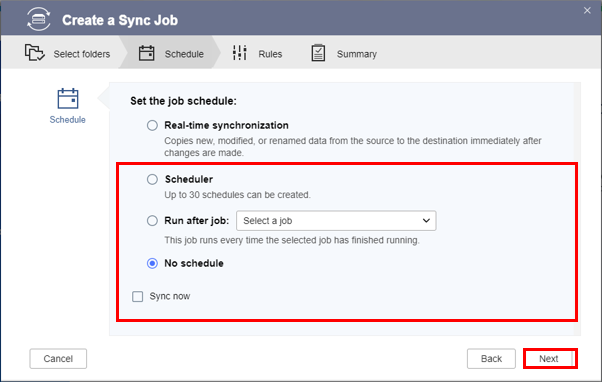
- Configure the job schedule, then click Next.
Important
Do not select Real-time synchronization. This option may cause data corruption in your backup.
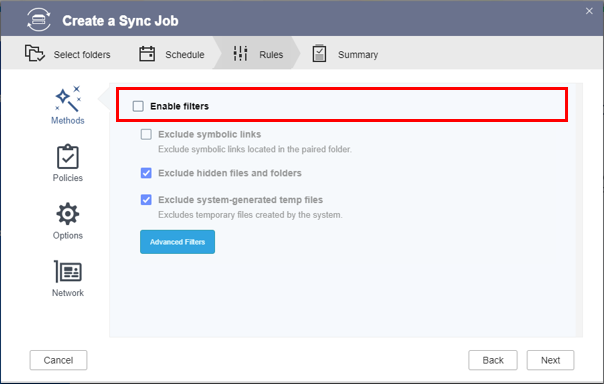
- Deselect Enable filters.
- Configure the job policies.
Important
To avoid data corruption, please configure the following settings as recommended:
- Use rate limits: Disable
- Use TCP BBR congestion control: Enable
- Integrate with QuWAN: Disable
- Remove additional files in destination folder: Enable
- Replicate ACL and extended attributes: Enable
- Do not take a snapshot: Disable
- Optional: Configure the Options and Network settings.
- Click Next.
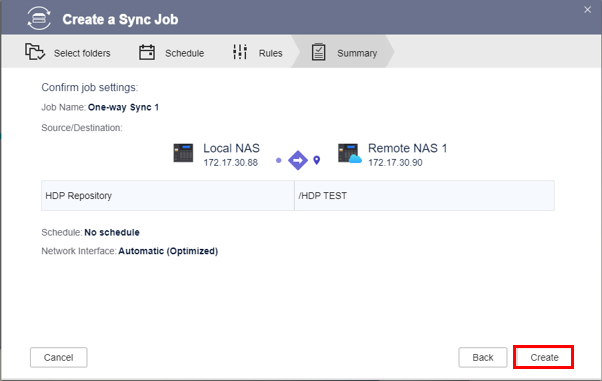
- Review the summary, then click Create.
- Click Sync now.

HBS 3 starts syncing your repository to the destination NAS.
Further Reading
Hybrid Backup Sync Web Help
适用产品
概述
本教程将指导您通过 HBS 3 将 HDP for PC/VM 中的虚拟机备份到远程 QNAP NAS。该过程需要 4 个步骤:
A. 将虚拟机管理程序添加到库存中 (HDP for PC/VM)
B. 创建存储库 (HDP for PC/VM)
C. 将虚拟机管理程序备份到存储库 (HDP for PC/VM)
D. 将存储库备份或同步到远程 NAS (HBS 3)
重要提示
在 HDP for PC/VM(步骤 C)和 HBS 3(步骤 D)中创建备份任务时,请确保两个任务的计划时间不重叠。
要求
本地和远程 NAS 设备上必须安装以下内容:
- HDP for PC/VM 1.3.0.0813 或更高版本
- HBS 3 版本 17.2.0726 或更高版本
A. 将虚拟机管理程序添加到清单中
- 打开 HDP for PC/VM。
- 前往清单 > 虚拟机。
- 点击 添加 以选择要备份的虚拟机管理程序类型(VMware或Hyper-V)。
- 添加 / 编辑清单窗口打开。
- 输入虚拟机管理程序的详细信息。
- 输入名称。
- 输入主机 IP 地址。
- 输入虚拟机管理程序账户的用户名。
- 输入虚拟机管理程序账户的密码。
- 输入服务端口。
- 点击创建。
- 检查虚拟机管理程序是否已添加到列表中。
B. 创建存储库
需要一个存储库来存储虚拟机管理程序数据。
- 打开 HDP for PC/VM。
- 点击存储库。
- 点击创建。
创建存储库窗口打开。
- 输入存储库名称。
- 选择一个或多个共享文件夹来存储备份数据。
- 点击创建。
C. 将 VMware/Hyper-V 虚拟机管理程序备份到存储库
要将虚拟机管理程序备份到存储库,您需要在 HDP for PC/VM 中创建一个备份任务。
- 在 HDP for PC/VM 中,点击备份 > 创建任务。
创建备份任务窗口打开。 - 输入任务名称。
- 可选:输入描述。
- 在存储库部分,点击添加。
选择存储库文件夹窗口打开。 - 选择或创建一个文件夹来存储备份数据。
- 点击选择。
- 在库存下,选择一个现有库存或添加一个新库存。
- 点击添加。
打开选择来源 窗口。- 选择一个视图。
- 选择要包含的虚拟机或磁盘。
- 点击选择。
关闭选择来源窗口。 - 查看所选虚拟机的总数及其总大小。
- 点击下一步。
- 配置备份计划,然后点击下一步。
- 配置保留策略,然后点击下一步。
- 配置规则,然后点击下一步。
提示
- 传输加密和压缩:增强传输安全性并优化文件大小以加快传输速度。
- 为所有虚拟机启用 VMware CBT:更改块跟踪(CBT)是一种用于 VMware 虚拟机的增量备份技术。CBT 仅备份已更改的块,而不是备份基础设施中每个虚拟机的每个块。
- 启用应用程序感知处理: 应用程序感知基于 Microsoft VSS,如果备份文件包含应用程序数据或系统状态信息,则可防止数据丢失或应用程序故障。
- 查看摘要页面,然后点击完成。
HDP for PC/VM 根据配置的计划执行备份任务。
D. 备份或同步存储库到远程 NAS
注意
创建备份任务和创建同步任务的步骤几乎相同。下面我们演示创建同步任务所需的步骤。
- 在远程 NAS 上配置 RTRR 服务器。
重要
此步骤是为了允许本地和远程 NAS 设备通过 HBS 3 连接。
- 在远程 NAS 上打开 HBS 3。
- 进入服务 > RTRR 服务器并启用 RTRR 服务器。
- 配置账户访问设置。
- 共享 RTRR 服务器账户: 此选项允许传入连接使用共享账户登录。
- 本地 NAS 账户: 此选项允许传入连接使用远程 NAS 的本地账户登录。
注意
记住您选择的选项。稍后在源 NAS 上设置备份任务时需要此信息。
- 配置服务器设置。
- 端口: 指定用于访问远程 NAS 的端口号。
注意
记住端口号。稍后在本地 NAS 上设置备份任务时需要此信息。
- 使用 TCP BBR 拥塞控制: 此选项优化传输速度,允许更高的带宽和更低的延迟。
- 与 QuWAN 集成: 允许 QuWAN 管理和优化使用此服务的作业的网络流量。
- 上传限制: 设置上传速率限制。
- 下载限制: 设置下载速率限制。
- 点击应用。
- 在本地 NAS 上打开 HBS 3。
- 转到同步 > 创建 > 单向同步作业。
提示
要创建备份作业,请转到备份 > 创建 > 新备份作业。
出现创建同步作业向导。 - 选择远程 NAS。
- 点击添加新账户。
打开创建存储空间窗口。
- 配置存储空间设置。
- 名称:用于识别存储空间的名称。
- IP 地址 / 主机名:用于访问存储空间的 IP 地址或主机名。
- 端口:用于访问存储空间的端口号。
此值必须在 1 到 65535 之间。 - 账户访问:用于访问存储空间的账户。
使用您在远程 NAS 上为 RTRR 服务器配置的相同设置。 - 用户名:用于访问存储空间的用户名。
仅当选择远程 NAS 账户作为账户访问时,此字段才可用。 - 密码:用于访问存储空间的密码。
- 使用 SSL 连接:访问远程 NAS 时需要 SSL 连接。
- 点击创建。
- 选择新添加的目标 NAS。
- 点击选择。
- 输入同步任务的名称。
- 选择之前备份的 HDP 用于 PC/VM 存储库。
重要
所选文件夹必须位于共享文件夹中或共享文件夹中的“HDP”文件夹中。
- 选择远程 NAS 上的目标文件夹。
重要
确保该文件夹不是另一个单向同步任务的目标。如果同一文件夹被用作两个或多个单向同步任务的目标,可能会导致文件损坏。
- 点击下一步。
- 配置任务计划,然后点击下一步。
重要
不要选择实时同步。此选项可能会导致备份数据损坏。
- 取消选择启用过滤器。
- 配置作业策略。
重要提示
为避免数据损坏,请按建议配置以下设置:
- 使用速率限制:禁用
- 使用 TCP BBR 拥塞控制:启用
- 与 QuWAN 集成:禁用
- 删除目标文件夹中的附加文件:启用
- 复制 ACL 和扩展属性:启用
- 不进行快照:禁用
- 可选:配置选项和网络设置。
- 点击下一步。
- 查看摘要,然后点击创建。
- 点击立即同步。
HBS 3 开始将您的存储库同步到目标 NAS。
进一步阅读
Hybrid Backup Sync Web 帮助


