Applicable Products
- QuTS hero h5.3.0 or later
- Virtualization Station 4.0 Beta or later
Introduction
VM High Availability (VMHA) is a feature in Virtualization Station that enables automatic failover of virtual machines between two QNAP NAS devices. It helps ensure service continuity in case of hardware failure by minimizing downtime.
This tutorial guides you through the complete setup process, including preparing your environment, creating a VMHA device pair, creating and managing VMHA groups, configuring failover, and troubleshooting common issues.
VMHA Requirements
System Requirements
| Component | Requirement |
|---|
| Operating system | QuTS hero h5.3.0 or later on both NAS devices. Note For best compatibility, it is recommended to use NAS devices that are running the same version of QuTS hero. |
| Processor | Both NAS devices must use CPUs from the same vendor (e.g., Intel® or AMD®). |
| Memory | The destination NAS must have enough memory to run the migrated virtual machines from the source NAS during failover. |
| Storage | Both NAS devices must have sufficient space for Virtualization Station to create a shared folder to store the VMHA disk images. Disk images must be stored on the NAS’s internal storage only, and external storage cannot be used. |
Network Requirements
| Component | Requirement |
|---|
| Network connections | At least two independent network connections are required between the two NAS devices.
These must be on different subnets: one for the management link and one for the availability link (used for data synchronization). |
| IP addresses | All interfaces used for HA must use static IPv4 addresses. IPv6 and VLAN settings must be disabled. |
| Firewall ports | If a firewall is in use, ensure that TCP ports 16500-16550 are open between the two NAS devices to allow HA communication.
For a complete list of service ports used by QNAP systems, see What network ports are used by QTS, QuTS hero, and QuTScloud systems. |
| Availability link | A network speed of at least 2.5 Gbps is strongly recommended, as link speed directly affects VM performance. For best performance, use a direct Ethernet connection between the NAS devices, avoiding switches when possible. |
| SSH service | The SSH service must be enabled on both NAS devices. For details, see Configuring SSH connections in the QuTS hero User Guide. |
Preconfiguration Requirements
- Configure compatible virtual switches on both NAS devices using Network & Virtual Switch. While the virtual switch names do not need to match, the interface assignments and network settings must be aligned. For details, see Virtual switch configuration in the QuTS hero User Guide.
- Ensure that both NAS devices are running the same version of QuTS hero. If the firmware versions differ, VMHA might not function as expected. To update the NAS firmware, see Firmware update in the QuTS hero User Guide.
- Configure both NAS devices to use the same NTP server for time synchronization. For details, see Configuring time settings in the QuTS hero User Guide.
- Ensure required ports are open or forwarded if using firewalls or NAT.
Warning
- VMHA cannot be enabled if either NAS is part of a Hero HA cluster. Ensure that both devices are in standalone mode by unpairing any existing Hero HA configuration before proceeding.
- Both NAS devices must run the same version of Virtualization Station. If the versions differ, such as after a system or app update, all HA protection groups will be paused automatically until version consistency is restored.
Procedure
Setting up virtual machine high availability (VMHA) involves three main steps to ensure that your virtual machines remain operational if the source NAS becomes unavailable.
- Create an HA Device Pair: Connect two NAS devices to form a high availability group. This step only pairs the two NAS devices, including verifying requirements, configuring the network connection for synchronization, and binding the virtual switches used by the VM. It does not include the future HA synchronization direction for the VMs.
- Create an HA Availability Group: Defines which virtual machine to protect, sets up the synchronization direction, and allocates storage on both NAS devices. This group manages the backup and recovery process for the VM.
- Configure the Failover Policy: Specifies the conditions that will automatically trigger failover, such as hardware issues or high resource usage.
Completing these steps ensures that selected virtual machines can be automatically restarted on the destination NAS in the event of a failure, minimizing service disruption.
Create an HA Device Pair
- Open Virtualization on the local NAS.
- Go to High Availability.
- Click Configure Paired Devices.
The Configure Paired Devices for VM Availability wizard opens. - Click Start.
- Review the requirements for paired devices.
- Click Next.
- Configure the local device settings.
Important
If you are using a direct physical connection (such as a dedicated Ethernet cable between the two NAS devices), do not select the adapters to configure the M-link (management link). Assigning an IP address in this scenario can cause Virtualization Station to report connection errors.
- Specify the IP address of the local device.
- Specify the device port number.
- Optional: Select Use SSL connection.
- Specify the device username.
- Specify the device password.
- Click Next.
- Configure the remote device settings.
- Specify the IP address of the remote device.
- Specify the device port number.
- Optional: Select Use SSL connection.
- Specify the device username.
- Specify the device password.
- Optional: Click Test.
Virtualization Station tests the local and remote device connection.
- Click Next.
The Configure Paired Devices and Their Credentials window appears.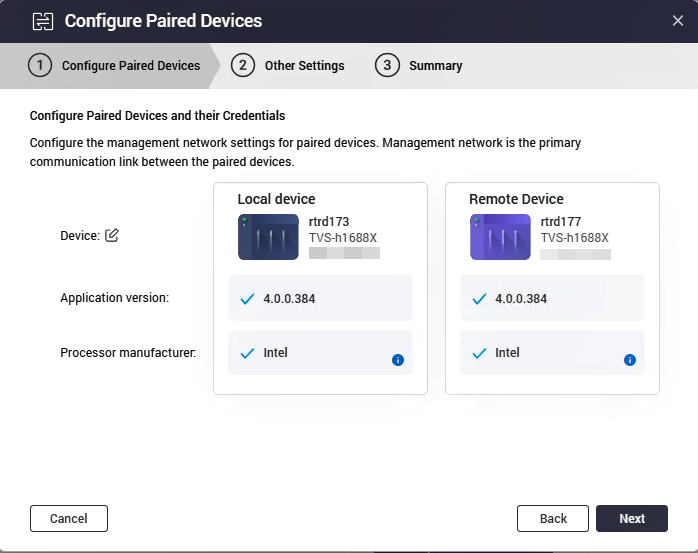
- Review the local and remote device settings.
- Click Next.
The Configure Availability Link (A-Link) window appears.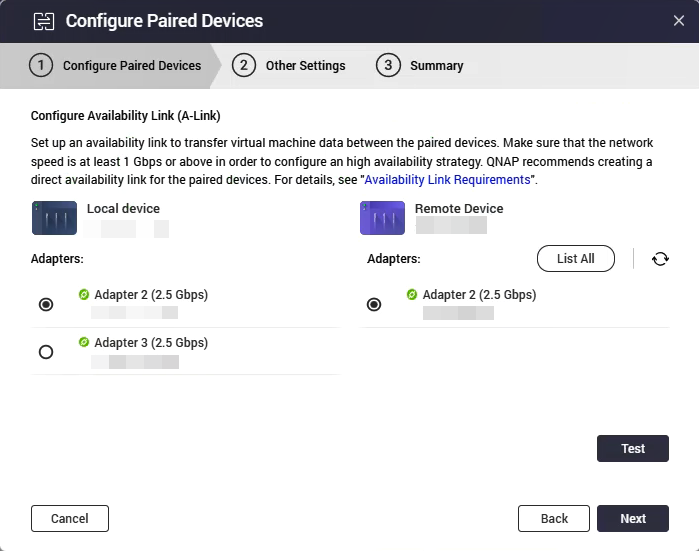
- Select the A-link adapters for the local and remote device.
Note
Click List All to view all the adapters linked to the local or remote device.
- Click Test.
Virtualization Station tests the A-link connectivity. - Click Next.
The Configure VM Network Settings window appears. - Configure the VM network settings for the paired devices.
- Click Add.
The Pairing VM Networks window appears.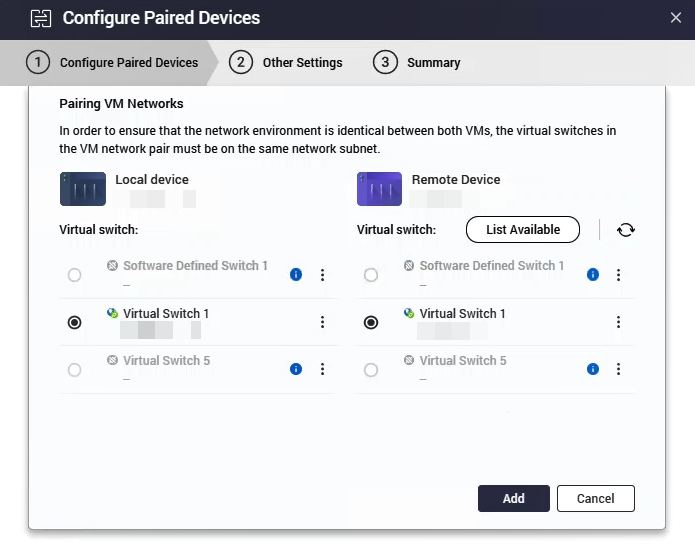
- Select the virtual switches for the local and remote devices.
Important
- The virtual switch or switches you select in this step determine which VMs can be protected by HA. Only VMs connected to the selected virtual switches will be available for selection.
- The wizard filters out incompatible virtual switches automatically. This includes switches that are not linked to a physical network adapter, reserved for system use (such as Docker or LXD), or configured with NAT or DHCP server functions.
If a virtual switch is missing from the list, review its settings in Network & Virtual Switch.
- Click Add.
Virtualization Station adds the virtual switches to the paired devices.
- Click Next.
The Other Settings window appears. - Configure the failover policy settings.
For details, see Configuring Failover Policy Settings. - Click Next.
- Review the settings.
- Click Finish.
Virtualization Station creates the HA device pair.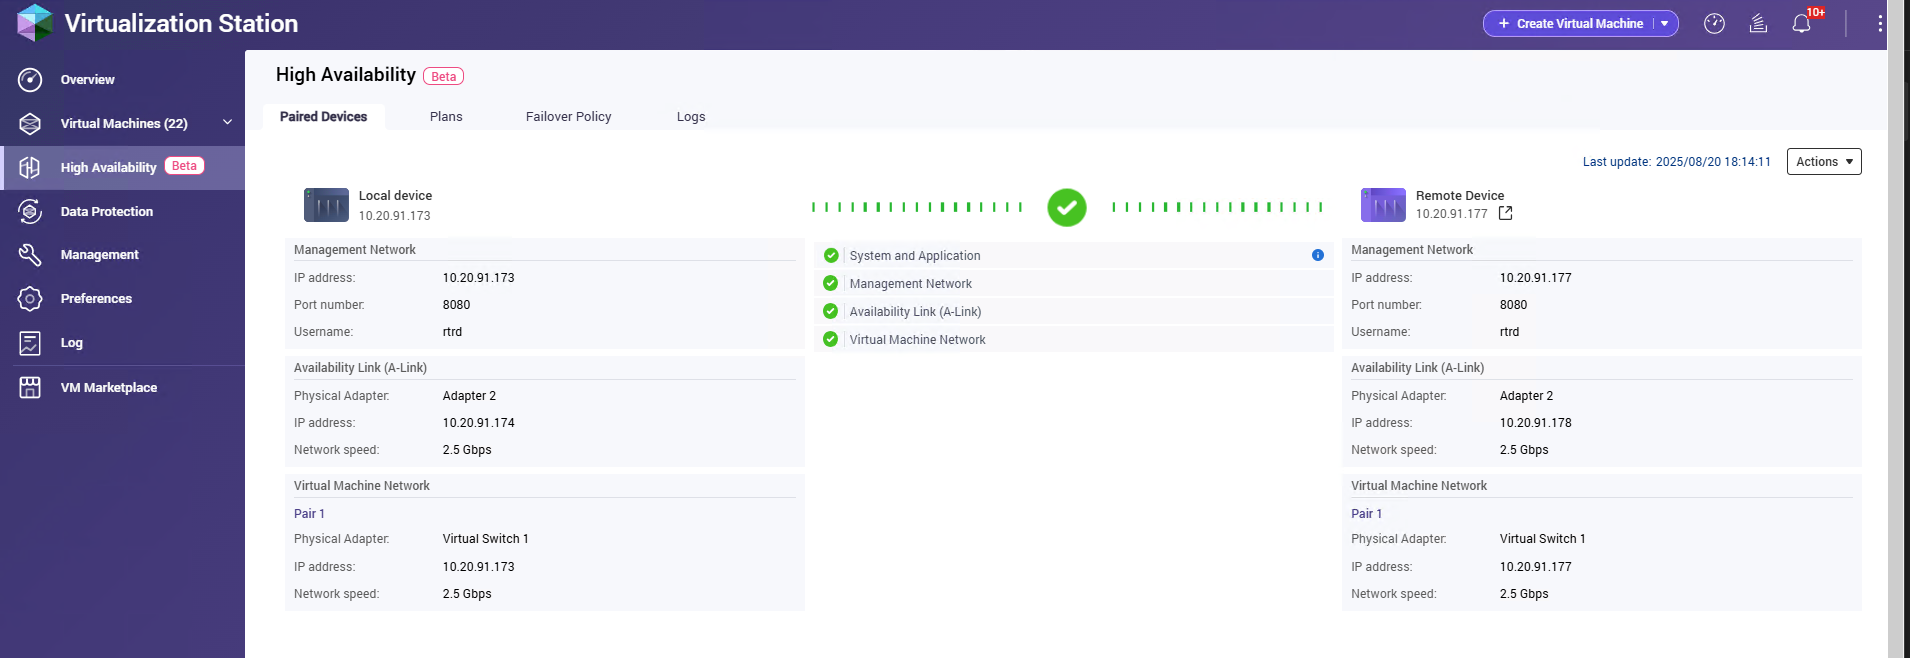
Tip
To manage the configured VMHA device pair, go to High Availability > Paired Devices.
- Go to Actions > Edit Paired Devices to update the configuration.
- Go to Actions > Unpair Paired Devices to remove the pairing.
Configure an HA Availability Group or Plan
Note
The Beta version of Virtualization Station 4.0 allows each NAS to create up to two HA availability groups, with each group limited to a single virtual machine.
- Log in to your local NAS.
- Open Virtualization Station.
- Next to Create Virtual Machine, click
 .
. - Click Create Availability Group.
The Availability Groups window appears. - Click Start.
The Create Availability Group window appears. - Select the synchronization direction.
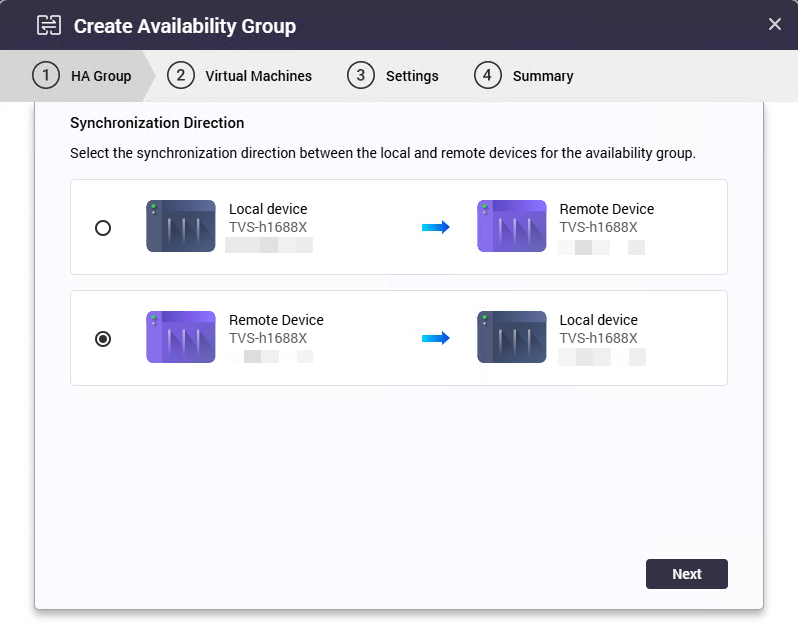
Note
The synchronization direction defines which NAS acts as the source and which NAS receives the VM data as a high-availability backup. The list of virtual machines displayed during the selection step depends on the chosen source NAS.
- Click Next.
- Configure the HA group settings.
- Specify an HA group name.
Note
A shared folder with the same name as the HA protection group is created in the selected storage pool on both the local and remote NAS devices. Ensure that the folder name is unique on each device to prevent naming conflicts.
Warning
Do not rename this folder for any VM that is already protected, as this may cause unexpected issues.
- Select the source device storage pool.
- Select the destination device storage pool.
- Specify the allocated quota for shared folder.
Note
Click Use Available Pool Capacity to automatically assign the smaller of the available capacities from the selected local and remote storage pools.
- Click Create.
The High Availability (HA) Group Configuration window appears. - Verify the configured group settings.
- Click Next.
The Virtual Machines window appears.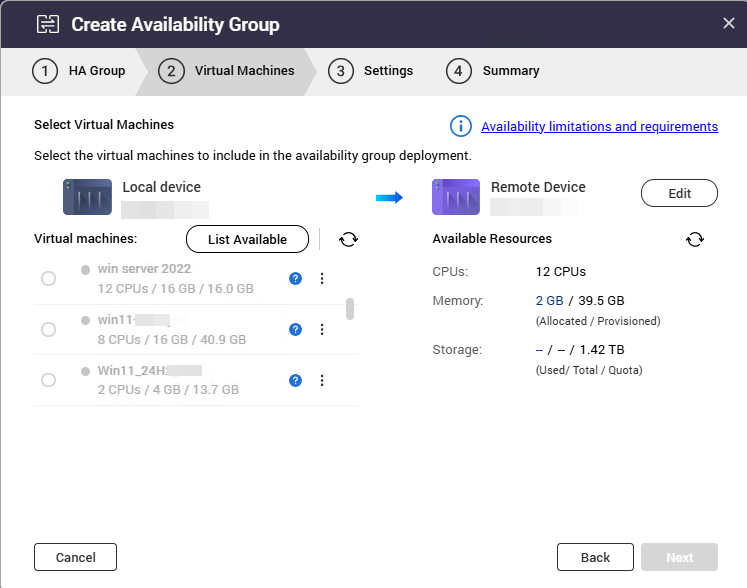
- Under the source device (local or remote device), click List Available.
- Select one or more virtual machines to include in the VMHA deployment.
- Click Next.
The Settings window opens. - Optional: Select Automatically resume the plan.
This option automatically restarts the HA plan after a reboot or interruption. - Click Next.
The Summary window opens. - Review the HA group settings.
- Click Create.
Virtualization Station creates the HA availability group.
Configure Failover Policy Settings
- Open Virtualization Station.
- Go to High Availability > Failover Policy.
- Configure the monitoring interval. This defines how frequently the system checks for failover conditions.
- Optional: Under Triggered Events, select the conditions that should trigger a failover. You can configure the following settings:
- Backup power mode: Initiates failover when the device runs on an Uninterruptible Power Supply (UPS).
- PSU redundancy loss: Initiates failover when the redundant power supply unit is disconnected or malfunctioning.
- System fan failure: Initiates failover when a system fan is not functioning properly.
- CPU load average exceeds threshold: Initiates failover when average CPU usage exceeds a defined percentage over a set duration.
- Memory load average exceeds threshold: Initiates failover when average memory usage exceeds a defined percentage over a set duration.
- Disk health error: Initiates failover when a virtual machine disk experiences a health issue or when a shared folder volume encounters an error.
- Network virtual switch error: Initiates failover when the virtual switch encounters a network-related error.
- Click Apply.
Virtualization Station saves and applies the failover policy settings to all the VMHA availability groups.
VMHA Monitoring, Troubleshooting, and Diagnostics
Monitor and Manage VMHA Groups
You can view the status of all VMHA groups, perform actions such as pause, resume, edit, or delete, and monitor synchronization progress and resource usage across both NAS devices.
Perform VMHA Actions
After an HA protection group is created, you can monitor and manage its status from the High Availability > Plans page.
- Open Virtualization Station.
- Go to High Availability > Plans.
- Under Action, click
 .
. - Identify a VMHA group or plan.
- Perform any of the following VMHA plan tasks.
| Task | Description |
|---|
| Switchover | Switches VMs between two NAS devices while keeping them online and operational, without requiring a reboot or suspension. |
| Pause | Temporarily suspends VMHA synchronization and failover protection for the HA group. |
| Delete | Removes the VMHA group and disables protection for the associated VM. |
| Resume | Restarts VMHA synchronization and failover monitoring for the group. |
| Edit | Opens the VMHA group settings for configuration changes. |
Note
If the Virtualization Station versions on the two NAS devices become inconsistent, a warning banner will appear on this page. All HA protection groups will be automatically paused until version consistency is restored.
Status Descriptions
| Status | Description |
|---|
Normal | The VMHA group is operating normally with no issues. |
Syncing | Initial or scheduled synchronization is in progress between the source and destination NAS. |
Pause | Synchronization is temporarily halted. The availability group is not actively syncing, but its configuration is preserved. Note This state can occur automatically if Virtualization Station is stopped or the NAS is shut down. |
Warning | VMHA protection is still active, but one or more issues may affect failover. Review and address the underlying causes promptly. |
Error | One or more critical failures have occurred. The VMHA group is no longer functioning correctly and requires immediate attention. |
Diagnose and Troubleshoot Common VMHA Conditions
To ensure stable and reliable HA operation, monitor system conditions and avoid configuration changes that may affect failover readiness.
Common Warning Conditions
| Warning | Description | Impact |
|---|
| Insufficient memory on the destination NAS | The available memory on the destination NAS is not enough to start the protected VM during a failover. | Failover will fail unless memory resources are increased or freed. |
| Degraded availability link | The availability link throughput has dropped below 50 Mbps or latency has exceeded 1 millisecond. | Reduced sync performance and increased recovery point objective (RPO). |
| Device pair configuration issues | Misconfigurations such as unstable management links or subnet mismatches between paired Virtual Switches. | Failover reliability may be compromised if not corrected. |
Warning
Do not modify or delete any virtual switch that is part of a VMHA pair. Changing or removing a paired virtual switch will result in a loss of network connectivity for the protected VM after failover and may cause the HA group to enter an error state.
Troubleshoot VMHA Group Issues
| Issue | Recommendation |
|---|
| Virtualization Station version mismatch | Ensure both NAS devices are running the same version of Virtualization Station. Check App Center for updates. Restart the app if needed. |
| Insufficient CPU or memory on source or destination NAS | Check system resource usage on both the source and destination NAS. Failover may fail if either system lacks sufficient CPU or memory to complete the process. Shut down unused VMs or services to free up resources. If necessary, consider upgrading the system memory. |
| Slow synchronization speeds or high latency | Use a direct network cable between NAS devices, or assign the availability link to a dedicated, high-speed subnet. |
| Virtual switch pairing errors | Open Network & Virtual Switch and confirm both switches are on the same subnet and have no conflicting settings (e.g., NAT or DHCP). |
| Cluster fails to create or join | Ensure both NAS devices are not already members of another Hero HA or VMHA cluster. Unpair any existing clusters before proceeding. |
Manage VMHA Logs
You can view and download VMHA-related logs to assist with troubleshooting, auditing, or verifying the system’s failover behavior. These logs provide detailed records of synchronization events, status changes, and system alerts, helping administrators diagnose issues and maintain operational visibility.
- Open Virtualization Station.
- Go to High Availability > Logs.
- Perform any of the following tasks.
- Search logs: Enter keywords in the search bar to filter log entries by event type, VM name, or timestamp.
- Download logs: Click Save under Actions to export the current VMHA log data as a CSV file for offline analysis or support.
Further Reading
适用产品
- QuTS hero h5.3.0 or later
- Virtualization Station 4.0 Beta or later
简介
VM 高可用性 (VMHA) 是 Virtualization Station 中的一项功能,能够在两个 QNAP NAS 设备之间自动进行虚拟机的故障转移。它通过减少停机时间来帮助确保在硬件故障时服务的连续性。
本教程将指导您完成整个设置过程,包括准备环境、创建 VMHA 设备对、创建和管理 VMHA 组、配置故障转移以及解决常见问题。
VMHA 要求
系统要求
| 组件 | 要求 |
|---|
| 操作系统 | 两个 NAS 设备上均需运行 QuTS hero h5.3.0 或更高版本。 注意 为了获得良好的兼容性,建议使用运行相同版本 QuTS hero 的 NAS 设备。 |
| 处理器 | 两个 NAS 设备必须使用来自同一供应商的 CPU(例如 Intel® 或 AMD®)。 |
| 内存 | 目标 NAS 必须有足够的内存来运行源 NAS 在故障转移期间迁移的虚拟机。 |
| 存储 | 两个 NAS 设备必须有足够的空间供 Virtualization Station 创建共享文件夹以存储 VMHA 磁盘映像。磁盘映像必须仅存储在 NAS 的内部存储上,不能使用外部存储。 |
网络要求
| 组件 | 要求 |
|---|
| 网络连接 | 需要在两个 NAS 设备之间至少有两个独立的网络连接。
这些连接必须在不同的子网中:一个用于管理链接,一个用于可用性链接(用于数据同步)。 |
| IP 地址 | 所有用于 HA 的接口必须使用静态 IPv4 地址。IPv6 和 VLAN 设置必须禁用。 |
| 防火墙端口 | 如果使用防火墙,请确保在两个 NAS 设备之间打开 TCP 端口 16500-16550 以允许 HA 通信。
有关 QNAP 系统使用的服务端口的完整列表,请参见QTS、QuTS hero 和 QuTScloud 系统使用的网络端口。 |
| 可用性链接 | 强烈建议网络速度至少为 2.5 Gbps,因为链接速度直接影响 VM 性能。为了获得更好的性能,建议在 NAS 设备之间使用直接以太网连接,尽量避免使用交换机。 |
| SSH 服务 | 必须在两个 NAS 设备上启用 SSH 服务。详情请参见配置 SSH 连接中的QuTS hero 用户指南。 |
预配置要求
- 使用网络与虚拟交换机在两个 NAS 设备上配置兼容的虚拟交换机。虽然虚拟交换机名称不需要匹配,但接口分配和网络设置必须一致。详情请参见虚拟交换机配置中的QuTS hero 用户指南。
- 确保两个 NAS 设备运行相同版本的 QuTS hero。如果固件版本不同,VMHA 可能无法按预期运行。要更新 NAS 固件,请参见固件更新中的QuTS hero 用户指南。
- 配置两个 NAS 设备使用相同的 NTP 服务器进行时间同步。详情请参见配置时间设置中的QuTS hero 用户指南。
- 如果使用防火墙或 NAT,请确保所需端口已开放或转发。
警告
- 如果任何 NAS 是 Hero HA 群集的一部分,则无法启用 VMHA。在继续之前,请确保通过解除现有 Hero HA 配置将两个设备设置为独立模式。
- 两个 NAS 设备必须运行相同版本的 Virtualization Station。如果版本不同,例如系统或应用更新后,所有 HA 保护组将自动暂停,直到版本一致性恢复。
步骤
设置虚拟机高可用性(VMHA)涉及三个主要步骤,以确保当源 NAS 不可用时,您的虚拟机仍然可以正常运行。
- 创建 HA 设备对:连接两个 NAS 设备以形成高可用性组。此步骤仅配对两个 NAS 设备,包括验证要求、配置网络连接以进行同步以及绑定 VM 使用的虚拟交换机。它不包括未来 VM 的 HA 同步方向。
- 创建 HA 可用性组:定义要保护的虚拟机,设置同步方向,并在两个 NAS 设备上分配存储。此组管理 VM 的备份和恢复过程。
- 配置故障切换策略:指定将自动触发故障转移的条件,例如硬件问题或资源使用率高。
完成这些步骤可确保选定的虚拟机在发生故障时能够自动在目标 NAS 上重新启动,较大限度地减少服务中断。
创建 HA 设备对
- 在本地 NAS 上打开虚拟化。
- 前往高可用性。
- 点击配置配对设备。
打开配置配对设备以确保 VM 可用性向导。 - 点击开始。
- 查看配对设备的要求。
- 点击下一步。
- 配置本地设备设置。
重要
如果使用直接物理连接(例如两台 NAS 设备之间的专用以太网线),请勿选择适配器来配置 M -link(管理链接)。在这种情况下分配 IP 地址可能会导致 Virtualization Station 报告连接错误。
- 指定本地设备的 IP 地址。
- 指定设备端口号。
- 可选:选择使用 SSL 连接。
- 指定设备用户名。
- 指定设备密码。
- 点击下一步。
- 配置远程设备设置。
- 指定远程设备的 IP 地址。
- 指定设备端口号。
- 可选:选择使用 SSL 连接。
- 指定设备用户名。
- 指定设备密码。
- 可选:点击测试。
Virtualization Station 测试本地和远程设备连接。
- 点击下一步。
出现配置配对设备及其凭据窗口。 - 查看本地和远程设备设置。
- 点击下一步。
出现配置可用性链接(A-Link)窗口。 - 选择本地和远程设备的 A -link 适配器。
注意
点击列出所有 以查看链接到本地或远程设备的所有适配器。
- 点击测试。
Virtualization Station 测试 A -link 连接性。 - 点击下一步。
出现配置 VM 网络设置窗口。 - 配置配对设备的 VM 网络设置。
- 点击添加。
出现配对 VM 网络窗口。 - 选择本地和远程设备的虚拟交换机。
重要
- 您在此步骤中选择的虚拟交换机决定了哪些 VM 可以由 HA 保护。只有连接到所选虚拟交换机的 VM 才可供选择。
- 向导会自动过滤掉不兼容的虚拟交换机。这包括未连接到物理网络适配器的交换机、保留用于系统使用的交换机(如 Docker 或 LXD),或配置了 NAT 或 DHCP 服务器功能的交换机。
如果列表中缺少虚拟交换机,请在网络与虚拟交换机中查看其设置。
- 点击添加。
Virtualization Station 将虚拟交换机添加到配对设备中。
- 点击下一步。
出现其他设置窗口。 - 配置故障转移策略设置。
详情请参见配置故障切换策略设置。 - 点击下一步。
- 查看设置。
- 点击完成。
Virtualization Station 创建 HA 设备对。
提示
要管理配置的 VMHA 设备对,请前往高可用性>配对设备。
- 前往操作 >编辑配对设备以更新配置。
- 前往操作 >取消配对设备以移除配对。
配置 HA 可用性组或计划
注意
Virtualization Station 4.0 的测试版允许每个 NAS 创建较多两个 HA 可用性组,每个组仅限于一个虚拟机。
- 登录到您的本地 NAS。
- 打开Virtualization Station。
- 在创建虚拟机旁边,点击。
- 点击创建可用性组。
可用性组窗口出现。 - 点击开始。
创建可用性组窗口出现。 - 选择同步方向。
注意
同步方向定义哪个 NAS 作为源,哪个 NAS 接收虚拟机数据作为高可用性备份。在选择步骤中显示的虚拟机列表取决于所选的源 NAS。
- 点击下一步。
- 配置 HA 组设置。
- 指定一个 HA 组名称。
注意
在本地和远程 NAS 设备上选定的存储池中创建一个与 HA 保护组同名的共享文件夹。确保每个设备上的文件夹名称是稀有的,以防止命名冲突。
警告
不要重命名任何已受保护的虚拟机的文件夹,否则可能会导致意外问题。
- 选择源设备存储池。
- 选择目标设备存储池。
- 指定共享文件夹的分配配额。
注意
点击使用可用池容量自动分配所选本地和远程存储池中较小的可用容量。
- 点击创建。
高可用性 (HA) 组配置窗口出现。 - 验证配置的组设置。
- 点击下一步。
虚拟机窗口出现。 - 在源设备(本地或远程设备)下,点击列出可用项。
- 选择一个或多个虚拟机以包含在 VMHA 部署中。
- 点击下一步。
设置窗口打开。 - 可选:选择自动恢复计划。
此选项在重启或中断后自动重新启动 HA 计划。 - 点击下一步。
摘要窗口打开。 - 查看 HA 组设置。
- 点击创建。
Virtualization Station 创建 HA 可用性组。
配置故障转移策略设置
- 打开 Virtualization Station。
- 前往高可用性>故障转移策略。
- 配置监控间隔。这定义了系统检查故障转移条件的频率。
- 可选:在触发事件中,选择应触发故障转移的条件。您可以配置以下设置:
- 备用电源模式:当设备运行在不间断电源(UPS)上时启动故障转移。
- 电源冗余丢失:当冗余电源单元断开或故障时启动故障转移。
- 系统风扇故障:当系统风扇无法正常工作时启动故障转移。
- CPU 负载平均值超过阈值:当平均 CPU 使用率在设定时间内超过定义的百分比时启动故障转移。
- 内存负载平均值超过阈值:当平均内存使用率在设定时间内超过定义的百分比时启动故障转移。
- 磁盘健康错误: 当虚拟机磁盘出现健康问题或共享文件夹卷遇到错误时,启动故障转移。
- 网络虚拟交换机错误: 当虚拟交换机遇到网络相关错误时,启动故障转移。
- 点击应用。
Virtualization Station 保存并应用故障转移策略设置到所有 VMHA 可用性组。
VMHA 监控、故障排除和诊断
监控和管理 VMHA 组
您可以查看所有 VMHA 组的状态,执行暂停、恢复、编辑或删除等操作,并监控同步进度和跨两个 NAS 设备的资源使用情况。
执行 VMHA 操作
创建 HA 保护组后,您可以在高可用性 > 计划页面监控和管理其状态。
- 打开 Virtualization Station。
- 前往高可用性>计划。
- 在操作中,点击。
- 识别一个 VMHA 组或计划。
- 执行以下任何 VMHA 计划任务。
| 任务 | 描述 |
|---|
| 切换 | 在两个 NAS 设备之间切换虚拟机,同时保持在线和运行,无需重启或暂停。 |
| 暂停 | 暂时暂停 VMHA 同步和 HA 组的故障转移保护。 |
| 删除 | 移除 VMHA 组并禁用关联虚拟机的保护。 |
| 恢复 | 重新启动 VMHA 同步和组的故障转移监控。 |
| 编辑 | 打开 VMHA 组设置以进行配置更改。 |
注意
如果两个 NAS 设备上的 Virtualization Station 版本不一致,此页面将出现警告横幅。所有 HA 保护组将自动暂停,直到版本一致性恢复。
状态描述
| 状态 | 描述 |
|---|
正常 | VMHA 组正常运行,没有问题。 |
同步中 | 源和目标 NAS 之间正在进行初始或计划的同步。 |
暂停 | 同步暂时停止。可用性组未主动同步,但其配置已保存。 注意 如果 Virtualization Station 停止或 NAS 关闭,此状态可能会自动发生。 |
警告 | VMHA 保护仍然有效,但一个或多个问题可能影响故障转移。请及时检查并解决潜在原因。 |
错误 | 发生一个或多个严重故障。VMHA 组不再正常运行,需要立即关注。 |
诊断和排除常见 VMHA 状况
为了确保稳定可靠的 HA 操作,请监控系统状况并避免可能影响故障转移准备的配置更改。
常见警告状况
| 警告 | 描述 | 影响 |
|---|
| 目标 NAS 内存不足 | 目标 NAS 上的可用内存不足以在故障转移期间启动受保护的虚拟机。 | 除非增加或释放内存资源,否则故障转移将会失败。 |
| 可用性链接降级 | 可用性链接吞吐量已降至 50 Mbps 以下或延迟超过 1 毫秒。 | 同步性能降低,恢复点目标(RPO)增加。 |
| 设备对配置问题 | 配置错误,例如不稳定的管理链接或配对虚拟交换机之间的子网不匹配。 | 如果不纠正,故障转移的可靠性可能会受到影响。 |
警告
不要修改或删除任何属于 VMHA 对的虚拟交换机。更改或移除配对的虚拟交换机将在故障转移后导致受保护虚拟机的网络连接丢失,并可能导致 HA 组进入错误状态。
故障排除 VMHA 组问题
| 问题 | 建议 |
|---|
| Virtualization Station 版本不匹配 | 确保两个 NAS 设备运行相同版本的 Virtualization Station。检查 App Center 以获取更新。如有必要,重启应用程序。 |
| 源或目标 NAS 的 CPU 或内存不足 | 检查源和目标 NAS 上的系统资源使用情况。如果任一系统缺乏足够的 CPU 或内存来完成故障转移,可能会失败。关闭未使用的虚拟机或服务以释放资源。如有必要,考虑升级系统内存。 |
| 同步速度慢或延迟高 | 在 NAS 设备之间使用直接网络电缆,或将可用性链接分配给专用的高速子网。 |
| 虚拟交换机配对错误 | 打开网络与虚拟交换机,确认两个交换机在同一子网且没有冲突设置(例如 NAT 或 DHCP)。 |
| 群集创建或加入失败 | 确保两个 NAS 设备尚未是另一个 Hero HA 或 VMHA 群集的成员。在继续之前,解除任何现有的群集配对。 |
管理 VMHA 日志
您可以查看和下载与 VMHA 相关的日志,以协助故障排除、审计或验证系统的故障转移行为。这些日志提供了同步事件、状态变化和系统警报的详细记录,帮助管理员诊断问题并保持操作可见性。
- 打开 Virtualization Station。
- 前往高可用性>日志。
- 执行以下任一任务。
- 搜索日志:在搜索栏中输入关键字,以事件类型、虚拟机名称或时间戳过滤日志条目。
- 下载日志:点击保存在操作下,将当前 VMHA 日志数据导出为 CSV 文件,以便离线分析或支持。
进一步阅读


