NAS Recovery Guide for x86-based NAS
Applicable Models
- TS-251B, TS-251D, TS-451D, TS-451D2, TS-551
- TS-253B, TS-453B, TS-653B, TS-253Be, TS-453Be, TS-453BT3, TS-453BU, TS-853BU, TS-1253BU
- TS-453U, TS-853U, TS-1253U, TS-251A, TS-451A, TBS-453A, TBS-453DX, HS-453DX, TS-253D, TS-453D, TS-453DU, TS-653D, TS-253A, TS-453A, TS-653A, TS-853A, TS-453E, TS-253E
- TS-262, TS-462, TS-264, TS-364, TS-464, TS-664, HS-264, TS-262C, TS-462C, TS-464C, TS-464C2, TS-564
- TS-466C
- TVS-463, TVS-663, TVS-863
- TS-464U, TS-1264U-RP
- TBS-464
- TVS-471, TVS-671, TVS-871, TVS-871T, TVS-471U, TVS-871U, TVS-1271U
- TVS-672N, TVS-872N, TVS-672X, TVS-872X, TVS-472XT, TVS-672XT, TVS-872XT, TVS-872XU, TVS-972XU, TVS-1272XU, TVS-1672XU
- TVS-473, TVS-673, TVS-873, TVS-675, TS-873U, TS-1273U, TS-1673U
- TVS-h474, TVS-h674, TVS-h874
- TBS-h574TX
- TS-677, TS-877, TS-1277, TS-877XU, TS-977XU, TS-1277XU, TS-1677XU, TS-2477XU, TS-h1277XU, TS-h1677XU, TS-h2477XU
- TS-1685
- TVS-ECx80, TVS-ECx80+ series, TVS-ECx80U Series
- TVS-682, TVS-882, TVS-1282, TVS-682T, TVS-882T, TVS-1282T, TVS-882ST2, TVS-882ST3, TVS-882BR, TVS-882BRT3, TVS-951X, TVS-1282T3, TVS-1582TU, TS-883XU, TS-983XU, TS-1283XU, TS-1683XU, TS-2483XU, TS-h1283XU
- TDS-16489U
- TDS-16489U R2
- TES-1885U, TES-3085U
- TVS-h1288X, TVS-h1688X, TS-h3088XU, TS-h1886XU-RP_R2
- TS-h987XU, TS-h1887XU, TS-h2287XU
- TS-h3087XU
Overview
This FAQ explains how to manually recover your NAS if it fails to start up. This FAQ only applies to the NAS models listed above.
NAS Recovery Requirements
To recover the NAS, you will need the following:
- An empty USB drive of at least 4 GB capacity
- A USB keyboard
- An HDMI cable, or a VGA cable
- A Windows PC
- A monitor
Recovering the NAS
You can recover your NAS by first creating a boot disk to restore basic NAS functionality and then updating the firmware with Qfinder Pro. If any part of the recovery process fails, see Further Troubleshooting below. To recover the NAS, perform the following steps:
Prepare the NAS and verify the state of the DOM
- Power off the NAS.
- Remove all drive trays.
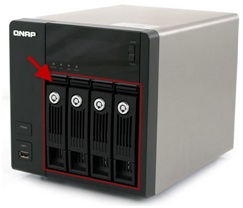
- Connect the USB keyboard to a USB port on the NAS.
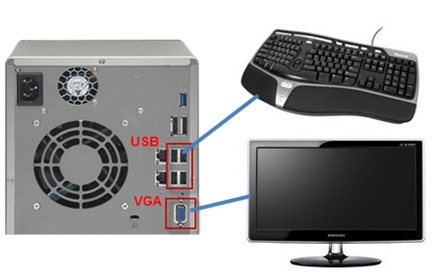
- If the NAS has a VGA or HDMI port, connect the NAS to a monitor with a corresponding HDMI or VGA Cable.
- If the NAS does not have either a VGA or HDMI port but does have a console port, then connect the NAS to a monitor via the console port. For details see, How do I enter BIOS and Console with 3.5mm Console port?
- Power on the NAS
BIOS information is displayed including the version and release date of the BIOS.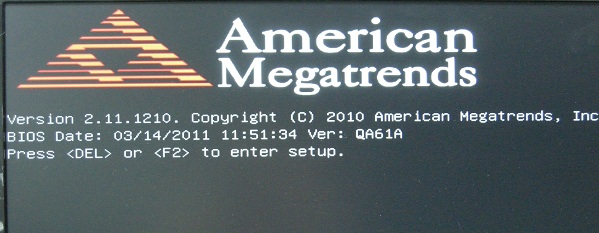
- Wait until the DOM (Disk-on-module) starts up.
If the DOM fails to start up completely, then the DOM data has been corrupted and you can continue following this guide to recover the NAS.
Create a USB boot drive
- Download Rufus.
- Download and install the version of Clonezilla that corresponds to the NAS model:
NAS Model Clonezilla - HS-453DX, TS-251D, TS-451D, TS-451D2, TS-551
- TS-253D, TS-453D, TS-453DU, TS-653D, TS-453E, TS-253E
- TS-251B, TS-253B, TS-453B, TS-653B, TS-253Be, TS-453Be, TS-453BT3
- TVS-675, TS-677, TS-877, TVS-951X, TS-1277
clonezilla-live-2.5.0-25-amd64.iso - TS-x77 Series, TS-x77XU Series, TS-h1277XU, TS-h1677XU, TS-h2477XU
- TS-x83XU Series, TS-h1283XU
- TS-1685, TES-1885U, TES-3085U
- TS-h987XU, TS-h1887XU, TS-h2287XU, TS-h3087XU
clonezilla-live-2.5.0-25-amd64_console.iso - TS-hx88X Series, TS-h3088XU
clonezilla-live-2.7.1-22-amd64.zip - TS-262, TS-462, TS-662, TS-264, TS-364, TS-464, TS-664, TS-464U, TS-1264U-RP
- TS-262C, TS-462C, TS-464C, TS-464C2, TS-564
- TS-466C
- TBS-464
- TVS-h474, TVS-h674, TVS-h874
- TBS-h574TX
clonezilla-live-20221103-kinetic-amd64.iso - TS-453BU, TS-853BU, TS-1253BU
- TS-453U, TS-853U, TS-1253U, TS-251A, TS-451A, TBS-453A, HS-453DX, TS-253A, TS-453A, TS-653A, TS-853A
- TVS-463, TVS-663, TVS-863
- TVS-471, TVS-671, TVS-871, TVS-871T, TVS-471U, TVS-871U, TVS-1271U
- TVS-672N, TVS-872N, TVS-672X, TVS-872X, TVS-472XT, TVS-672XT, TVS-872XT, TVS-872XU, TVS-972XU, TVS-1272XU, TVS-1672XU
- TVS-473, TVS-673, TVS-873, TVS-675, TS-873U, TS-1273U, TS-1673U
- TVS-ECx80 / TVS-ECx80+ series, TVS-ECx80U Series
- TVS-682, TVS-882, TVS-1282, TVS-682T, TVS-882T, TVS-1282T, TVS-882ST2, TVS-882ST3, TVS-882BR, TVS-882BRT3, TVS-1282T3, TVS-1582TU
- TDS-16489U
- TDS-16489U R2
- TS-h1886XU-RP_R2
clonezilla-live-2.4.2-10-amd64.iso - Format the USB flash drive as FAT32:
- Open File Explorer.
- Go to My Computer.
- Locate the USB flash drive.
- Right click the USB flash drive icon.
A context menu appears. - Click Format.
The USB Format window appears. - Under File system, select Fat32.
- Click Start.
A confirmation window appears explaining that all data will be erased on the flash drive.WarningFormatting a USB flash drive will erase all its existing data. If you have data on the USB flash drive you want to preserve, copy the data to your PC first, then after formatting the USB flash drive, copy the data back.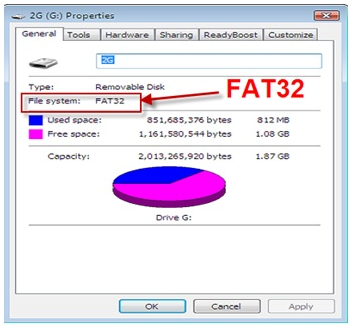
- Click OK.
The USB flash drive is formatted.
- Install Clonezilla on the USB drive:
- Open Refus.
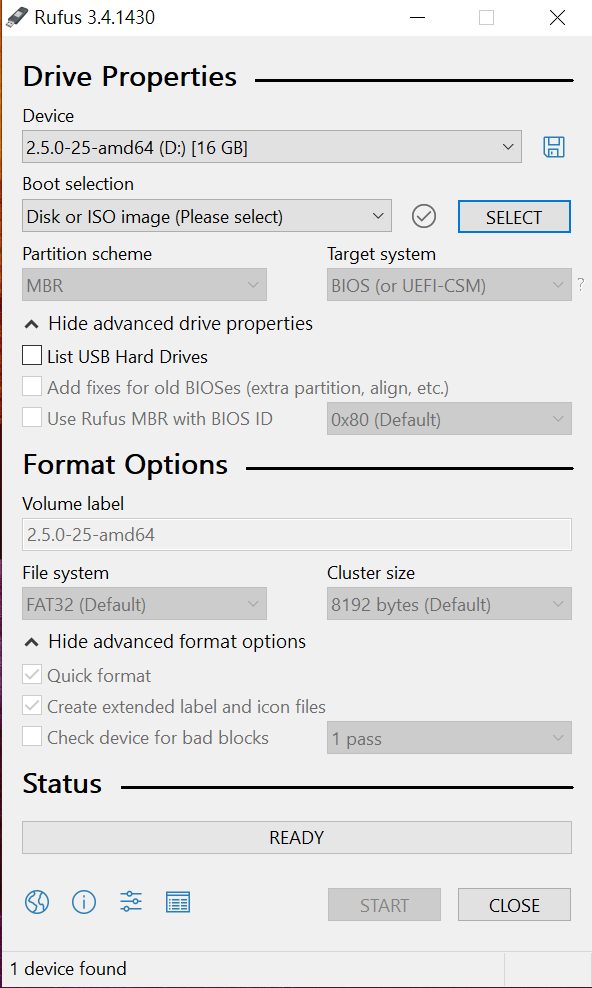
- Under Device, select the USB drive.
- Next to Boot selection, click Select.
- Select the downloaded Clonezilla ISO file.
- Click Open.
- Click Start.
Rufus installs Clonezilla onto the USB drive.
- Open Refus.
- Download one of the NAS system images below corresponding to the NAS model:
- TBS-h574TX
- TVS-h474, TVS-h674, TVS-h874
- TS-262, TS-462, TS-264, TS-364, TS-464, TS-664, HS-264, TS-262C, TS-462C, TS-464C, TS-464C2, TS-564
- TS-466C
- TS-464U
- TS-1264U-RP
- TBS-464
- TS-1685
- TS-677, TS-877, TS-1277
- TS-877XU, TS-977XU, TS-1277XU, TS-1677XU, TS-2477XU
- TS-h1277XU, TS-h1677XU, TS-h2477XU
- TS-251B
- TS-251D, TS-451D
- TS-451D2
- TS-551
- TS-253B, TS-453B, TS-653B, TS-253Be, TS-453Be, TS-453BT3
- TS-453BU, TS-853BU, TS-1253BU
- TS-453U, TS-853U, TS-1253U
- TS-251A, TS-451A
- TBS-453A
- TBS-453DX, HS-453DX
- TS-253D, TS-453D, TS-653D
- TS-453DU
- TS-253E, TS-453E
- TS-253A, TS-453A, TS-653A, TS-853A
- TVS-471, TVS-671, TVS-871
- TVS-871T
- TVS-471U, TVS-871U
- TVS-1271U
- TVS-463, TVS-663, TVS-863, TVS-863+
- TVS-472XT, TVS-672XT, TVS-872XT
- TVS-672N, TVS-872N, TVS-672X, TVS-872X
- TVS-675
- TVS-872XU, TVS-972XU, TVS-1272XU, TVS-1672XU
- TVS-473, TVS-673, TVS-873
- TVS-473e, TVS-673e, TVS-873e
- TS-873U, TS-1273U, TS-1673U
- TVS-ECx80, TVS-ECx80+ Series
- TVS-ECx80U Series
- TVS-682, TVS-882, TVS-1282
- TVS-682T, TVS-882T, TVS-1282T
- TVS-882ST2, TVS-882ST3
- TVS-882BR, TVS-882BRT3
- TVS-951X
- TVS-1282T3
- TS-883XU, TS-983XU, TS-1283XU-RP, TS-1683XU-RP, TS-2483XU-RP
- TS-h1283XU-RP
- TVS-1582TU
- TDS-16489U (QTS)
- TES-1885U, TES-3085U
- TVS-h1288X, TVS-h1688X
- TS-h3088XU
- TS-h1886XU-RP_R2
- TS-h987XU, TS-h1887XU, TS-h2287XU
- TS-h3087XU
- Rename the NAS sytem image file to "dom.img"
- Copy the NAS system image file to the root folder of USB drive.
Use the USB boot drive to recover the corrupted DOM
- Power off the NAS.
- Connect the USB boot drive to a USB port on the NAS.
- Power on the NAS.
- Press the delete key to enter the BIOS page when the enter setup prompt appears on the monitor connected to the NAS.
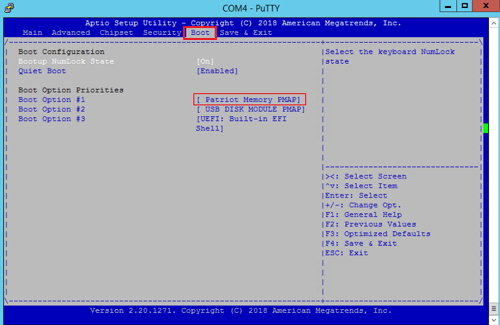
The BIOS page appears. - Use arrow keys to navigate to the Boot tab.
- Under Boot Option Priorities > Boot Option #1, specify your USB flash drive. If your NAS has UEFI-based BIOS (for example the HS-453DX, TVS-951X, TVS-h1288X, TVS-h1688X, or TS-h3088XU) then select the UEFI version of your USB flash drive.WarningDo not select USB DISK MODULE.
Selecting the UEFI version of your USB drive for UEFI-based BIOS: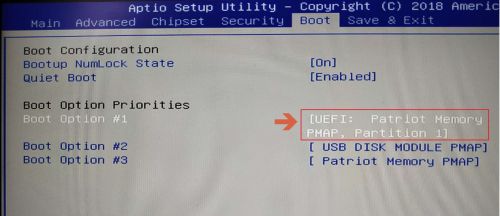
- Use the arrow keys to navigate to the Save & Exit tab.
- Under Save Options, select Save Changes and Exit and press enter.
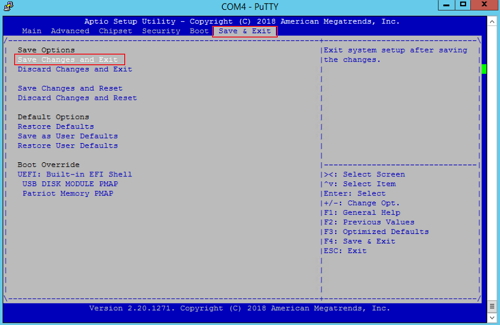
The NAS will start up using your USB drive, and the Clonezilla options page appears. - Select the Clonezilla boot option:
- If your monitor is connected to the NAS via a com port, then select Clonezilla Live (Serial Console).
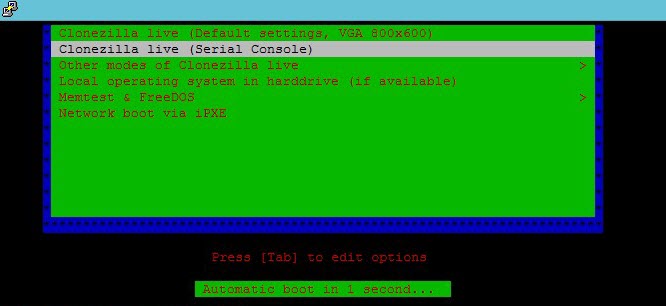
- If your monitor is connected to the NAS via an HDMI or VGA cable, then select Clonezilla Live (Default settings, VGA 800x600).
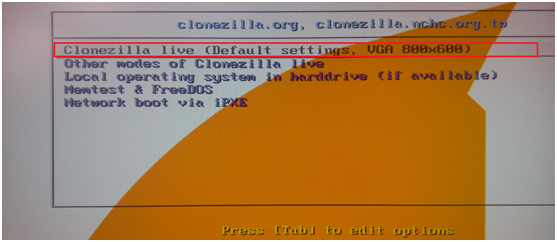
- If your monitor is connected to the NAS via a com port, then select Clonezilla Live (Serial Console).
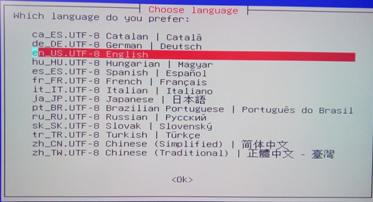
- If the Choose language page appears, select your language.
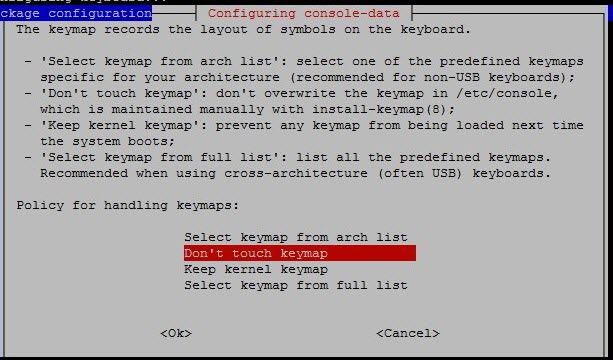
- If the Configuring console-data display page appears, select Don't touch keymap.
- When the Start Clonezilla page appears, select Enter_shell.
 The Chose mode page appears.
 - Select cmd.
 An Ubuntu terminal appears.
 - View NAS partitions by entering the following commands:
The partitions present depend on the NAS model:sudo su fdisk –l- TS-251A, TS-253E, TS-451A, TBS-453A, TS-551, TBS-453DX, HS-453DX, TS-262, TS-462, TS-662, TS-264, TS-464, TS-664, TS-464U, TS-1264U-RP, TS-x62C, TS-x64C, TBS-464:
Partition Description /dev/sda The USB boot device /dev/mmcblk0 The DOM (Disk On Module) 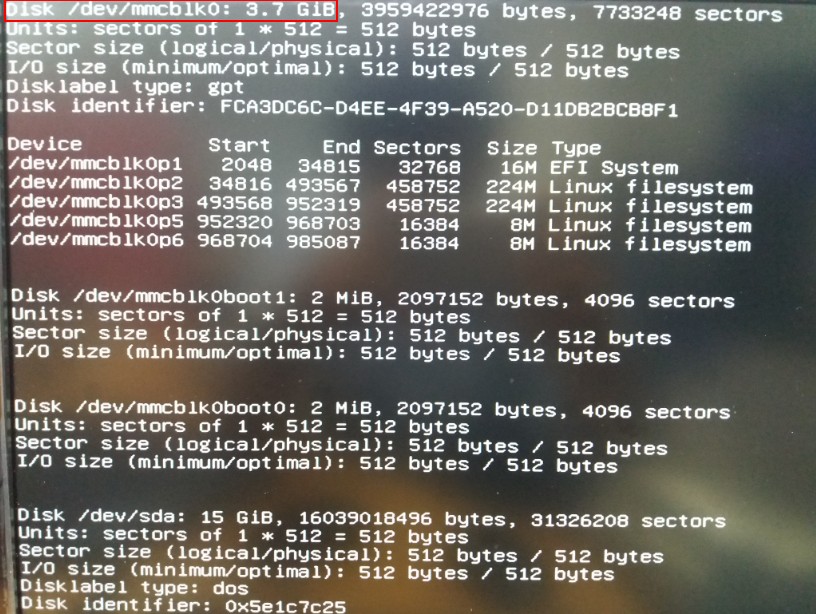
- TS-251B, TS-253B, TS-453B, TS-653B, TS-253Be, TS-453Be:
Partition Description /dev/sda The USB boot device /dev/mmcblk1 The DOM (Disk On Module) - All other NAS models:
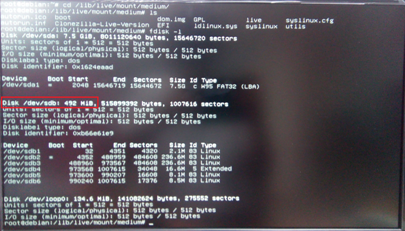
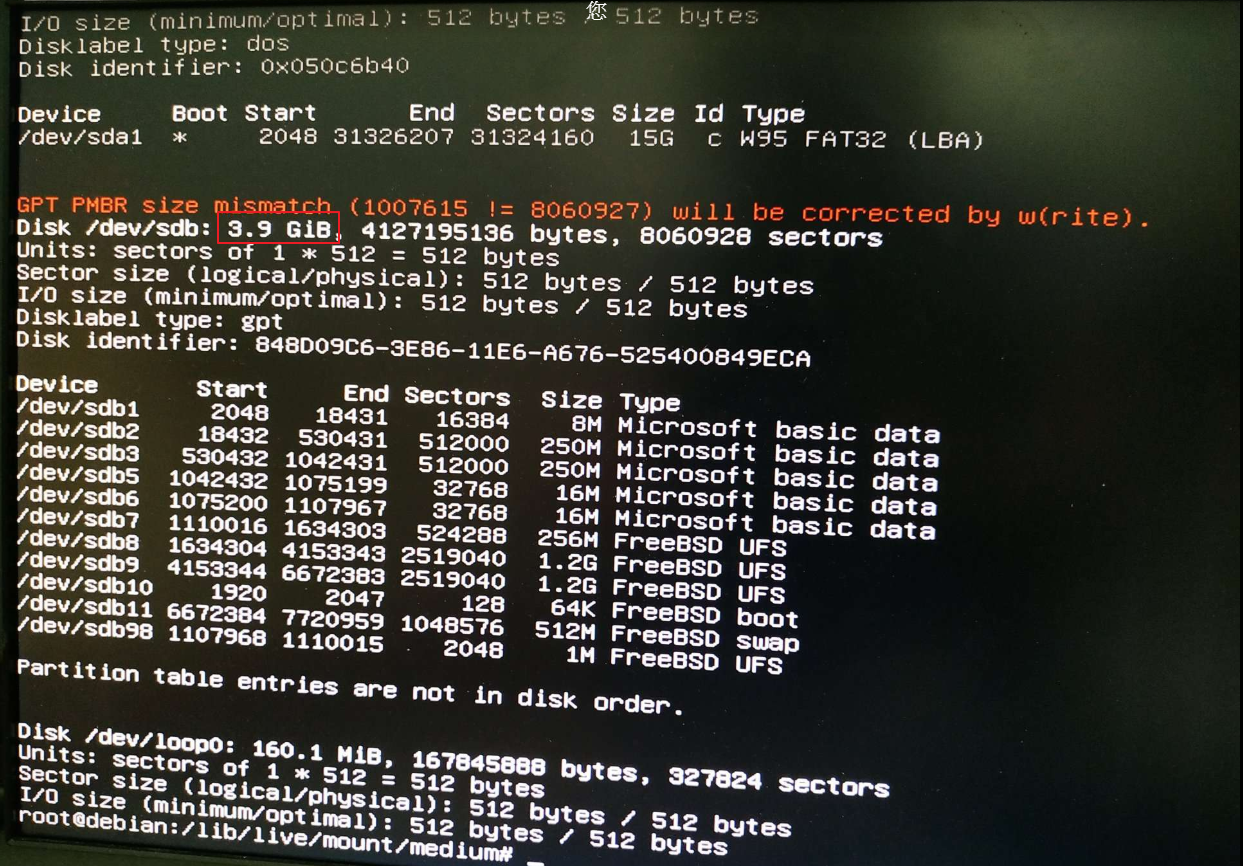
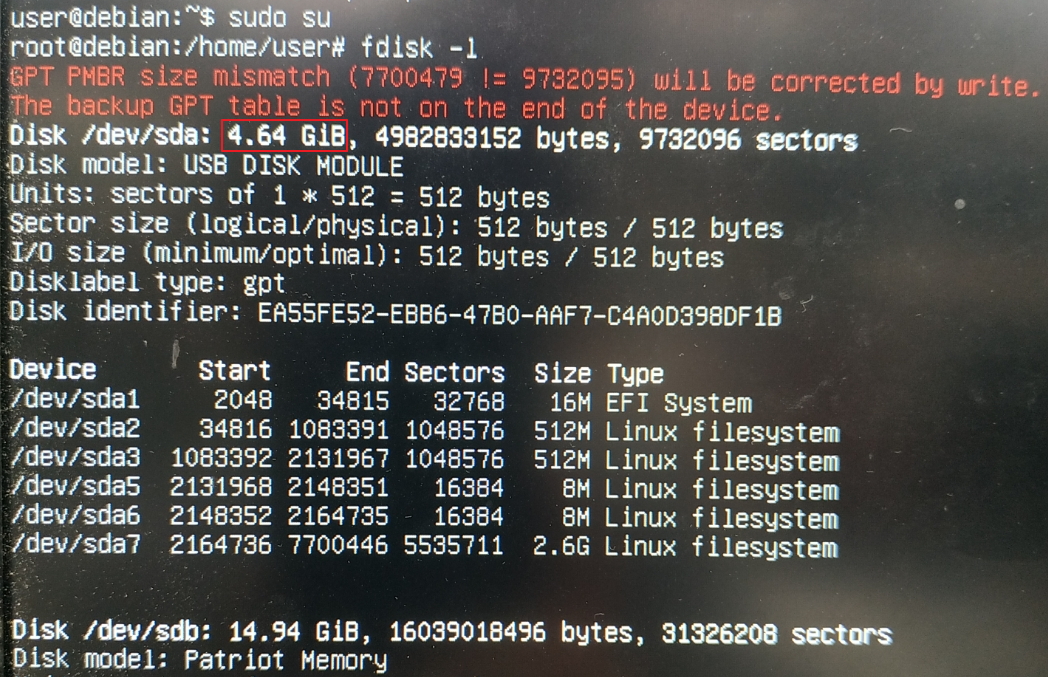
Partition Description /dev/sda The USB boot device /dev/sdb The DOM (Disk On Module) drive. The storage capacity of the DOM depends on the NAS model: - TDS-16489U R2 / TES-1885U / TES-3085U: 3.9 GB
- TVS-h1288X/TVS-h1688X/TS-h3088XU: 4.64 GB
- TVS-675: 4.7 GB
- All other models: 492 MB
- TS-251A, TS-253E, TS-451A, TBS-453A, TS-551, TBS-453DX, HS-453DX, TS-262, TS-462, TS-662, TS-264, TS-464, TS-664, TS-464U, TS-1264U-RP, TS-x62C, TS-x64C, TBS-464:
- Enter the following command:
cd /lib/live/mount/medium/ - Enter the following command depending on your NAS model:
- TS-251A, TS-253E, TS-451A, TBS-453A, TS-551, TBS-453DX, HS-453DX, TS-262, TS-462, TS-662, TS-264, TS-464, TS-664, TS-464U, TS-1264U-RP, TS-x62C, TS-x64C, TBS-464:
cp dom.img /dev/mmcblk0 - TS-251B, TS-253B, TS-453B, TS-653B, TS-253Be, TS-453Be, TS-453BT3:
cp dom.img /dev/mmcblk1 - TVS-h1288X, TVS-h1688X, TS-h3088XU:
cp dom.img /dev/sda - All other NAS models:
cp dom.img /dev/sdb - The NAS system image is copied to the NAS DOM.
- TS-251A, TS-253E, TS-451A, TBS-453A, TS-551, TBS-453DX, HS-453DX, TS-262, TS-462, TS-662, TS-264, TS-464, TS-664, TS-464U, TS-1264U-RP, TS-x62C, TS-x64C, TBS-464:
- After the NAS system image is copied to the NAS DOM, restart the NAS with the following command:
reboot - Remove the USB drive.
The NAS starts up correctly and Qfinder Pro can now find your NAS.
Install the latest firmware version on your NAS with Qfinder Pro
- Download and install Qfinder Pro.
- Open Qfinder Pro.
- Locate your NAS in the device list.TipFor details on using Qfinder Pro, see Qfinder Pro Help.
- Right click on your NAS.
- Select Update Firmware.
 The Update Firmware window opens.
 - Select Automatically update the firmware to the latest version.
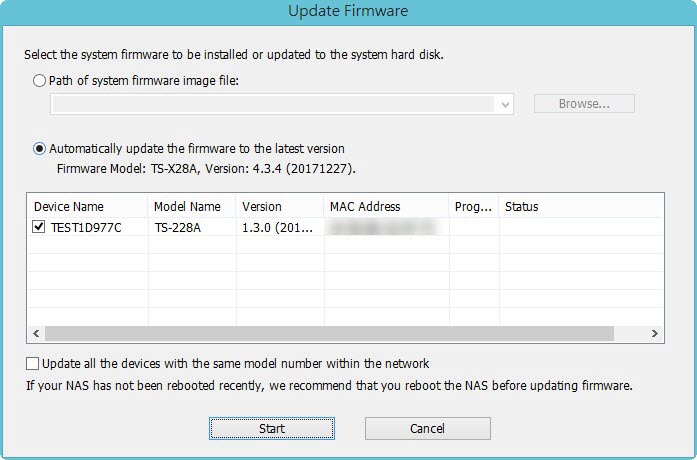
- Click Start.
The NAS firmware will be updated to the latest version.
Install hard drives
- After the firmware is updated, perform the following steps to install hard drives:
- Attach the hard drives to the drive trays.
- Insert the drive trays into the NAS.
For details on installing hard drives, see the NAS User Guide available for download from Download Center. - If the hard drives are not new, the firmware must be updated again while the hard drives are installed. For details, see Updating the NAS Firmware Using Qfinder Pro in How to search and manage a QNAP NAS using Qfinder Pro.
- If the hard drives are new, you can continue to initialize the NAS. For details on initializing QTS or QuTS hero on your NAS, see the following:
Further Troubleshooting
- If the NAS BIOS failed to display:
Your NAS needs to be physically serviced by a qualified hardware technician. - If the steps of this guide could not be successfully completed:
Your NAS needs to be physically serviced by a qualified hardware technician. - If you were able to install the latest firmware version on your NAS with Qfinder Pro but after installing the hard drives, the NAS will not boot up:
The hard drives are faulty and need to be replaced. A NAS will fail to start up if the hard drives are faulty.
Further Reading
What to do if Firmware update is stuck?
Why won't my NAS boot after a firmware update?
What can I do if I can not access my NAS after firmware update?
What do I do if there was a power failure or network disconnection during a firmware update?


