Applicable Products
Windows 10 or later
Symptom
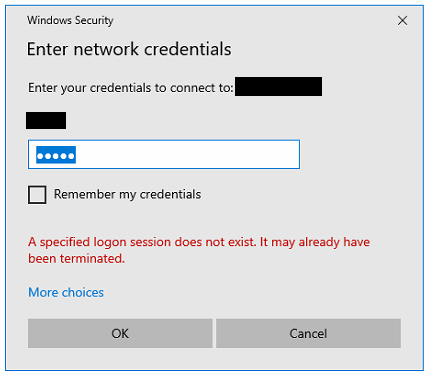
On Windows 10 or later, you may encounter the "Enter network credentials" error when connecting to your NAS.
Root Cause
By default, Windows first tries to access an SMB server using your Windows account credentials. If these differ from your NAS account credentials, the connection is rejected and Windows displays this prompt so you can enter your NAS credentials instead.
Note
This is expected Windows behavior, not a sign of a network or security problem with your NAS.
Solutions
You can resolve this error by modifying your login credentials or by disabling Windows Hello.
Solution 1: Verify the correct username and password in Windows Credential Manager
- On your Windows PC, open Control Panel.
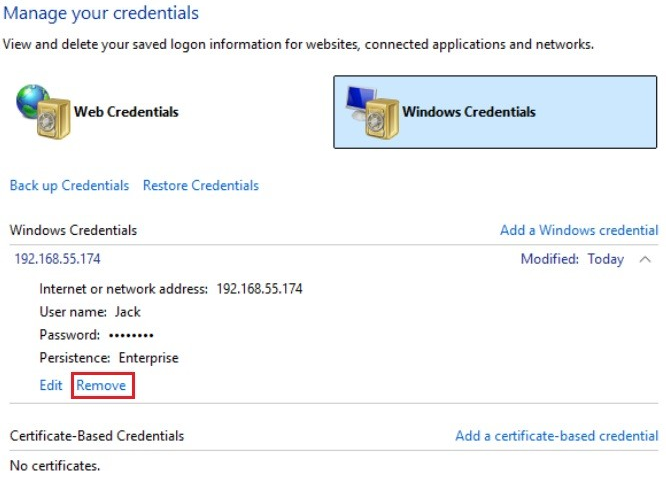
- Go to User Accounts > Credential Manager > Windows Credentials.
- Click Remove to remove the saved Windows credentials for your NAS (identified by IP address or server name).
- Click Add a Windows credential.
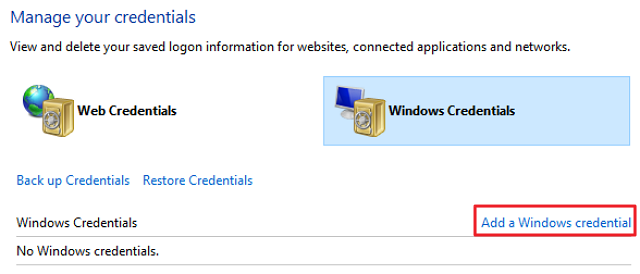
- In the User namefield, specify your NAS username using the following format:
- For NAS users:
NAS Server Name\Your Username. For example, if your NAS is named "QNAPNAS" and your username is "Jack," enter "QNAPNAS\Jack". - For domain users:
Domain Name\Your Username. If you continue to experience issues, refer to Solution 2.
- Complete the following fields as well:
- Internet or network address: Specify the IP address or hostname of your NAS.
- Password: Specify the password for your NAS account.
Tip
We recommend saving these credentials in Credential Manager for convenience.
- Click OK.
Solution 2: Disable Windows Hello
Windows Hello (PIN, fingerprint, or facial recognition) signs you in to your Windows account, but it is not the same as a network username and password. When you are signed in via Windows Hello, Windows can get stuck trying to use that sign-in identity for SMB authentication instead of your stored NAS credentials, causing the login prompt to loop even when your credentials are correct. This is a known Windows behavior, not an issue with your NAS. Disabling Windows Hello removes this conflict.
- Go to the Start button (Windows logo) > Settings > Accounts > Sign-in options.
- Expand the following options:
- For Windows 11:
- Facial recognition (Windows Hello)
- Fingerprint recognition (Windows Hello)
- PIN (Windows Hello)
- For Windows 10:
- Windows Hello Face
- Windows Hello Fingerprint
- Windows Hello PIN
- For each option listed above, click Remove, and then click Remove again to confirm.
Note
The "Remove" button only appears if the sign-in option is already configured.
- Verify your account password and then click OK.
- Try connecting to your NAS again.
Further Reading
适用产品
Windows 10 或更高版本
症状
在 Windows 10 或更高版本中,连接到 NAS 时可能会遇到“输入网络凭据”错误。
根本原因
默认情况下,Windows 首先尝试使用您的 Windows 帐户凭据访问 SMB 服务器。如果这些凭据与您的 NAS 帐户凭据不同,连接将被拒绝,Windows 会显示此提示,以便您输入 NAS 凭据。
注意
这是 Windows 的预期行为,并不是您的 NAS 存在网络或安全问题的迹象。
解决方案
您可以通过修改登录凭据或禁用 Windows Hello 来解决此错误。
解决方案 1:在 Windows 凭据管理器中验证正确的用户名和密码
- 在您的 Windows 电脑上,打开控制台。
- 转到用户帐户 > 凭据管理器 > Windows 凭据。
- 点击删除以删除保存的 NAS 的 Windows 凭据(通过 IP 地址或服务器名称识别)。
- 点击添加 Windows 凭据。
- 在用户名字段中,使用以下格式指定您的 NAS 用户名:
- 对于 NAS 用户:
NAS Server Name\Your Username。例如,如果您的 NAS 名为“QNAPNAS”,用户名为“Jack”,请输入“QNAPNAS\Jack”。 - 对于域用户:
Domain Name\Your Username。如果您继续遇到问题,请参考解决方案 2。
- 还需完成以下字段:
- 互联网或网络地址:指定您的 NAS 的 IP 地址或主机名。
- 密码:指定您的 NAS 帐户的密码。
提示
我们建议将这些凭据保存在凭据管理器中以便使用。
- 点击确定。
解决方案 2:禁用 Windows Hello
Windows Hello(PIN 码、指纹或面部识别)用于登录您的 Windows 账户,但这与网络用户名和密码不同。当您通过 Windows Hello 登录时,Windows 可能会尝试使用该登录身份进行 SMB 身份验证,而不是使用您存储的 NAS 凭据,导致即使凭据正确也会出现登录提示循环。这是 Windows 已知的行为,并不是您的 NAS 问题。禁用 Windows Hello 可以消除这种冲突。
- 进入开始按钮(Windows 徽标)> 设置 > 账户 > 登录选项。
- 展开以下选项:
- 对于 Windows 11:
- 面部识别(Windows Hello)
- 指纹识别(Windows Hello)
- PIN 码(Windows Hello)
- 对于 Windows 10:
- Windows Hello 面部识别
- Windows Hello 指纹识别
- Windows Hello PIN 码
- 对于上述每个选项,点击移除,然后再次点击移除 以确认。
- 验证您的账户密码,然后点击确定。
- 尝试再次连接到您的 NAS。
进一步阅读


