Applicable Products
- NAS models with onboard M.2 slots
- QM2 expansion cards
Overview
QNAP NAS models support various types of M.2 SSDs, which differ in interface and connector type. To ensure compatibility and optimal performance, identify the type of M.2 slot available (B key, M key, or B+M key), then choose a compatible SSD. This FAQ explains how to find the correct M.2 SSD and install it safely.
Procedure
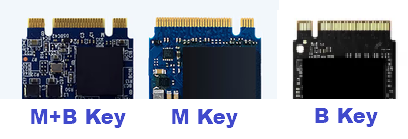
- Identify the M.2 slot type on your NAS:
- M key: Supports most NVMe (PCIe) SSDs.
- B key: Supports most SATA SSDs.
- B+M key: May support both SATA SSDs and entry-level NVMe SSDs (check your model for details).
- M.2 SSDs have notches or "keys" that must match the slot. Inspect both your SSD and slot, or refer to your NAS manual.
| Key Type | Notch Position | Supported Interface | Main Usage |
|---|
| B key | Left side (6 pins) | PCIe x2, SATA | M.2 SATA SSD, WWAN |
| M key | Right side (5 pins) | PCIe x4, SATA | M.2 NVMe SSD |
| B+M key | Both sides | PCIe x2, SATA | M.2 SATA SSD, entry-level NVMe SSD |
Note: The notch positions (keys) must match between the slot and the SSD.
- Check your NAS specifications:
- Visit the QNAP product page or your device manual, and locate the "Specifications" or "Hardware" section to confirm which M.2 SSD types (NVMe or SATA) are supported.
- Select a compatible M.2 SSD:
- For M key slots, use an M.2 NVMe SSD.
- For B key slots, use an M.2 SATA SSD.
- For B+M key slots, refer to your NAS documentation for supported SSD types.
- Prepare for installation:
- Power off and unplug your NAS before installing the SSD.
- Use an anti-static wrist strap if available to prevent static discharge.
- Install the M.2 SSD:
- Insert the SSD into the slot at a slight angle (about 30 degrees), align the notch with the key, and gently push it in.
- Secure the SSD using the provided screw.
Further Reading
适用产品
- NAS models with onboard M.2 slots
- QM2 expansion cards
概述
QNAP NAS 型号支持多种类型的 M.2 SSD,这些 SSD 在接口和连接器类型上有所不同。为了确保兼容性和较佳性能,请识别可用的 M.2 插槽类型(B 键、M 键或 B + M 键),然后选择兼容的 SSD。本常见问题解答说明如何找到正确的 M.2 SSD 并安全安装。
步骤
- 识别 NAS 上的 M.2 插槽类型:
- M 键: 支持大多数 NVMe(PCIe)SSD。
- B 键: 支持大多数 SATA SSD。
- B+ M 键: 可能支持 SATA SSD 和入门级 NVMe SSD(请检查您的型号以获取详细信息)。
- M.2 SSD 具有必须与插槽匹配的凹槽或“键”。检查您的 SSD 和插槽,或参考您的 NAS 手册。
| 键类型 | 凹槽位置 | 支持接口 | 主要用途 |
|---|
| B 键 | 左侧(6 针) | PCIe x2, SATA | M.2 SATA SSD, WWAN |
| M 键 | 右侧(5 针) | PCIe x4, SATA | M.2 NVMe SSD |
| B+ M 键 | 两侧 | PCIe x2, SATA | M.2 SATA SSD, 入门级 NVMe SSD |
注意:插槽和 SSD 之间的凹槽位置(键)必须匹配。
- 检查您的 NAS 规格:
- 访问QNAP 产品页面或您的设备手册,并找到“规格”或“硬件”部分以确认支持的 M.2 SSD 类型(NVMe 或 SATA)。
- 选择兼容的 M.2 SSD:
- 对于 M 键插槽,使用 M.2 NVMe SSD。
- 对于 B 键插槽,使用 M.2 SATA SSD。
- 对于 B + M 键插槽,请参考您的 NAS 文档以获取支持的 SSD 类型。
- 准备安装:
- 在安装 SSD 之前,请关闭并拔掉您的 NAS 电源。
- 如果有防静电腕带,请使用以防止静电放电。
- 安装 M.2 SSD:
- 以轻微角度(约 30 度)插入 SSD,将凹槽与键对齐,然后轻轻推入。
- 使用提供的螺丝固定 SSD。
进一步阅读


