Applicable Products
- HDP for PC/VM
- HDP PC Agent
- Microsoft SQL Server
Starting from version 2.3.1, the product previously known as HDP has been renamed to HDP for PC/VM.
Starting from version 1.3.0, the product previously known as NetBak PC Agent has been renamed to HDP PC Agent.
Prerequisites
To back up and restore your Microsoft SQL Server using the methods outlined in this guide, you need to install HDP for PC/VM on your NAS or install HDP PC Agent on your physical server. Ensure that you install the appropriate application before proceeding.
HDP Installation
- Log in to your NAS as an administrator.
- Open App Center.
- Click
 , and then enter "HDP for PC/VM".
 - Click Install.
HDP PC Agent Installation
Before installing HDP PC Agent, ensure that you meet the system requirements. For details, see HDP PC Agent Quick Start Guide.
- Install HDP following the steps above. HDP PC Agent requires HDP to be running on your NAS to back up or restore your server.
- Download and install HDP PC Agent.
Details
This section provides step-by-step instructions on how to back up and restore Microsoft SQL Server using HDP and HDP PC Agent.
Back up Microsoft SQL Server
Choose the backup method based on your Microsoft SQL Server environment.HDP (for Virtual Machines)
- Add the hypervisor hosting the Microsoft SQL Server to the HDP inventory.
- Create a backup job.
- Configure the backup settings.
- Start the backup job.
For detailed instructions, see Using HDP for PC/VM to Back Up Hypervisors to a QNAP NAS.
HDP PC Agent (for Physical Servers)
- Create a repository to store your backup data on your NAS.
- Create a backup job.
- Configure the backup settings.
- Start the backup job.
For detailed instructions, see HDP PC Agent Quick Start Guide.
Restore Your Entire Microsoft SQL Server
Depending on your server environment, you can use HDP to restore your virtual machine to a hypervisor or use HDP PC Agent to restore your physical server with a USB boot drive.
HDP (for Virtual Machines)
- Create a restore job.
- Select the source to restore.
- Configure the restore settings.
- Start the restore process.
For detailed instructions, see Using HDP for PC/VM to Back Up Hypervisors to a QNAP NAS.
HDP PC Agent (for Physical Servers)
- Create a USB boot drive.
- Insert the USB boot drive into your server.
- Configure the BIOS boot order.
- Follow the Restore Wizard to restore your server.
For detailed instructions, see the HDP PC Agent Quick Start Guide.
Restore a Microsoft SQL Database
To restore your Microsoft SQL database to a precise point in time using .mdf and .ldf files, follow the steps below.
- View database file paths.
- Open Microsoft SQL Server Management Studio (SSMS).
- Complete the fields in the Connect to Server dialog box if it appears. For instructions, see this tutorial.
If SSMS automatically connects to your desired server, proceed to the next step. Otherwise, go to Object Explorer > Connect > Database Engine to connect manually. - In the Object Explorer pane, expand Databases.
- Right-click the database you want to restore.
- Click Properties.
The Database Properties dialog box appears. - Click Files on the left panel to view file paths.

- Download database files.
- Open Backup Explorer in HDP.
- Select the database version you want to restore.
- Locate and download the
.mdf and .ldf files to the desired restore destination.
For detailed instructions, see How do I restore files to my Windows PC or server with HDP Backup Explorer?.
- Configure file permissions.
- Open Command Prompt as Administrator.
- Run the following command twice, once for the
.mdf file and once for the .ldffile.icacls File_Path /grant MSSQLSERVER:(F)
- First, replace
File_Path with the .mdf file path obtained in the "View database file paths" section. - Then, replace
File_Path with the .ldf file path obtained in the "View database file paths" section.
- Attach the database.
- Run the following command to open the SQL command-line interface.
sqlcmd -S localhost
- Run the following SQL.
USE [master]GOCREATE DATABASE [Database_Name] ON( FILENAME = N'Disk:\Path\File_Name.mdf' ),( FILENAME = N'Disk:\Path\File_Name.ldf' )FOR ATTACHGO
- Replace the following placeholders.
[Database_Name] with your database name.Disk:\Path\File_Name.mdf with the .mdf file path obtained in the "View database file paths" section. Disk:\Path\File_Name.ldf with the .ldf file path obtained in the "View database file paths" section.
- The image below shows the typical output after executing the command.
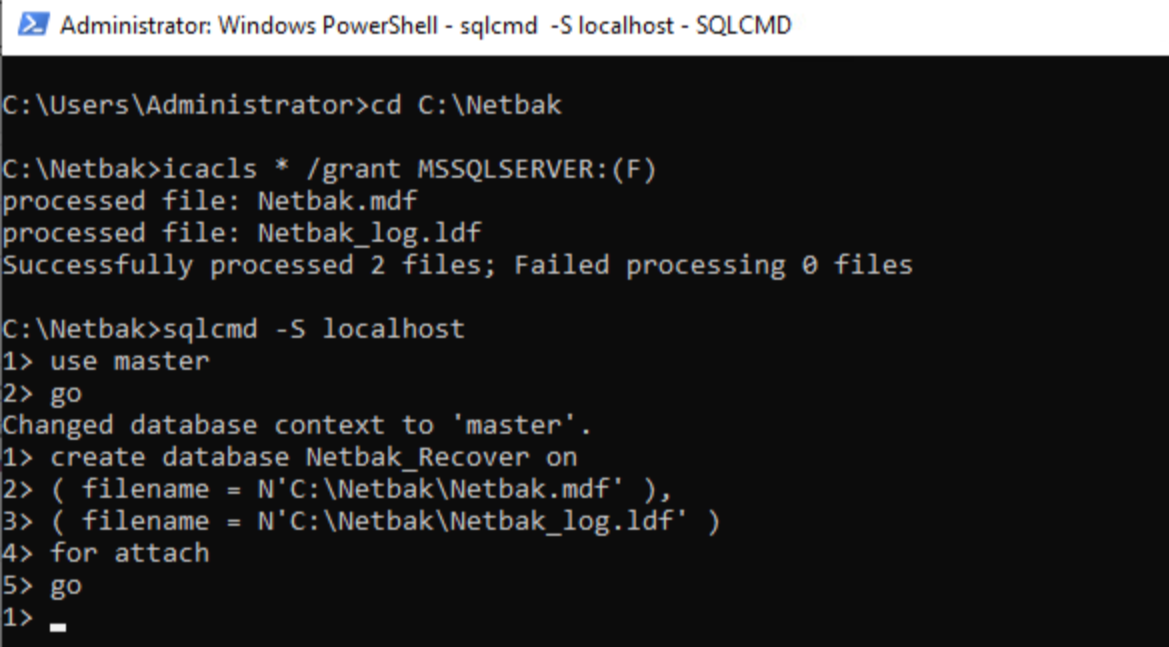
Once completed, your database will be restored and available for use.
Further Reading
适用产品
- HDP for PC/VM
- HDP PC Agent
- Microsoft SQL Server
从版本 2.3.1 开始,之前称为 HDP 的产品已更名为 HDP for PC/VM。
从版本 1.3.0 开始,之前称为 NetBak PC Agent 的产品已更名为 HDP PC Agent。
先决条件
要使用本指南中列出的方法备份和恢复 Microsoft SQL Server,您需要在 NAS 上安装 HDP for PC/VM 或在物理服务器上安装 HDP PC Agent。在继续之前,请确保安装了适当的应用程序。
HDP 安装
- 以管理员身份登录到您的 NAS。
- 打开 App Center。
- 点击 ,然后输入 "HDP for PC/VM"。
- 点击 安装。
HDP PC Agent 安装
在安装 HDP PC Agent 之前,请确保满足系统要求。详情请参见HDP PC 代理快速入门指南。
- 按照上述步骤安装 HDP。HDP PC Agent 需要在您的 NAS 上运行 HDP 才能备份或恢复您的服务器。
- 下载并安装HDP PC 代理。
详细信息
本节提供了使用 HDP 和 HDP PC Agent 备份和恢复 Microsoft SQL Server 的分步说明。
备份 Microsoft SQL Server
根据您的 Microsoft SQL Server 环境选择备份方法。HDP(用于虚拟机)
- 将托管 Microsoft SQL Server 的虚拟机管理程序添加到 HDP 清单中。
- 创建备份任务。
- 配置备份设置。
- 启动备份任务。
详细说明请参见使用 HDP 为 PC/VM 备份虚拟机到 QNAP NAS。
HDP PC Agent(用于物理服务器)
- 创建一个存储库以在您的 NAS 上存储备份数据。
- 创建备份任务。
- 配置备份设置。
- 启动备份任务。
有关详细说明,请参阅HDP PC 代理快速入门指南。
还原整个 Microsoft SQL Server
根据您的服务器环境,您可以使用 HDP 将虚拟机还原到虚拟机管理程序,或使用 HDP PC Agent 通过 USB 启动盘还原物理服务器。
HDP(用于虚拟机)
- 创建还原任务。
- 选择要还原的源。
- 配置还原设置。
- 启动还原过程。
有关详细说明,请参阅使用 HDP 为 PC/VM 备份虚拟机到 QNAP NAS。
HDP PC Agent(用于物理服务器)
- 创建 USB 启动盘。
- 将 USB 启动盘插入服务器。
- 配置 BIOS 启动顺序。
- 按照还原向导还原服务器。
有关详细说明,请参阅HDP PC 代理快速入门指南。
还原 Microsoft SQL 数据库
要将 Microsoft SQL 数据库还原到更精细的时间点,请使用 .mdf 和 .ldf 文件,按照以下步骤操作。
- 查看数据库文件路径。
- 打开 Microsoft SQL Server Management Studio (SSMS)。
- 如果出现连接到服务器对话框,请填写字段。有关说明,请参阅此教程。
如果 SSMS 自动连接到您想要的服务器,请继续下一步。否则,请转到对象资源管理器 > 连接 > 数据库引擎手动连接。 - 在 对象资源管理器 窗格中,展开 数据库。
- 右键单击要还原的数据库。
- 单击属性。
出现数据库属性对话框。 - 单击左侧面板上的文件以查看文件路径。
- 下载数据库文件。
- 在 HDP 中打开备份资源管理器。
- 选择要还原的数据库版本。
- 定位并下载
.mdf和.ldf文件到所需的还原目的地。
有关详细说明,请参阅如何使用 HDP 备份浏览器将文件恢复到我的 Windows PC 或服务器?。
- 配置文件权限。
- 以管理员身份打开命令提示符。
- 运行以下命令两次,一次用于
.mdf 文件,一次用于 .ldf文件。icacls File_Path /grant MSSQLSERVER:(F)
- 首先,替换
File_Path 为 .mdf 在“查看数据库文件路径”部分中获得的文件路径。 - 然后,替换
File_Path 为 .ldf 在“查看数据库文件路径”部分中获得的文件路径。
- 附加数据库。
- 运行以下命令以打开 SQL 命令行界面。
sqlcmd -S localhost
- 运行以下 SQL。
USE [master]GOCREATE DATABASE [Database_Name] ON(FILENAME = N'Disk:\Path\File_Name.mdf'),(FILENAME = N'Disk:\Path\File_Name.ldf')FOR ATTACHGO
- 替换以下占位符。
[Database_Name] 为您的数据库名称。Disk:\Path\File_Name.mdf 为 .mdf 在“查看数据库文件路径”部分中获得的文件路径。 Disk:\Path\File_Name.ldf 为 .ldf 在“查看数据库文件路径”部分中获得的文件路径。
- 下图显示了执行命令后的典型输出。
完成后,您的数据库将被恢复并可供使用。
进一步阅读


