Applicable Products
- QuTS hero
- HBS 3 Hybrid Backup Sync version 26 or later
- Storage Manager
Introduction
WORM (Write Once, Read Many) is a data protection solution that ensures data integrity by preventing files from being modified or deleted. Once data is written, it cannot be changed or removed within the configured retention period, protecting your data against ransomware attacks and unauthorized modifications.
In QuTS hero, you can enable WORM on a shared folder. You can then use HBS to back up files to the WORM shared folder, ensuring the backup data will be immutable, thereby preventing any accidental or malicious modifications.
This tutorial provides a step-by-step guide on how to set up a WORM shared folder and then create a backup job in HBS to back up files to the WORM shared folder.
Note
HBS currently only supports backing up to WORM shared folders. Syncing to WORM shared folders is not supported.
Instructions
Because WORM cannot be enabled, disabled, or modified on an existing shared folder, you must create a new shared folder and enable WORM during creation. After the WORM shared folder is created, you can create a backup job in HBS using the WORM shared folder as destination, and then monitor the job status after it runs for the first time. If you run out of space on the WORM shared folder, you can expand the folder capacity as needed.
A. Create a WORM shared folder.
Note
Only the required settings and WORM settings are covered in the following steps.
For details on other shared folder settings, see "Creating a shared folder" in the
QuTS hero User Guide.
- Log in to your NAS as an administrator.
- Open Control Panel.
- Go to System > Shared Folders > Shared Folder.
- Click Create > Shared Folder.
The Create Shared Folder Wizard opens.
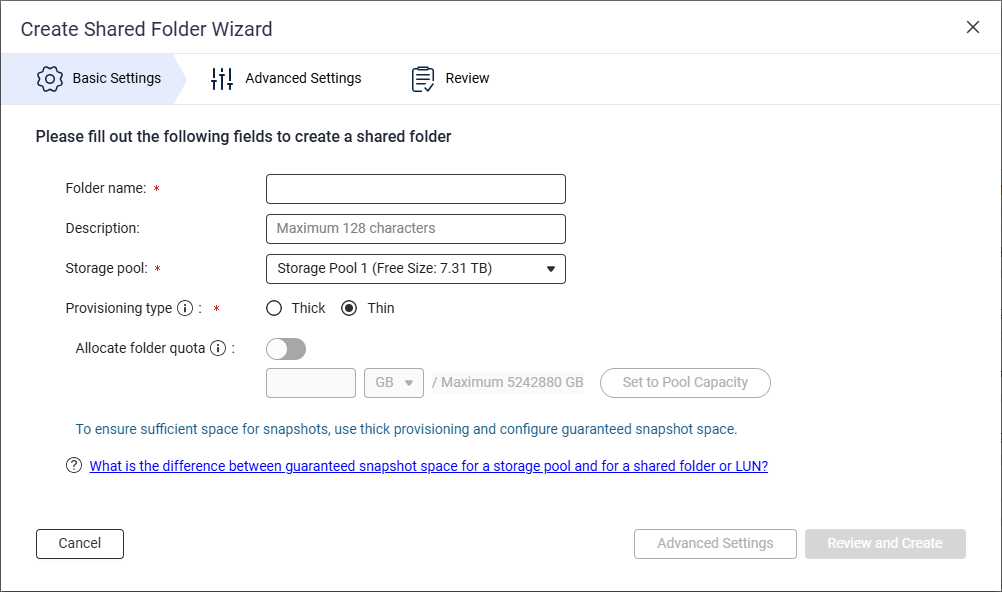
- Next to Folder name, specify the shared folder name.
- Next to Storage pool, select the storage pool in which to create the shared folder.
- Next to Provisioning type, select a provisioning type.
- Click Advanced Settings.
- Configure WORM.
- Next to Security Settings, click
 .
.
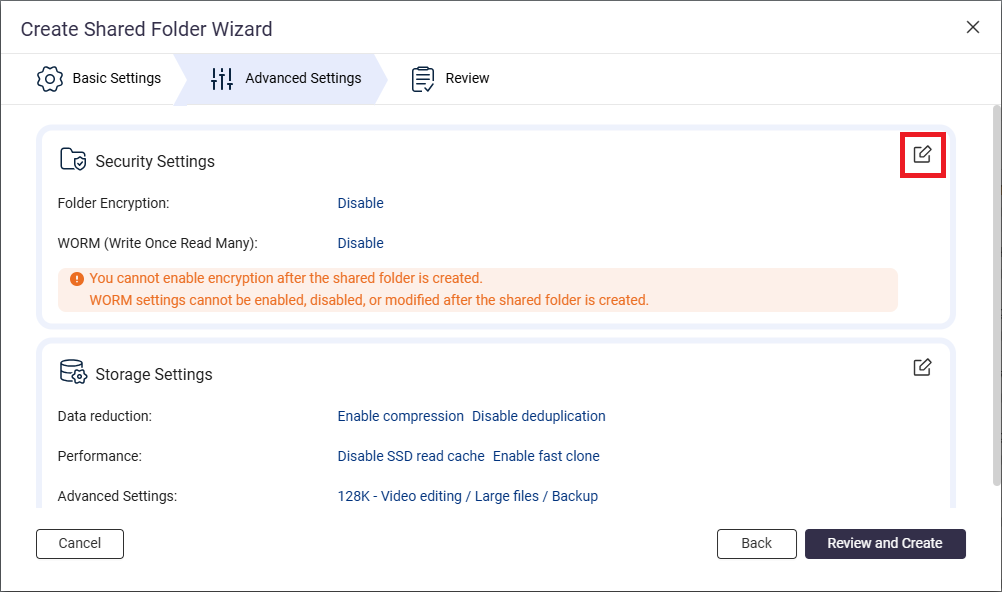
- Go to the WORM (Write Once Read Many) section.
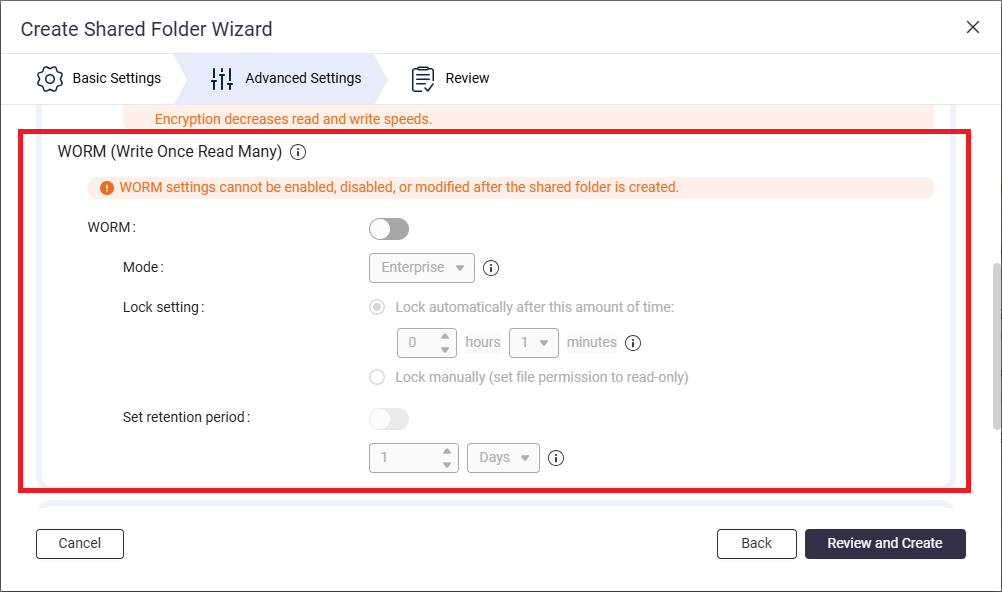
- Next to WORM, click
 .
. - Next to Mode, select one of the following WORM modes:
- Enterprise: Users can delete the shared folder.
- Compliance: Users cannot delete the shared folder. An administrator must delete the parent storage pool in order to delete the shared folder.
- Next to Lock setting, select Lock manually (set file permission to read-only).
This option requires a user with the appropriate privileges to manually set the file permission to read-only in order to lock the file.
Note
To use a WORM shared folder as a destination in HBS, you must select the Lock manually option.
- Enable the retention period.
The retention period limits how long WORM applies to each file and folder in the shared folder. Files and folders can be deleted after the specified retention period.
Note
To use a WORM shared folder as a destination in HBS, you must enable the retention period on the shared folder.
- Next to Set retention period, click .
- Specify the number of days, months, or years.
- Click Review and Create.
- Review the settings, and then click Create.
The system creates the WORM shared folder.
B. Create a backup job in HBS with the WORM shared folder as destination.
For illustration purposes, we'll create a local backup job where the source and destination folders are on the same NAS device.
Note
Only the required settings are covered in the following steps.
For details on other job settings, see
Creating a backup job.
- Open HBS 3 Hybrid Backup Sync.
- Go to Backup & Restore.
- Click Create, and then click New backup Job.
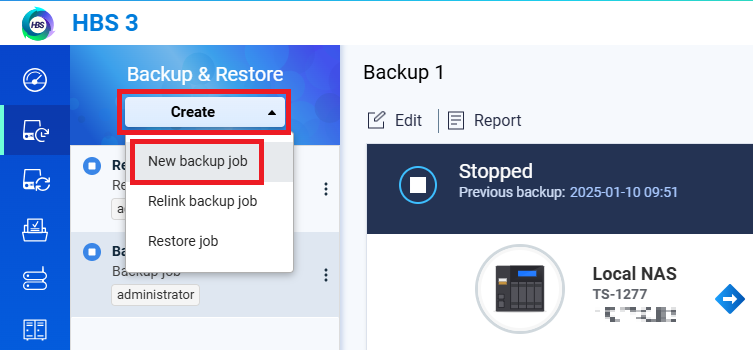 The Create a Backup Job wizard opens.
 - Select the source folder, and then click Next.
- Select Local NAS for the destination NAS, and then click Select.
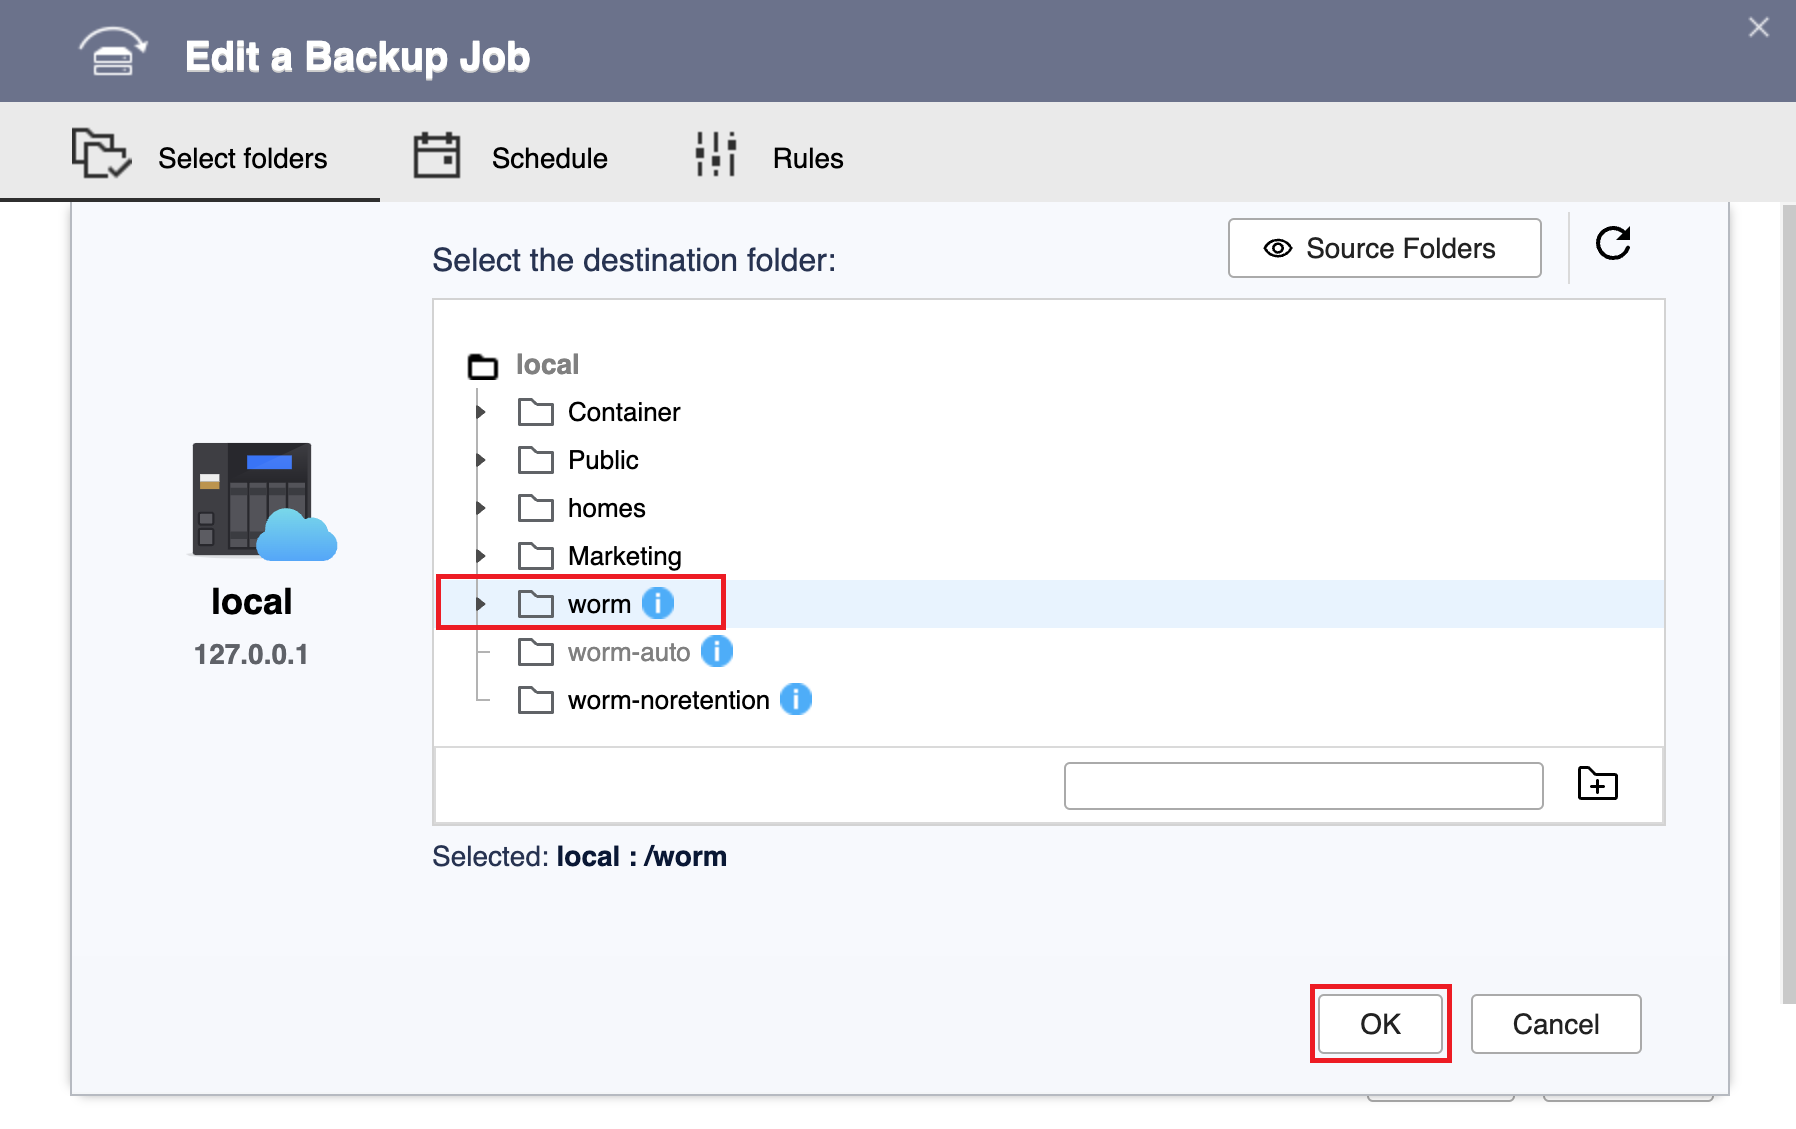
- Select the WORM shared folder you created as the destination folder, and then click OK.
Note
To select a WORM shared folder for the destination folder, the folder's WORM lock setting must be set to Lock manually and the retention period must be enabled.
For details, see earlier instructions in this tutorial.
- Click Next.
- Check that version management is enabled.
Note
- HBS automatically enables and configures the version management setting to match the retention period of the destination WORM shared folder.
- You cannot change this setting.
- Click Version Management.
- Check that Enable Version Management is selected.
- Check that Number of days to retain each version is selected and matches the retention period of the WORM shared folder.

- Click Next.
- Optional: Configure job rules.
- Click Next.
- Review the summary, and then click Create.
HBS creates the backup job.
C. Run and monitor the backup job in HBS.
- Manually run the backup job.
Note
You can skip this step if you configured the job to run immediately after creation or if you want the job to run according to the schedule you configured.
- Go to HBS > Backup & Restore.
- Select the backup job you created.
- Click Back Up Now.
- After the job runs for the first time, check the job report to ensure the job ran smoothly.
- Go to HBS > Backup & Restore.
- Select the backup job.
- Click Report.
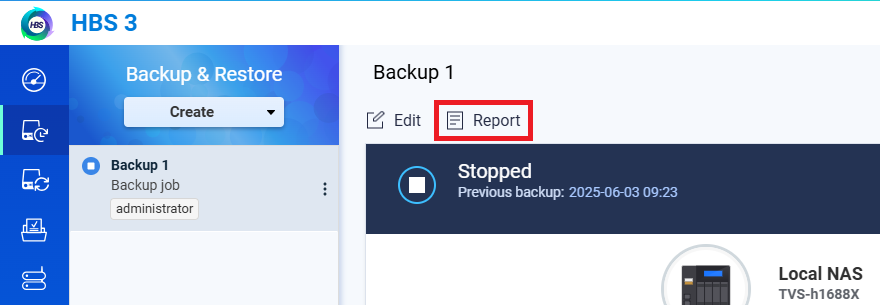 The Report window opens.
 - Go to the Logs tab.
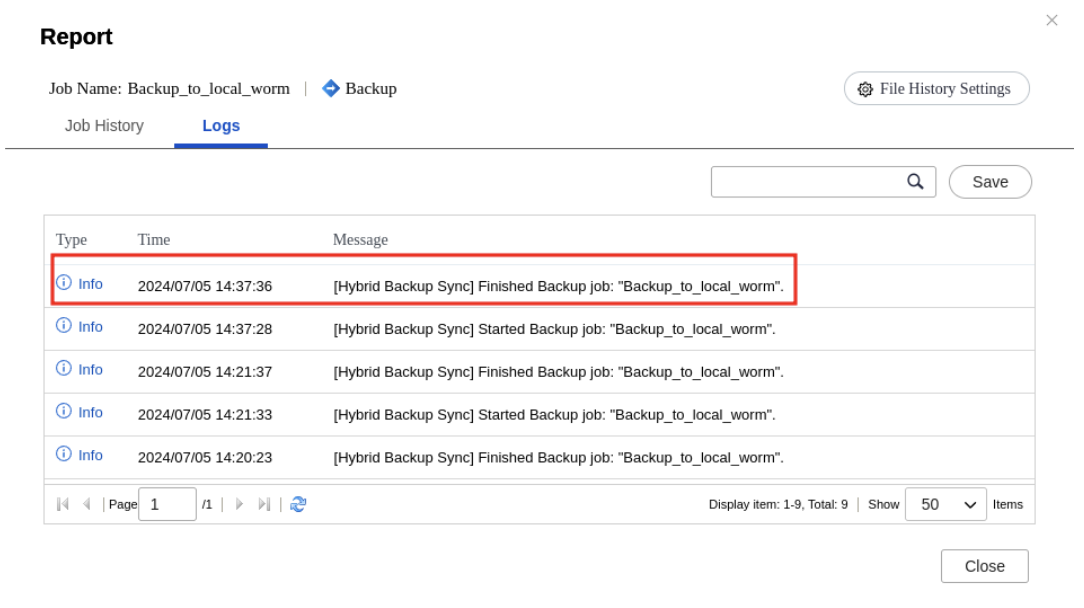
- Check for a message that mentions the job name and includes the words "Finished Backup job".
For example:
D. Expand the WORM shared folder if you run out of space.
If your backup job fails due to the destination shared folder running out of space, and the folder's parent storage pool still has free space, you can increase the capacity of the shared folder.
You can see that the destination shared folder is full by checking the Quota field of your job in HBS > Backup & Restore:
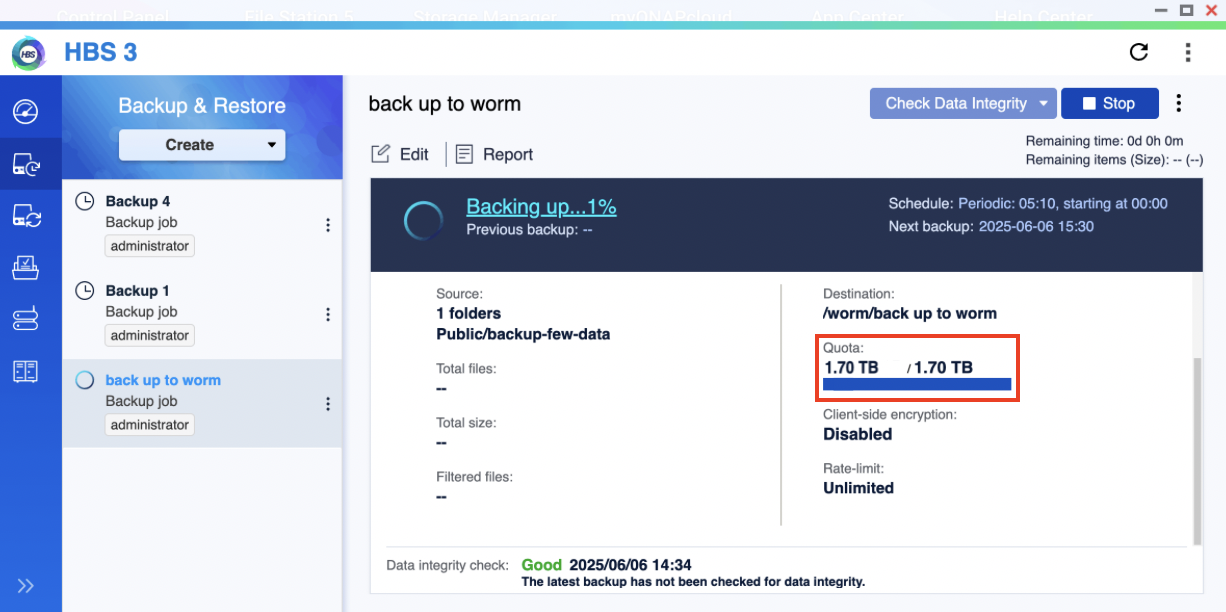
Note
The used quota shown here in HBS may not reflect the actual used capacity of the shared folder in its parent storage pool. The actual used capacity in the storage pool subtracts the amount reduced by data reduction. You can check the data reduction by going to
Storage Manager > Storage Space, identifying the shared folder, and then clicking
 > Manage
 under
Action.
To expand your WORM shared folder, follow these instructions:
- Go to Storage Manager > Storage Space.
- Locate the shared folder.
- Under Action, click > Resize Shared Folder.
The Resize Shared Folder window opens. - Next to New capacity, specify a greater size for the shared folder.
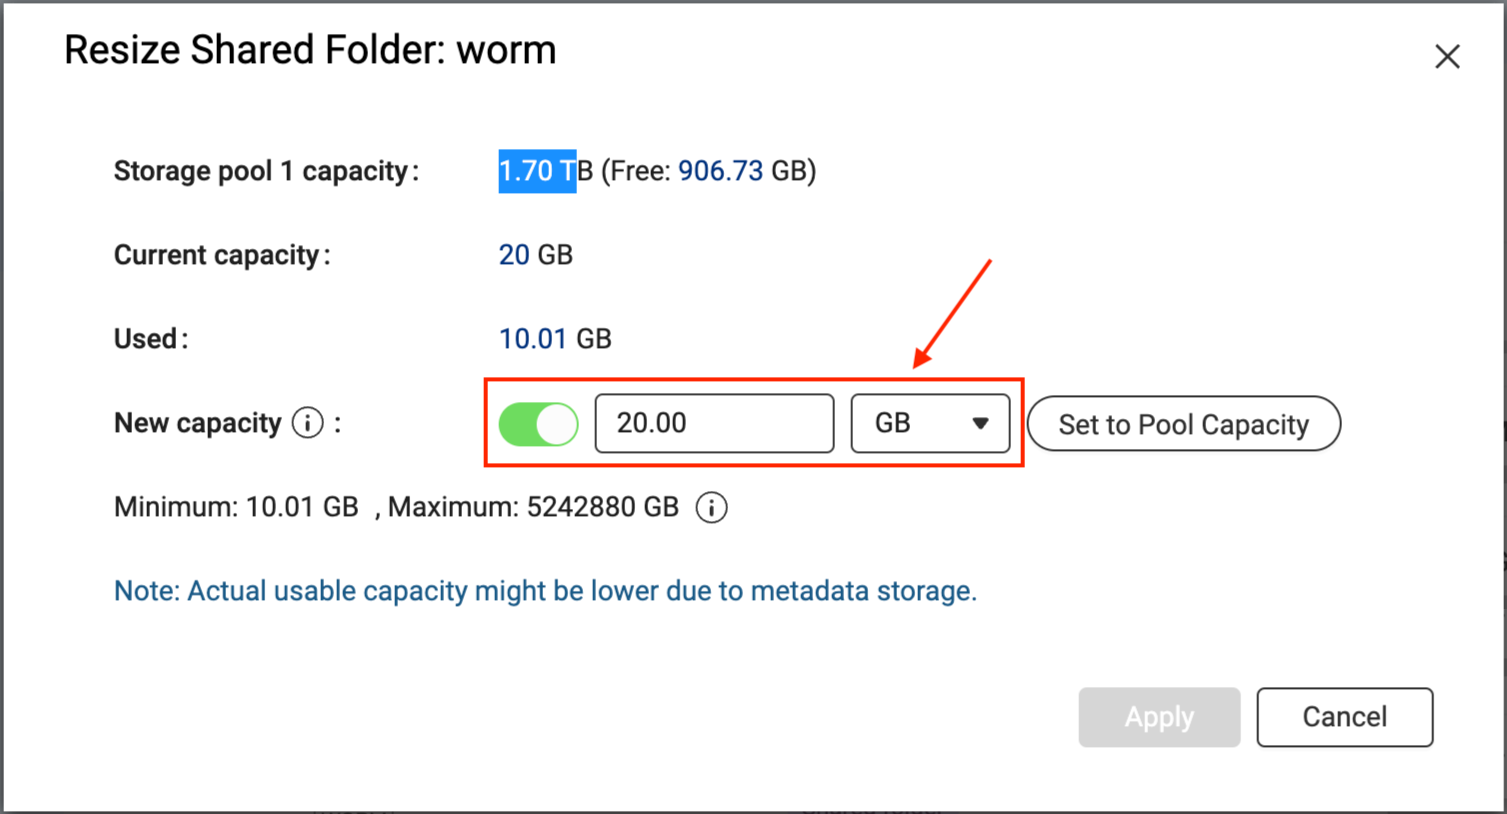
- Click Apply.
The system expands the shared folder. This process may take a while.
After the shared folder has been expanded, you can go to HBS and run the backup job again.
Further Reading and Resources
适用产品
- QuTS hero
- HBS 3 Hybrid Backup Sync version 26 or later
- Storage Manager
简介
WORM(一次写入,多次读取)是一种数据保护解决方案,通过防止文件被修改或删除来确保数据完整性。数据一旦写入,在配置的保留期内无法更改或删除,从而保护您的数据免受勒索软件攻击和未经授权的修改。
在 QuTS hero 中,您可以在共享文件夹上启用 WORM。然后,您可以使用 HBS 将文件备份到 WORM 共享文件夹,确保备份数据不可变,从而防止任何意外或恶意修改。
本教程提供了有关如何设置 WORM 共享文件夹,然后在 HBS 中创建备份作业以将文件备份到 WORM 共享文件夹的分步指南。
注意
HBS 目前仅支持备份到 WORM 共享文件夹。不支持同步到 WORM 共享文件夹。
说明
由于无法在现有共享文件夹上启用、禁用或修改 WORM,您必须创建一个新的共享文件夹并在创建时启用 WORM。创建 WORM 共享文件夹后,您可以在 HBS 中创建一个备份作业,使用 WORM 共享文件夹作为目标,然后在首次运行后监控作业状态。如果 WORM 共享文件夹空间不足,您可以根据需要扩展文件夹容量。
A. 创建 WORM 共享文件夹。
注意
以下步骤仅涵盖必需设置和 WORM 设置。
有关其他共享文件夹设置的详细信息,请参阅
QuTS hero 用户指南 中的“创建共享文件夹”。
- 以管理员身份登录到您的 NAS。
- 打开控制台。
- 前往系统 > 共享文件夹 > 共享文件夹。
- 点击 创建 > 共享文件夹 。
打开 创建共享文件夹向导。
- 旁边文件夹名称,指定共享文件夹名称。
- 旁边存储池,选择要在其中创建共享文件夹的存储池。
- 旁边配置类型,选择一种配置类型。
- 点击高级设置。
- 配置 WORM。
- 在 安全设置 旁边,点击。
- 转到 WORM(一次写入,多次读取) 部分。
- 旁边WORM,点击。
- 旁边模式,选择以下 WORM 模式之一:
- 企业:用户可以删除共享文件夹。
- 合规:用户不能删除共享文件夹。必须由管理员删除父存储池才能删除共享文件夹。
- 在 锁定设置 旁边,选择 手动锁定(将文件权限设置为只读)。
此选项要求具有适当权限的用户手动将文件权限设置为只读以锁定文件。
注意
要在 HBS 中使用 WORM 共享文件夹作为目标,必须选择 手动锁定 选项。
- 启用保留期。
保留期限制 WORM 应用于共享文件夹中每个文件和文件夹的时间。文件和文件夹可以在指定的保留期后删除。
注意
要在 HBS 中使用 WORM 共享文件夹作为目标,必须在共享文件夹上启用保留期。
- 在 设置保留期 旁边,点击 。
- 指定天数、月数或年数。
- 点击审查并创建。
- 审查设置,然后点击创建。
系统创建 WORM 共享文件夹。
B. 在 HBS 中创建一个以 WORM 共享文件夹为目标的备份任务。
为了说明,我们将创建一个本地备份任务,其中源文件夹和目标文件夹在同一个 NAS 设备上。
注意
以下步骤仅涵盖所需的设置。
有关其他作业设置的详细信息,请参阅
创建备份作业。
- 打开HBS 3 Hybrid Backup Sync。
- 前往备份与恢复。
- 点击 创建 ,然后点击 新备份作业 。
打开 创建备份作业 向导。 - 选择源文件夹,然后点击下一步。
- 选择本地 NAS作为目标 NAS,然后点击选择。
- 选择您创建的 WORM 共享文件夹作为目标文件夹,然后点击 确定 。
注意
要选择 WORM 共享文件夹作为目标文件夹,文件夹的 WORM 锁定设置必须设置为 手动锁定 并启用保留期。
有关详细信息,请参阅本教程中的早期说明。
- 点击下一步.
- 检查版本管理是否已启用。
注意
- HBS 会自动启用并配置版本管理设置,以匹配目标 WORM 共享文件夹的保留期限。
- 您无法更改此设置。
- 点击 版本管理 。
- 检查是否已选择 启用版本管理 。
- 检查是否已选择 保留每个版本的天数,并与 WORM 共享文件夹的保留期限相匹配。
- 点击下一步。
- 可选:配置作业规则。
- 点击下一步。
- 查看摘要,然后点击创建。
HBS 创建备份作业。
C. 在 HBS 中运行并监控备份作业。
- 手动运行备份作业。
注意
如果您配置了作业在创建后立即运行,或者希望作业按照您配置的计划运行,可以跳过此步骤。
- 前往 HBS > 备份与恢复。
- 选择您创建的备份作业。
- 点击 立即备份。
- 作业首次运行后,检查作业报告以确保作业顺利运行。
- 前往HBS > 备份与恢复。
- 选择备份作业。
- 点击 报告 。
报告窗口打开。报告 - 前往日志标签。
- 检查是否有提到作业名称并包含“完成备份作业”字样的消息。
例如:
D. 如果空间不足,扩展 WORM 共享文件夹。
如果您的备份作业因目标共享文件夹空间不足而失败,并且文件夹的父存储池仍有空闲空间,您可以增加共享文件夹的容量。
您可以通过检查目标共享文件夹已满配额在您的作业中查看字段HBS > 备份与恢复:
注意
此处在 HBS 中显示的已用配额可能无法反映其父存储池中共享文件夹的实际已用容量。存储池中的实际已用容量减去数据缩减减少的量。您可以通过访问
存储管理器 > 存储空间,识别共享文件夹,然后点击
> 管理在
操作下。要扩展您的 WORM 共享文件夹,请按照以下说明操作:
- 前往存储管理器> 存储空间。
- 找到共享文件夹。
- 在 操作 下,点击 > 调整共享文件夹大小。
打开 调整共享文件夹大小 窗口。 - 在 新容量 旁边,为共享文件夹指定更大的大小。
- 点击 应用 。
系统将扩展共享文件夹。此过程可能需要一些时间。
共享文件夹扩展后,您可以前往 HBS 并再次运行备份作业。
进一步阅读和资源


