Applicable Products:
Some advanced uses of your NAS may require you to run custom applications at boot-time. Even though QNAP NAS are Linux-based, you cannot use the usual Linux methods for launching an application at startup: default config files are reset on every startup.
Skills required
- must be able to remote login via SSH (e.g. use SSH PuTTY)
- must know how to edit files using nano, vi, or edit via SFTP (e.g. use WinSCP)
MTD-based method
Autorun.sh is a script which will be executed on every startup of the TS-x09, TS-x19 and TS-x39. Editing this file allows you to start your own programs or overwrite config files with your own copies.
Manual edit of autorun.sh
Log into your QNAP device using SSH, for instance by using Putty
Optional: install nano; use ipkg install nano & edit with nano instead of vi
Mount config ramblock by finding your specific model below:
All HAL-based Intel and AMD NAS:
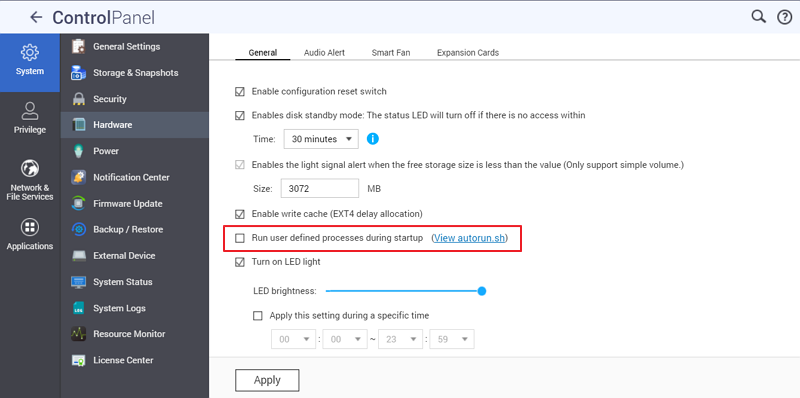
Note: Starting from QTS 4.3.3 it's required to enable the autorun.sh processing in the Control Panel -> Hardware -> General: Run user defined startup processes (autorun.sh)
TS-212P3, TS-230:Mount the config ramblock /dev/mmcblk0p5:
mount -t ext2 /dev/mmcblk0p5 /tmp/config
TS-269L:Mount the config ramblock /dev/sdc6:
mount -t ext2 /dev/sdc6 /tmp/config
TS-439, TS-509, TS-639, TS-809, TS-809U (x86):Mount the config ramblock /dev/sdx6:
mount -t ext2 /dev/sdx6 /tmp/config
TS-109, TS-109P, TS-110, TS-119,TS-209, TS-209P, TS-212, TS-219, TS-409 (Marvell ARM), TS-412, TS-419P:Mount the config ramblock /dev/mtdblock5:
Note: On TS-219P II, you may have to use ext4 instead of ext2
mount -t ext2 /dev/mtdblock5 /tmp/config
TS-201:Mount the config ramblock /dev/mtdblock4:
mount -t ext2 /dev/mtdblock4 /tmp/config
Create/Edit /tmp/config/autorun.sh.
Edit autorun.sh by vi using this command # vi /tmp/config/autorun.sh then enter edit mode by pressing a
- Edit whatever you need to
- Exit edit mode: press ESC
- Save and exit: x
Or editing autorun.sh using a desktop PC and e.g. SFTP
Ensure that /tmp/config/autorun.sh is executable using this command # chmod +x /tmp/config/autorun.sh
IMPORTANT: Unmount the mounted flash partition using this command # umount /tmp/config
editautorun.sh: script to ease autorun.sh edit
If you edit this file regularly you can save some time by creating a shell script (e.g. editautorun.sh) to automate the process. You can call the script by either putting it in the environment path, or add its folder to the path or call it by an alias.
The script contents are:
All HAL-based Intel and AMD NAS use ...
mount $(/sbin/hal_app --get_boot_pd port_id=0)6 /tmp/config
touch /tmp/config/autorun.sh
chmod +x /tmp/config/autorun.sh
$EDITOR /tmp/config/autorun.sh
umount /tmp/config
All AL-based NAS(TS-x31+ and TS-x31X) and TS-x31 use ...
ubiattach -m 6 -d 2
/bin/mount -t ubifs ubi2:config /tmp/config
vi /tmp/config/autorun.sh
chmod +x /tmp/config/autorun.sh
echo .
echo "unmounting /tmp/config..."
umount /tmp/config
ubidetach -m 6
TS-230 use ...
mount -t ext2 /dev/mmcblk0p5 /tmp/config
vi /tmp/config/autorun.sh
chmod +x /tmp/config/autorun.sh
echo .
echo "unmounting /tmp/config..."
umount /tmp/config
TAS-x68, TS-x28 use ...
/bin/mount -t ext4 /dev/mmcblk0p7 /tmp/config
vi /tmp/config/autorun.sh
chmod +x /tmp/config/autorun.sh
echo .
echo "unmounting /tmp/config..."
umount /tmp/config
TS-439, TS-509, TS-639, TS-809, TS-809U (x86) use ...
mount -t ext2 /dev/sdx6 /tmp/config
vi /tmp/config/autorun.sh
chmod +x /tmp/config/autorun.sh
echo .
echo "unmounting /tmp/config..."
For TS-109, TS-109P, TS-119, TS-209, TS-209P, TS-219, TS-412, TS-409 (Marvell ARM) use ...
mount -t ext2 /dev/mtdblock5 /tmp/config
vi /tmp/config/autorun.sh
chmod +x /tmp/config/autorun.sh
echo .
echo "unmounting /tmp/config..."
umount /tmp/config
For TS-201 use ...
mount -t ext2 /dev/mtdblock4 /tmp/config
vi /tmp/config/autorun.sh
chmod +x /tmp/config/autorun.sh
echo .
echo "unmounting /tmp/config..."
umount /tmp/config
Using "init" script to mount the flash
The QNAP GUI has the ability to view the autorun.sh content. As at V4.5.1.1540 on a TS-831XU-RP this is how the GUI does that:
/etc/init.d/init_disk.sh mount_flash_config
(displays /tmp/nasconfig_tmp/autorun.sh)
/etc/init.d/init_disk.sh umount_flash_config
Using these commands, you can create/edit the "autorun.sh" in the location given.
Allow running autorun.sh during startup
After completing the autorun.sh, please don't forget to enable the option to allow running autorun.sh during the system startup.
适用产品:
某些优异使用场景可能需要您在启动时运行自定义应用程序。尽管 QNAP NAS 基于 Linux,但您不能使用常规的 Linux 方法在启动时启动应用程序:默认配置文件在每次启动时都会重置。
所需技能
- 必须能够通过 SSH 远程登录(例如,使用SSH PuTTY)
- 必须知道如何使用 nano、vi 编辑文件,或通过 SFTP 编辑(例如,使用WinSCP)
基于 MTD 的方法
Autorun.sh 是一个脚本,每次启动 TS-x09、TS-x19 和 TS-x39 时都会执行。编辑此文件可以让您启动自己的程序或用自己的副本覆盖配置文件。
手动编辑 autorun.sh
使用 SSH 登录到您的 QNAP 设备,例如使用 Putty
可选:安装 nano;使用ipkg install nano并用 nano 编辑而不是 vi
通过在下方找到您的特定型号来挂载配置 ramblock:
所有基于 HAL 的 Intel 和 AMD NAS:
注意:从 QTS 4.3.3 开始,需要在控制台 -> 硬件 -> 常规中启用 autorun.sh 处理:运行用户定义的启动进程(autorun.sh)
TS-212P3, TS-230:挂载配置 ramblock /dev/mmcblk0p5:
mount -t ext2 /dev/mmcblk0p5 /tmp/config
TS-269L:挂载配置 ramblock /dev/sdc6:
mount -t ext2 /dev/sdc6 /tmp/config
TS-439, TS-509, TS-639, TS-809, TS-809U (x86):挂载配置 ramblock /dev/sdx6:
mount -t ext2 /dev/sdx6 /tmp/config
TS-109, TS-109P, TS-110, TS-119,TS-209, TS-209P, TS-212, TS-219, TS-409 (Marvell ARM), TS-412, TS-419P:挂载配置 ramblock /dev/mtdblock5:
注意:在 TS-219P II 上,您可能需要使用 ext4 而不是 ext2
mount -t ext2 /dev/mtdblock5 /tmp/config
TS-201:挂载配置 ramblock /dev/mtdblock4:
mount -t ext2 /dev/mtdblock4 /tmp/config
创建 / 编辑 /tmp/config/autorun.sh。
使用此命令# vi /tmp/config/autorun.sh,然后通过按 a进入编辑模式
- 编辑您需要的内容
- 退出编辑模式:按 ESC
- 保存并退出:x
或者使用桌面 PC 和例如 SFTP 编辑 autorun.sh
使用此命令确保 /tmp/config/autorun.sh 是可执行的 # chmod +x /tmp/config/autorun.sh
重要提示:使用以下命令卸载已挂载的闪存分区 # umount /tmp/config
editautorun.sh:用于简化编辑 autorun.sh 的脚本
如果您经常编辑此文件,可以通过创建一个 shell 脚本(例如 editautorun.sh)来自动化此过程,从而节省时间。您可以通过将脚本放入环境路径中,或将其文件夹添加到路径中,或通过别名调用它。
脚本内容为:
所有基于 HAL 的 Intel 和 AMD NAS 使用...
mount $(/sbin/hal_app --get_boot_pd port_id=0)6 /tmp/config
touch /tmp/config/autorun.sh
chmod +x /tmp/config/autorun.sh
$EDITOR /tmp/config/autorun.sh
umount /tmp/config
所有基于 AL 的 NAS(TS-x31+ 和 TS-x31X)和 TS-x31 使用...
ubiattach -m 6 -d 2
/bin/mount -t ubifs ubi2:config /tmp/config
vi /tmp/config/autorun.sh
chmod +x /tmp/config/autorun.sh
echo .
echo "正在卸载 /tmp/config..."
umount /tmp/config
ubidetach -m 6
TS-230 使用...
mount -t ext2 /dev/mmcblk0p5 /tmp/config
vi /tmp/config/autorun.sh
chmod +x /tmp/config/autorun.sh
echo .
echo "正在卸载 /tmp/config..."
umount /tmp/config
TAS-x68, TS-x28 使用...
/bin/mount -t ext4 /dev/mmcblk0p7 /tmp/config
vi /tmp/config/autorun.sh
chmod +x /tmp/config/autorun.sh
echo .
echo "正在卸载 /tmp/config..."
umount /tmp/config
TS-439、TS-509、TS-639、TS-809、TS-809U(x86)使用...
mount -t ext2 /dev/sdx6 /tmp/config
vi /tmp/config/autorun.sh
chmod +x /tmp/config/autorun.sh
echo .
echo "正在卸载 /tmp/config..."
对于 TS-109、TS-109P、TS-119、TS-209、TS-209P、TS-219、TS-412、TS-409(Marvell ARM)使用...
mount -t ext2 /dev/mtdblock5 /tmp/config
vi /tmp/config/autorun.sh
chmod +x /tmp/config/autorun.sh
echo .
echo "正在卸载 /tmp/config..."
umount /tmp/config
对于 TS-201 使用...
mount -t ext2 /dev/mtdblock4 /tmp/config
vi /tmp/config/autorun.sh
chmod +x /tmp/config/autorun.sh
echo .
echo "正在卸载 /tmp/config..."
umount /tmp/config
使用 "init" 脚本挂载闪存
QNAP GUI 可以查看 autorun.sh 的内容。在 TS-831XU-RP 上的 V4.5.1.1540 版本中,GUI 是这样操作的:
/etc/init.d/init_disk.sh mount_flash_config
(显示 /tmp/nasconfig_tmp/autorun.sh)
/etc/init.d/init_disk.sh umount_flash_config
使用这些命令,您可以在给定位置创建 / 编辑 "autorun.sh"。
允许在启动时运行 autorun.sh
完成 autorun.sh 后,请不要忘记启用选项以允许在系统启动时运行 autorun.sh。


