Appliable Products
- NAS running with QTS or QuTS system
Overview
There are many reasons to permanently erase data from your NAS drives — decommissioning hardware, repurposing drives, meeting compliance requirements, or ensuring sensitive data cannot be recovered. QNAP QTS and QuTS hero include a built-in Secure Erase function that handles this using certified overwrite methods.
Why isn't deleting files or reformatting a drive enough?
Deleting files or reformatting a volume only removes the filesystem index — the actual data sectors remain on the disk and can be recovered with widely available tools in minutes. Anyone with physical access to the drive could retrieve your files, documents, credentials, and any other data that was ever stored on it.
Secure Erase overwrites the raw storage media with one or more passes of data patterns, making the original content physically unreadable even with forensic software.
When should I use Secure Erase?
Common situations where Secure Erase is appropriate:
- Decommissioning hardware — retiring a NAS or drive from service and handing it off
- Repurposing drives — reusing a drive for a different purpose or different owner
- Compliance requirements — GDPR, HIPAA, and other regulations require verifiable data destruction when retiring storage that held personal or protected data
- Security policy — organizational policies may require certified erasure before any storage device leaves IT control
- Drive RMA — before returning a defective drive to the manufacturer under warranty
Solution
⚠️ Back up all data before proceeding. Secure Erase is irreversible. Verify your backup is complete and accessible on another device before starting.
Step 1 — Back up your data
Copy everything you need to keep to an external drive, network share, or cloud storage. Confirm the backup is complete and all files open correctly before continuing.
Step 2 — Remove drives from any storage pool
Open Storage & Snapshots → Storage → Storage/Snapshots. Select your storage pool, click Manage → Remove, and confirm. Repeat for all pools. The drives will now show Used Type: Free in the Disks view.
Step 3 — Select the drive and open Secure Erase
Go to Storage & Snapshots → Storage → Disks. Click a drive to select it — its details appear in the lower pane. Click Action → Secure Erase from the dropdown menu at the top right of the detail panel.
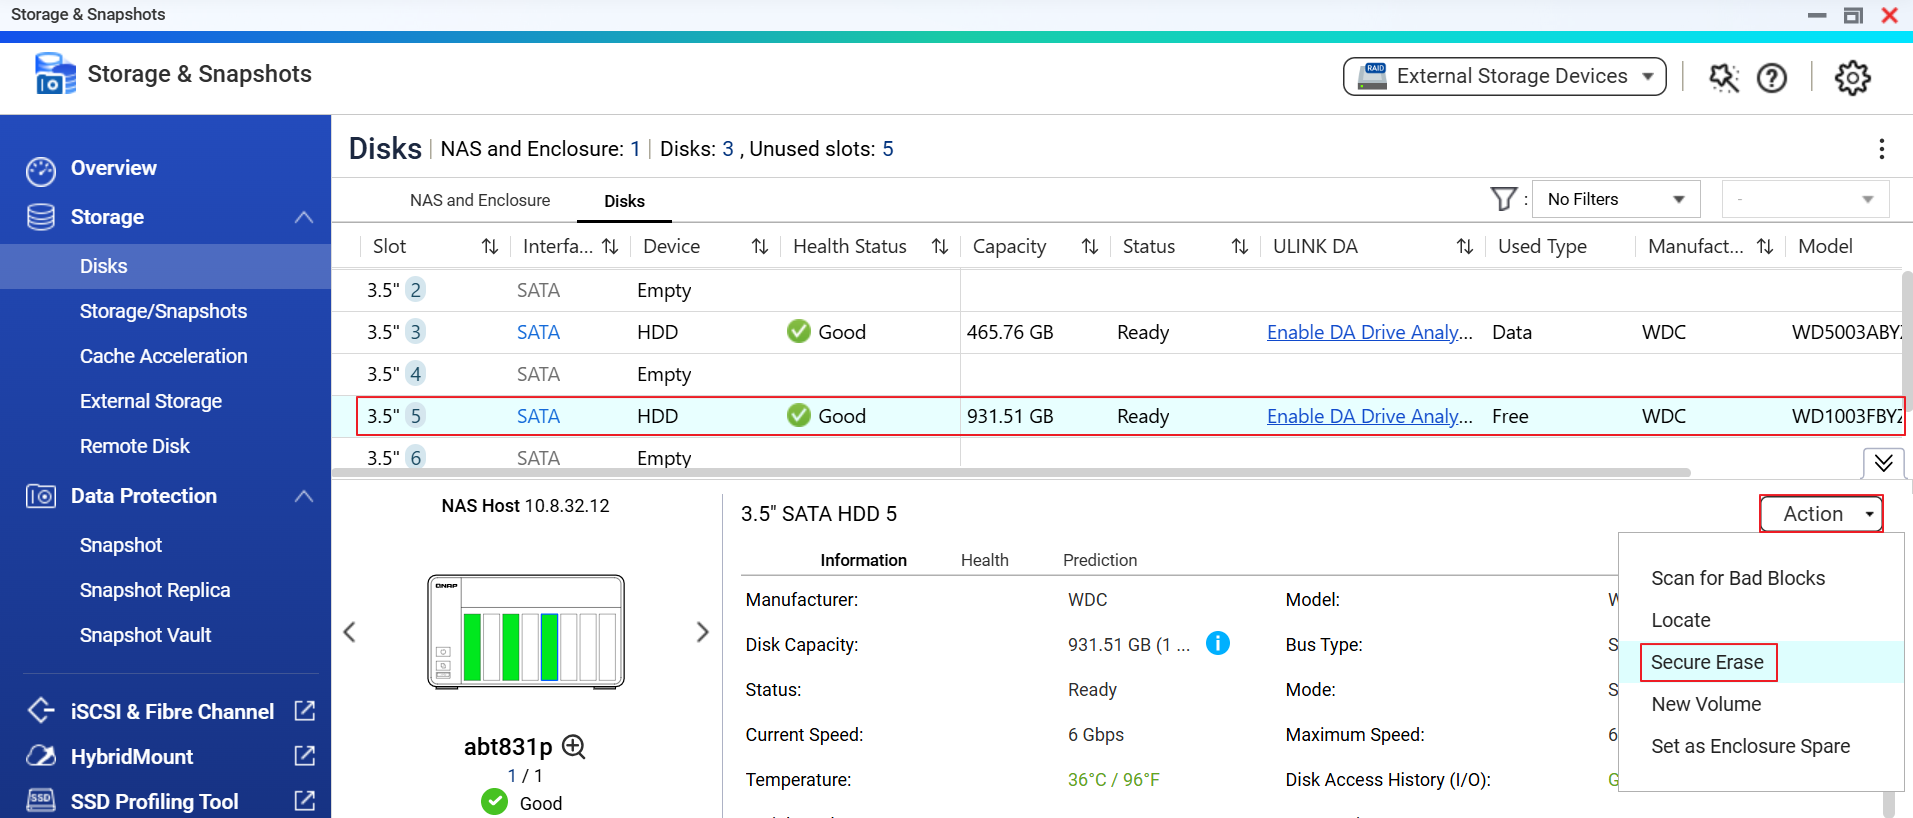
Step 4 — Wizard Step 1/3: Confirm the drive selection
The wizard lists the selected drive(s) and shows whether native SSD secure erase is supported for each. Verify the correct drive is checked, then click Next.
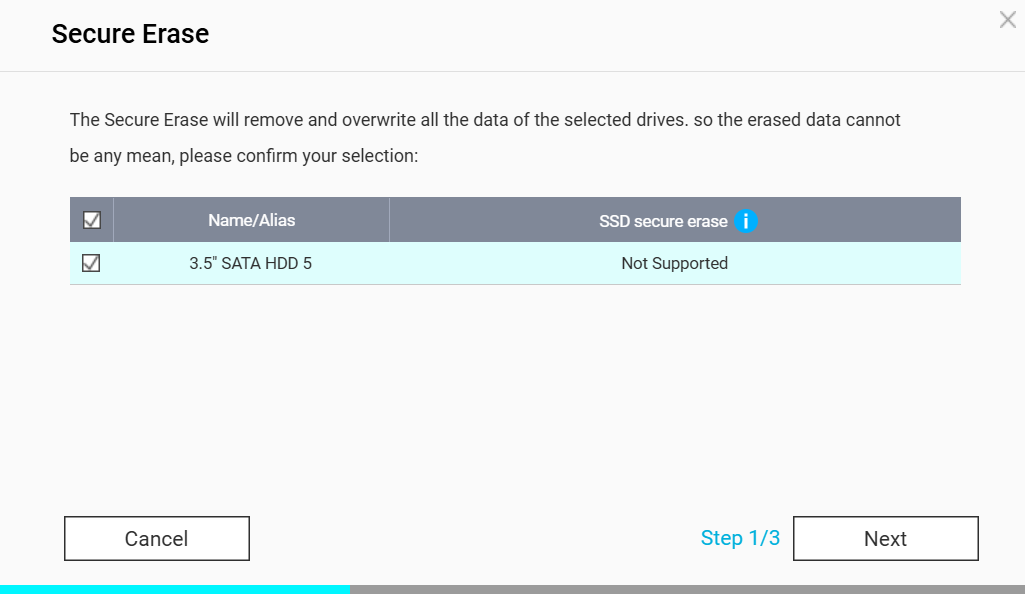
Step 5 — Wizard Step 2/3: Select an erase mode
Choose from Complete, SSD, or Fast. For most HDDs, select Complete. You can enable Customized to adjust the number of overwrite rounds and the data pattern per round. Click Next when done.
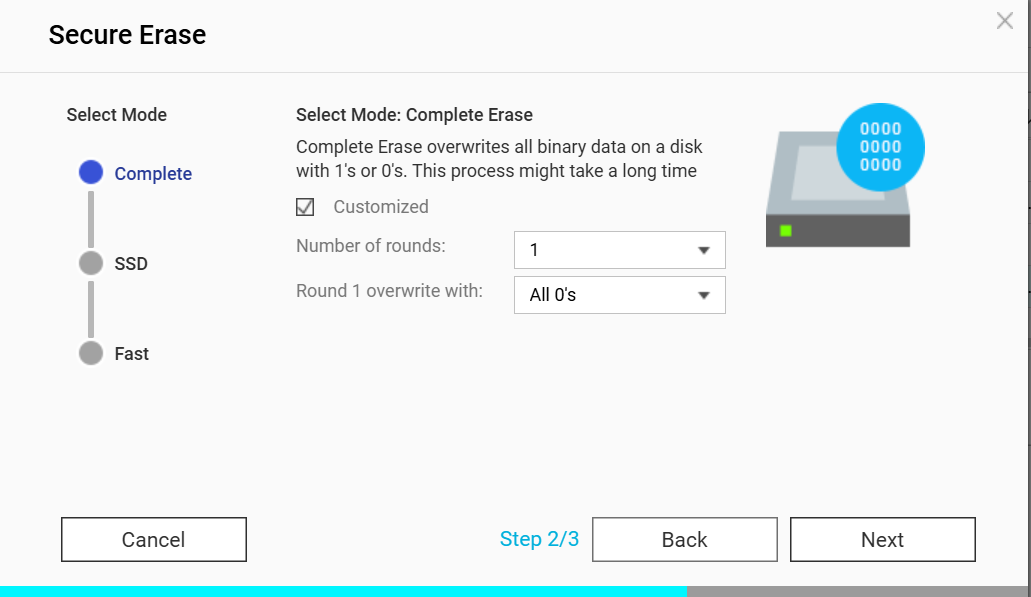
Step 6 — Wizard Step 3/3: Confirm with admin password and apply
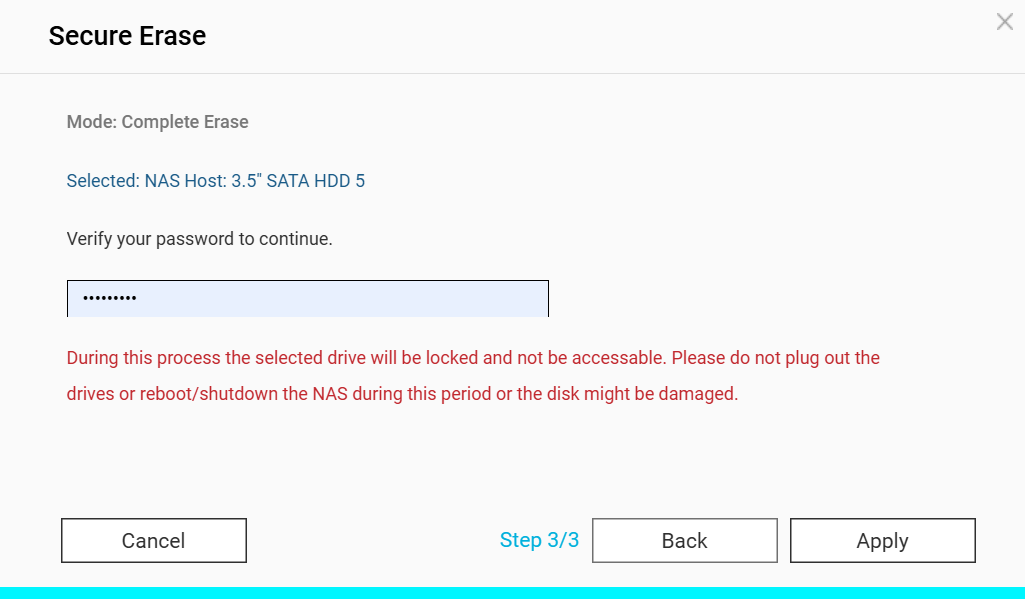
Review the summary (mode and selected drive). Enter your NAS administrator password, then click Apply. The drive will be locked immediately and the erase process begins.
⚠️ Do not unplug the drives or reboot/shutdown the NAS during this period or the disk might be damaged.
Step 7 — Monitor progress until completion
Progress is tracked per drive in the Disks view. Wait for each drive to report Erase completed. You can close the browser — the erase continues running on the NAS. Repeat steps 3–6 for any remaining drives.
Further Reading
What are the three erase modes?
Complete — Overwrites all binary data with 1's or 0's. Supports a customizable number of rounds (1–N) with selectable overwrite patterns per round (All 0's, All 1's, Random). This is the most flexible option and can emulate recognized standards by configuring multiple rounds. Takes longest but gives the highest assurance for HDDs.
SSD — Uses the drive's native ATA Secure Erase or NVMe Format command (where supported), letting the drive's own firmware erase all cells including those hidden from OS-level writes by wear leveling. The recommended mode for SSDs. Typically completes in minutes.
Fast — A quick single-pass erase. Suitable for low-risk scenarios where speed is a priority and the threat model does not include sophisticated data recovery attempts.
适用产品
概述
有很多原因需要长期擦除 NAS 硬盘上的数据——退役硬件、重新利用硬盘、满足合规要求或确保敏感数据无法恢复。QNAP QTS 和 QuTS hero 包含一个内置的安全擦除功能,使用认证的覆盖方法来处理这些问题。
为什么删除文件或重新格式化硬盘不够?
删除文件或重新格式化卷只会移除文件系统索引——实际的数据扇区仍然留在磁盘上,可以在几分钟内通过广泛可用的工具恢复。任何拥有硬盘物理访问权限的人都可以检索您的文件、文档、凭证以及曾经存储在其上的任何其他数据。
安全擦除通过一遍或多遍的数据模式覆盖原始存储介质,使得即使使用法医软件也无法读取原始内容。
我应该何时使用安全擦除?
适合使用安全擦除的常见情况:
- 退役硬件——将 NAS 或硬盘退役并交接
- 重新利用硬盘——将硬盘用于不同的用途或不同的所有者
- 合规要求——GDPR、HIPAA 和其他法规要求在退役存储个人或受保护数据的存储时进行可验证的数据销毁
- 安全策略——组织政策可能要求在任何存储设备离开 IT 控制之前进行认证擦除
- 硬盘 RMA——在保修期内将有缺陷的硬盘退回给制造商之前
解决方案
⚠️ 在继续之前备份所有数据。安全擦除是不可逆的。在开始之前,确认您的备份已完成并可在其他设备上访问。
步骤 1——备份您的数据
将您需要保留的所有内容复制到外部硬盘、网络共享或云存储。在继续之前,确认备份已完成且所有文件均能正确打开。
步骤 2 — 从任何存储池中移除驱动器
打开存储与快照总管 → 存储 → 存储 / 快照。选择您的存储池,点击管理 → 移除,并确认。对所有池重复此操作。驱动器现在将在磁盘视图中显示为使用类型:空闲。
步骤 3 — 选择驱动器并打开安全擦除
前往存储与快照总管 → 存储 → 磁盘。点击一个驱动器以选择它 — 其详细信息将显示在下方窗格中。从详细信息面板右上角的下拉菜单中点击操作 → 安全擦除。
步骤 4 — 向导步骤 1/3:确认驱动器选择
向导列出所选驱动器,并显示每个驱动器是否支持原生 SSD 安全擦除。确认选中了正确的驱动器,然后点击下一步。
步骤 5 — 向导步骤 2/3:选择擦除模式
从完整、SSD或快速中选择。对于大多数 HDD,选择完整。您可以启用自定义以调整覆盖轮次和每轮的数据模式。完成后点击下一步。
步骤 6 — 向导步骤 3/3:使用 admin 密码确认并应用
查看摘要(模式和选定的驱动器)。输入您的 NAS 管理员密码,然后点击应用。驱动器将立即锁定并开始擦除过程。
⚠️ 在此期间,请勿拔掉驱动器或重启 / 关闭 NAS,否则磁盘可能会损坏。
步骤 7 — 监控进度直至完成
在磁盘视图中跟踪每个驱动器的进度。等待每个驱动器报告擦除完成。您可以关闭浏览器 — 擦除过程会继续在 NAS 上运行。对任何剩余的驱动器重复步骤 3 -6。
进一步阅读
三种擦除模式是什么?
完整 — 将所有二进制数据覆盖为 1 或 0。支持自定义轮数(1-N),每轮可选择覆盖模式(全 0,全 1,随机)。这是较灵活的选项,通过配置多轮可以模拟公认的标准。耗时较长,但对 HDD 提供较高的保障。
SSD — 使用驱动器的原生 ATA 安全擦除或 NVMe 格式化命令(如果支持),让驱动器自身的固件擦除所有单元,包括那些因磨损均衡而被操作系统级写入隐藏的单元。推荐用于 SSD 的模式。通常在几分钟内完成。
快速 — 快速单次擦除。适用于速度优先且威胁模型不包括复杂数据恢复尝试的低风险场景。


